Technical data
11 Technical data
11.1 Engine number
11.2 Engine data
1Removing and installing engine
21 Removing and installing engine
21.1 Removing and installing engine cover
21.2 Removing engine
31.3 Separating gearbox from engine and assembling
111.4 Securing engine on engine and gearbox support VAS 6095
121.5 Notes on installing
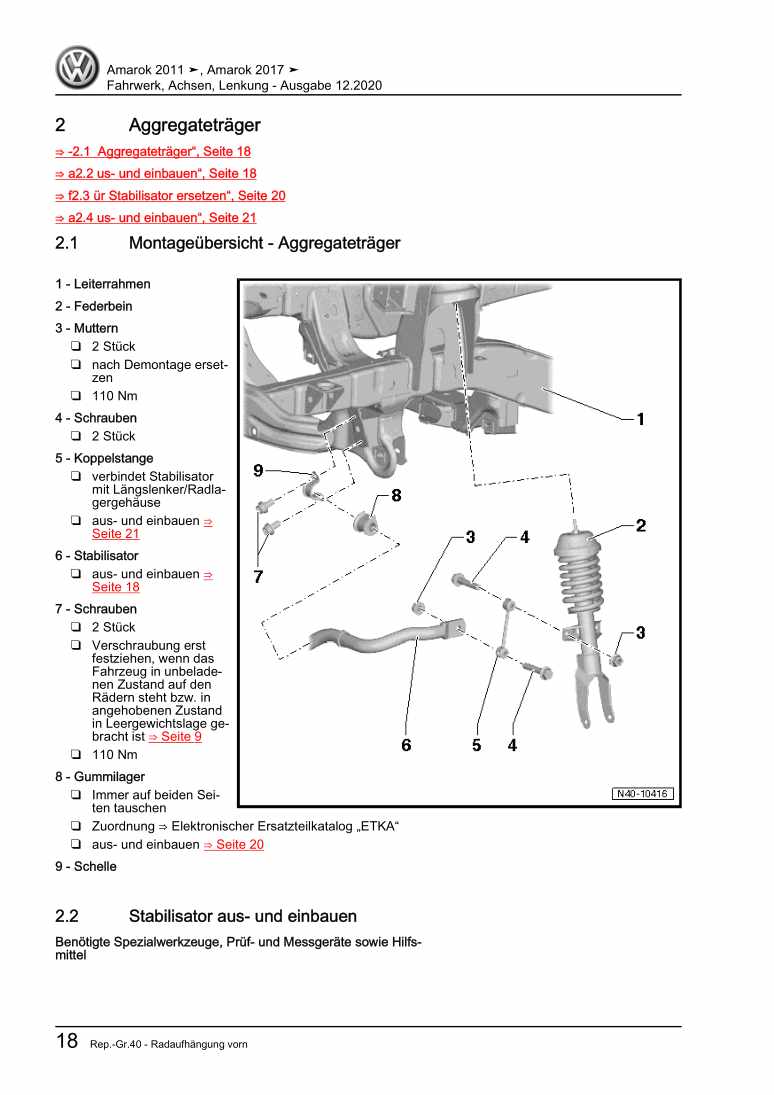
142 Assembly mounting, except Jetta 2011 ▶
172.1 Assembly mountings
172.2 Checking adjustment of engine assembly mountings
192.3 Adjusting assembly mountings
193 Assembly mounting, Jetta 2011 ▶
233.1 Assembly overview - assembly mountings
233.2 Removing and installing engine mounting
243.3 Removing and installing gearbox mounting
273.4 Removing and installing pendulum support
293.5 Supporting engine in installation position
303.6 Adjusting assembly mountings
343.7 Checking adjustment of assembly mountings (engine and gearbox mountings)
35Crankshaft group
361 Dismantling and assembling engine
361.1 Assembly overview - poly V-belt drive
361.2 Removing and installing poly V-belt without air conditioner compressor
391.3 Removing and installing poly V-belt with idler roller and air conditioner compressor
401.4 Removing and installing poly V-belt with tensioning element
411.5 Removing and installing tensioning element for poly V-belt
421.6 Removing and installing vibration damper
441.7 Removing and installing bracket for ancillaries
441.8 Assembly overview - toothed belt drive
461.9 Removing and installing engine bracket
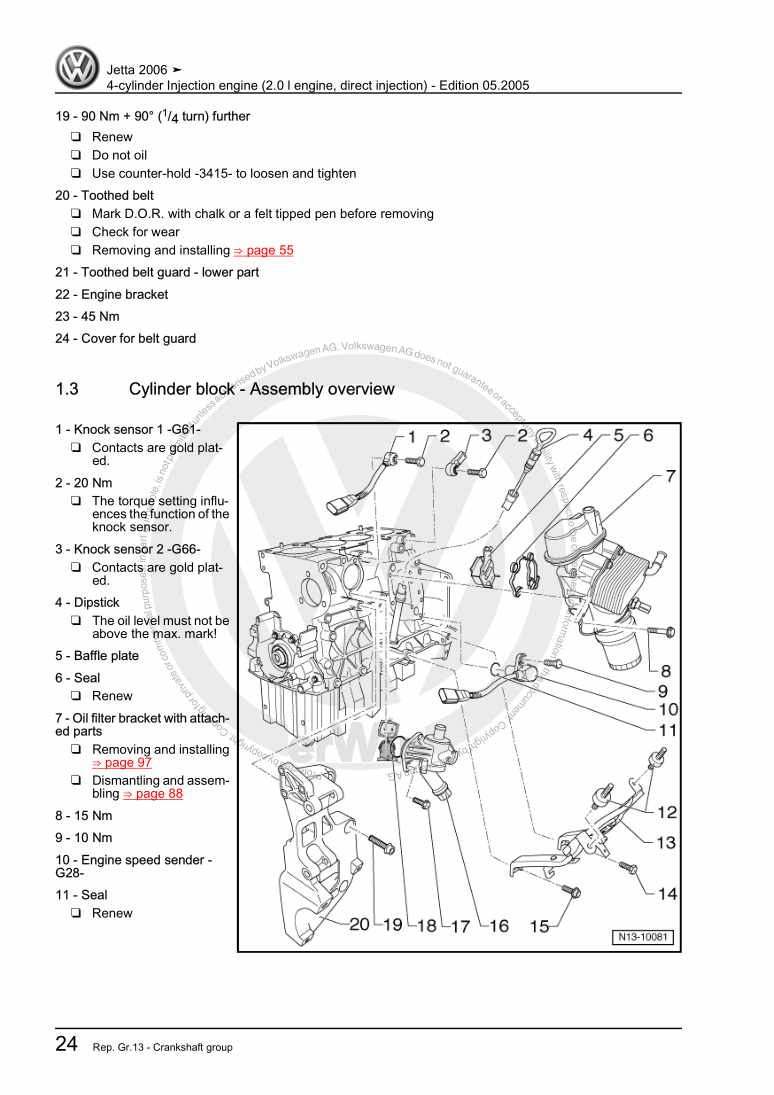
481.10 Assembly overview - crankcase
512 Removing and installing sealing flange and flywheel
532.1 Assembly overview - cylinder block, gearbox end
532.2 Removing and installing dual-mass flywheel
552.3 Renewing crankshaft sealing flange, flywheel end
562.4 Renewing crankshaft oil seal, pulley end
642.5 Removing and installing sealing flange - pulley end
662.6 Removing and installing engine speed sender G28
693 Pistons and conrods
713.1 Assembly overview - pistons and conrods
713.2 Separating new conrod
743.3 Piston and cylinder dimensions
743.4 Checking piston projection at TDC
744 Crankshaft
774.1 Assembly overview - crankshaft
774.2 Renewing needle bearing in crankshaft, vehicles with dual clutch gearbox only
784.3 Crankshaft dimensions
79Cylinder head, valve gear
801 Cylinder head
801.1 Assembly overview - cylinder head cover
801.2 Removing and installing Hall sender G40
811.3 Removing and installing cylinder head cover
831.4 Removing and installing injector seals
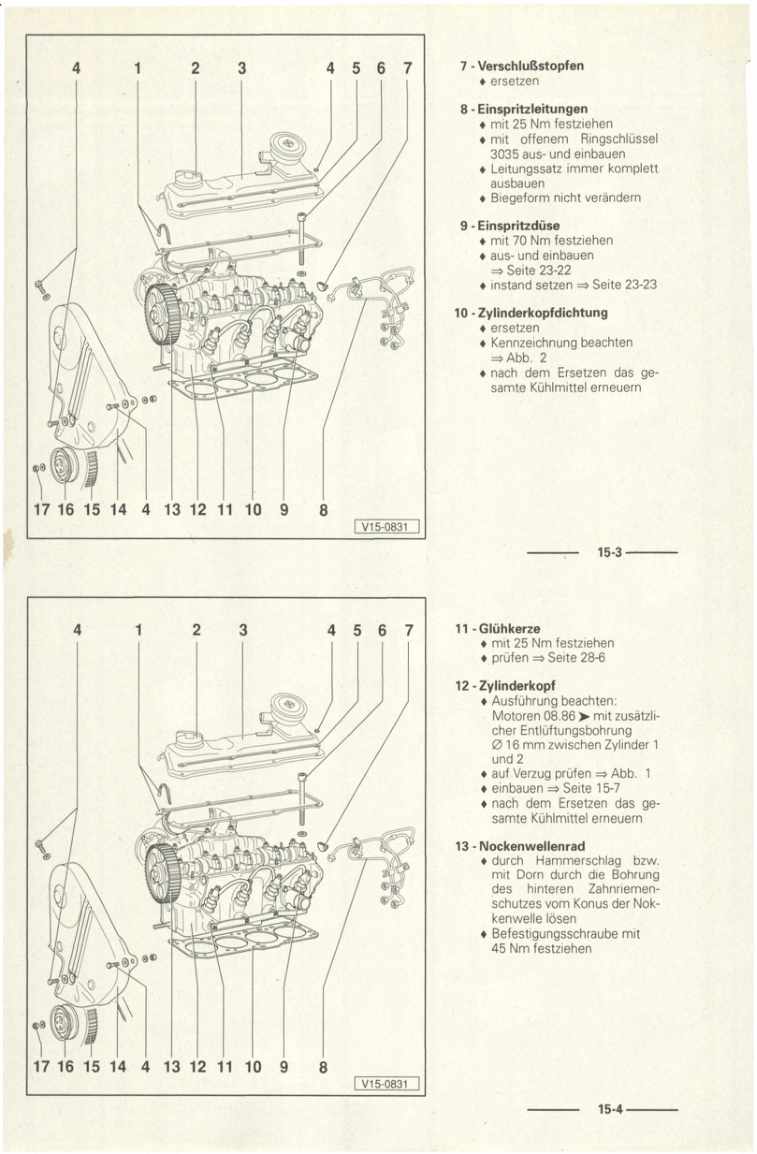
891.5 Assembly overview - cylinder head
891.6 Removing, installing and tensioning toothed belt
921.7 Removing and installing cylinder head
1061.8 Removing and installing vacuum pump
1181.9 Checking compression
1182 Valve gear
1202.1 Assembly overview - valve gear
1202.2 Checking valve guides
1212.3 Renewing valve stem seals
1222.4 Removing and installing camshafts
1262.5 Checking hydraulic compensation elements
1332.6 Removing and installing camshaft oil seal
133Lubrication
1361 Engine oil:
1361.1 Oil capacities
1361.2 Checking engine oil level
1362 Parts of lubrication system
1372.1 Assembly overview - oil pump, sump
1372.2 Removing and installing sump
1393 Oil filter bracket, oil pressure, engine oil cooler and oil supply line
1433.1 Assembly overview - oil filter bracket and engine oil cooler
1433.2 Checking oil pressure and oil pressure switch
1444 Oil supply line and turbocharger support
1474.1 Assembly overview - oil supply line and turbocharger support
1474.2 Removing and installing oil supply line and turbocharger support
147Cooling
1531 Parts of cooling system
1531.1 Assembly overview - parts of cooling system, body side
1541.2 Assembly overview - parts of cooling system, engine side
1561.3 Connection diagram for coolant hoses - not for Jetta from MY 2011
1581.6 Assembly overview - coolant pump and thermostat
1611.7 Assembly overview - coolant pump and 4/2-way valve with thermostat
1622 Repairing cooling system
1632.1 Removing and installing cowling with radiator fan V7 and radiator fan 2 V177
1632.2 Draining and adding coolant
1642.3 Removing and installing radiator
1692.4 Removing and installing coolant pump
1712.5 Removing and installing thermostat
1722.6 Checking thermostat
1742.7 Removing and installing 4/2-way valve with thermostat
1742.8 Checking cooling system for leaks
1802.9 Checking engine oil cooler for leaks
182Fuel supply system
1841 Safety measures when working on fuel supply
1842 Rules for cleanliness
1853 Procedure should vehicle be misfueled
1863.1 Step 1 (Engine was started with incorrect fuel)
1863.2 Step 2 (Engine was not started with incorrect fuel)
1873.3 Step 3 (There are filings in fuel delivery unit and fuel tank)
1883.4 Step 4 (There are no filings in fuel delivery unit and fuel tank)
1893.5 Step 5 (There are filings in high-pressure pump)
1893.6 Step 6 (There are no filings in high-pressure pump)
1894 Parts of fuel supply system
1904.1 Assembly overview - fuel tank, all vehicles apart from Jetta from MY 2011
1904.2 Assembly overview - fuel tank, only Jetta from MY 2011
1924.3 Emptying fuel tank
1944.4 Removing and installing fuel tank
1974.5 Removing and installing fuel delivery unit
2004.6 Removing and installing fuel gauge sender
2045 Repairing fuel supply
2065.1 Assembly overview - fuel filter, all vehicles but Jetta from MY 2011
2065.2 Assembly overview - fuel filter, only Jetta from MY 2011
2085.3 Removing and installing fuel filter
2085.5 Assembly overview - fuel filter, 6.0 bar low pressure fuel system
2125.6 Removing and installing fuel filter, 6.0 bar low pressure fuel system
2135.7 Checking fuel pump (pressurisation pump) G6 / fuel pump 2 V277
2145.8 Checking fuel pump - vehicles with 6.0 bar low pressure fuel system
2206 Electronic power control (EPC)
2326.1 Function of EPC system
2326.2 Assembly overview - accelerator module
2326.3 Removing and installing accelerator pedal module
233Turbocharging/supercharging
2361 Safety precautions when working on charge air system and turbocharger
2362 Rules for cleanliness
2373 Turbocharger
2383.1 Assembly overview - turbocharger
2383.2 Tightening exhaust gas temperature sender 1 G235
2413.3 Removing and installing turbocharger
2424 Charge air system
2504.1 Assembly overview - charge air system
2504.2 Removing and installing charge air cooler
2514.3 Assembly overview - charge-air hose connections
2534.4 Vacuum hose connection diagram
2564.5 Checking charge air system for leaks
2574.6 Checking vacuum system
260Mixture preparation - injection
2631 Observe safety precautions when working on diesel direct injection fuel system
2632 Rules for cleanliness
2643 Instructions for working on fuel system
2654 Diesel direct injection system
2674.1 System layout
2684.2 Assembly overview - fuel system
2704.3 Assembly overview - installation position of clamp
2754.4 Removing and installing injectors (piezo injectors)
2764.5 Removing and installing fuel rail
2804.6 Removing and installing high-pressure lines
2844.7 Checking fuel pressure regulating valve N276
2894.8 Removing and installing fuel pressure regulating valve N 276
2904.9 Removing and installing fuel pressure sender G247
2924.10 Removing and installing high-pressure pump
2944.11 Filling/bleeding high-pressure pump/fuel system
3004.12 Checking for leaks in the fuel system
3014.13 Check pressure retention valve in fuel return line
3024.14 Checking injectors (piezo injectors) with vacuum
3034.16 Assembly overview \- intake manifold with attachments, vehicles without intake manifold flap
3074.18 Removing and installing throttle valve module J338
3114.19 Assembly overview - air filter
3124.20 Removing and installing air filter housing
3144.21 Removing and installing air filter element
3154.22 Removing and installing air mass meter G70
3175 Engine control unit
3195.3 Removing and installing engine control unit J623 , only Jetta from MY 2011
324Exhaust system
3271 Exhaust system
3271.2 Assembly overview - particulate filter, only Jetta from MY 2011
3301.3 Tightening exhaust gas temperature sender 3 G495
3311.4 Removing and installing pressure differential sender G 505
3321.5 Assembly overview - front exhaust pipe with catalytic converter
3351.6 Removing and installing particulate filter
3371.7 Assembly overview - silencers
3451.8 Separating exhaust system
3451.9 Aligning exhaust system free of stress
3471.10 Installation position of clamp
3482 Exhaust gas recirculation
3492.1 Assembly overview - exhaust gas recirculation
3492.2 Checking changeover for exhaust gas recirculation cooler
3502.3 Removing and installing exhaust gas recirculation cooler
3512.4 Checking exhaust gas recirculation cooler for leaks
3542.5 Cleaning exhaust gas recirculation system
357Glow plug system
3641 Glow plug system
3641.1 Removing and installing glow plug
3641.2 Checking glow plugs
366
