DER AUTOREPARATUR-SHOP
0
Home » Anleitungen » 4-cylinder Injection engine (2.0 l engine, direct injection)
  • Beispielseite für Reparaturanleitung 4-cylinder Injection engine (2.0 l engine, direct injection)
  • Beispielseite für Reparaturanleitung 2 4-cylinder Injection engine (2.0 l engine, direct injection)
  • Beispielseite für Reparaturanleitung 3 4-cylinder Injection engine (2.0 l engine, direct injection)
  • Beispielseite für Reparaturanleitung 4-cylinder Injection engine (2.0 l engine, direct injection)
  • Beispielseite für Reparaturanleitung 2 4-cylinder Injection engine (2.0 l engine, direct injection)
  • Beispielseite für Reparaturanleitung 3 4-cylinder Injection engine (2.0 l engine, direct injection)

4-cylinder Injection engine (2.0 l engine, direct injection)

Für Jetta

Original VW-Reparaturanleitung


17,79 €inkl. 7% MwSt.

  • Deutsch
  • English

Sofort als Download verfügbar

Sprache: English

Digitale PDF Version

6.752 KB

216 Seiten

Detaillierte technische Daten

Sofort lesbar

Diese Reparaturanleitung umfasst: Removing and installing engine, Sealing flanges and flywheel/drive plate, Cylinder head, Parts of the lubrication system, Electronic power control (EPC), Active charcoal filter system und Checking components. Mehr anzeigen
Sichere Zahlung per PayPal, Kreditkarte, Lastschrift, Sofort-Überweisung oder Giropay
PayPal Logo SEPA Lastschrift Logo Giropay Logo Sofort Überweisung Logo

Reparaturanleitung Jetta 4-cylinder Injection engine pdf Download mit dem Inhalt:

Kapitelübersicht

  • Technical data
    1
  • 1 Technical data
    1
  • 1.1 Engine number
    1
  • 1.2 Engine data
    1
  • Removing and installing engine
    2
  • 1 Removing and installing engine
    2
  • 1.1 Removing engine
    2
  • 1.2 Fastening the engine to the assembly stand
    12
  • 1.3 Installing engine
    14
  • 1.4 Checking and adjusting assembly mounting
    16
  • 1.5 Assembly mounting - Torque settings
    19
  • Crankshaft group
    21
  • 1 Dismantling and assembling engine
    21
  • 1.1 Poly V-belt drive - Assembly overview
    21
  • 1.2 Toothed belt drive - Assembly overview
    23
  • 1.3 Cylinder block - Assembly overview
    24
  • 1.4 Removing and installing poly V-belt
    25
  • 2 Sealing flanges and flywheel/drive plate
    28
  • 2.1 Sealing flanges - Assembly overview
    28
  • 2.2 Renewing crankshaft oil seal - belt pulley end
    29
  • 2.3 Removing and installing sealing flange -belt pulley end-
    31
  • 2.4 Removing and installing sealing flange -gearbox side-
    34
  • 2.5 Removing and installing flywheel
    35
  • 2.6 Removing and installing drive plate
    35
  • 3 Removing and installing crankshaft
    38
  • 3.1 Crankshaft - Assembly overview
    38
  • 3.2 Removing and installing sender wheel
    40
  • 3.3 Crankshaft dimensions
    40
  • 3.4 Marking on crankshaft bearing top
    40
  • 4 Dismantling and assembling pistons and conrods
    41
  • 4.1 Pistons and conrods - Assembly overview
    41
  • 4.2 Check pistons, piston rings and cylinder bores
    42
  • 4.3 Piston and cylinder dimensions
    44
  • Cylinder head, valve gear
    45
  • 1 Cylinder head
    45
  • 1.1 Cylinder head - Assembly overview
    45
  • 1.2 Removing and installing cylinder head cover
    47
  • 1.3 Removing and installing cylinder head
    48
  • 1.4 Removing and installing toothed belt
    55
  • 1.5 Check compression pressures
    63
  • 2 Repairing valve gear
    66
  • 2.1 Valve gear - Assembly overview
    66
  • 2.2 Valve dimensions
    68
  • 2.3 Checking valve guides
    68
  • 2.4 Renewing valve stem seals
    69
  • 2.5 Renewing exhaust camshaft seal
    73
  • 2.6 Removing and installing camshaft adjuster
    76
  • 2.7 Removing and installing camshafts
    79
  • Lubrication
    83
  • 1 Parts of the lubrication system
    83
  • 1.1 Engine oil
    83
  • 1.2 Parts of the lubrication system - Assembly overview
    84
  • 1.3 Draining oil filter housing
    89
  • 1.4 Removing and installing oil sump
    90
  • 1.5 Removing and installing oil pump balancer shaft gear assembly
    92
  • 1.6 Removing and installing oil filter bracket
    97
  • 1.7 Checking oil pressure and oil pressure switch
    98
  • Cooling system
    101
  • 1 Removing and installing parts of cooling system
    101
  • 1.1 Parts of cooling system - engine side - Assembly overview
    101
  • 1.2 Parts of cooling system - body side - Assembly overview
    103
  • 1.3 Coolant hose schematic diagram
    104
  • 1.4 Assembly overview - thermostat housing with thermostat
    105
  • 1.5 Draining and filling coolant
    106
  • 1.6 Removing and installing coolant pump
    109
  • 1.7 Removing and installing coolant pipe
    111
  • 1.8 Removing and installing map-controlled engine cooling thermostat F265
    112
  • 1.9 Checking map-controlled engine cooling thermostat F265
    114
  • 1.10 Removing and installing radiator fan V7 and radiator fan 2 V177
    115
  • 1.11 Removing and installing radiator
    117
  • 1.12 Check cooling system for leaks:
    121
  • Fuel supply system
    123
  • 1 Parts of fuel supply system
    123
  • 1.1 Safety precautions when working on fuel supply system
    123
  • 1.2 Rules for cleanliness
    123
  • 1.3 Fuel tank - Assembly overview
    124
  • 1.4 Emptying fuel tank
    126
  • 1.5 Removing and installing fuel tank
    128
  • 1.6 Fuel filter with attachments - Assembly overview
    130
  • 1.7 Removing and installing fuel filter
    131
  • 2 Repairing fuel supply
    134
  • 2.1 Safety precautions when working on fuel supply system
    134
  • 2.2 Rules for cleanliness
    134
  • 2.3 Removing and installing fuel delivery unit
    135
  • 2.4 Removing and installing fuel gauge sender G
    137
  • 2.5 Checking fuel pump
    137
  • 2.6 High-pressure pump - Assembly overview
    147
  • 2.7 Removing and installing high-pressure pump
    148
  • 3 Electronic power control (EPC)
    151
  • 3.1 Function of EPC system
    151
  • 3.2 Accelerator pedal module - Assembly overview
    151
  • 3.3 Removing and installing accelerator pedal module
    152
  • 4 Active charcoal filter system
    154
  • 4.1 Function
    154
  • 4.2 Assembly overview - active charcoal filter system
    154
  • 4.3 Checking fuel tank breather
    155
  • Mixture preparation, Injection
    157
  • 1 Servicing injection system
    157
  • 1.1 General notes on injection
    157
  • 1.2 Safety precautions
    158
  • 1.3 Rules for cleanliness
    158
  • 1.4 Technical data
    159
  • 1.5 Fitting locations overview
    159
  • 1.6 Intake manifold - Assembly overview
    167
  • 1.7 Assembly overview - suction jet pump
    169
  • 1.8 Assembly overview - fuel rail with intake manifold flap motor V157
    170
  • 1.9 Air filter - Assembly overview
    171
  • 1.10 Removing and installing intake manifold
    172
  • 1.11 Removing and installing fuel rail with intake manifold flaps
    173
  • 1.12 Removing and installing injectors
    174
  • 1.13 Renewing Teflon seal on injector
    176
  • 1.14 Cleaning throttle valve module J338
    179
  • 2 Checking components
    180
  • 2.1 Checking intake manifold change-over
    180
  • 3 Engine control unit
    182
  • 3.1 Reading and erasing engine control unit fault memory
    182
  • 3.2 Removing and installing engine control unit
    183
  • Exhaust system
    187
  • 1 Removing and installing parts of exhaust system
    187
  • 1.2 Assembly overview - exhaust manifold, engine code BLY
    190
  • 1.3 Removing and installing exhaust manifold
    190
  • 1.4 Assembly overview - exhaust system, engine code BLR
    195
  • 1.5 Assembly overview - exhaust system, engine code BLY
    197
  • 1.6 Removing and installing front exhaust pipe with catalytic converter
    198
  • 1.7 Connecting and disconnecting front and rear silencers
    200
  • 1.8 Aligning exhaust system free of stress
    202
  • 2 Exhaust gas recirculation system - engine code BLR
    204
  • 2.1 Assembly overview - Exhaust gas recirculation system
    204
  • 2.2 Removing and installing upper connecting pipe for exhaust gas recirculation valve
    205
  • Ignition system
    207
  • 1 Repairing ignition system
    207
  • 1.1 General notes on ignition system
    207
  • 1.2 Safety precautions
    207
  • 1.3 Assembly overview - ignition system
    207
  • 1.4 Removing and installing ignition coils with output stage
    208
  • 1.5 Spark plugs
    209
Hersteller­bezeichnung 4-cylinder Injection engine (2.0 l engine, direct injection)
Hersteller Volkswagen
Passend für Jetta (2005 - 2007)
Passende Autotypen 1K2
Motor­kennbuchstaben BLR
Kategorie Reparaturanleitung

Im Moment sind noch keine Bewertungen für dieses Produkt vorhanden.

Ähnliche Reparaturanleitungen

General body repairs, exterior

Beispielseite für Reparaturanleitung General body repairs, exterior

Für Golf Variant (2007) / Jetta (2005 - 2007)

29,40 € Details

4-cylinder diesel engine (2.0 l engine, 4 valve)

Beispielseite für Reparaturanleitung 4-cylinder diesel engine (2.0 l engine, 4 valve)

Für Golf Variant (2007) / Jetta (2005 - 2007)

19,65 € Details

4-cylinder diesel engine (2.0 l engine, 2-valve, TDI)

Beispielseite für Reparaturanleitung 4-cylinder diesel engine (2.0 l engine, 2-valve, TDI)

Für Golf Variant (2007) / Jetta (2005 - 2007)

15,60 € Details

6-speed manual gearbox 0AG

Beispielseite für Reparaturanleitung 6-speed manual gearbox 0AG

Für Golf Variant (2007) / Jetta (2005 - 2007)

12,47 € Details

Convenience system (Canada, Mexico, USA), BRM, From November 2004

Beispielseite für Reparaturanleitung Convenience system (Canada, Mexico, USA), BRM, From November 2004

Für Jetta (2005 - 2007)

35,14 € Details

Electrical System

Beispielseite für Reparaturanleitung Electrical System

Für Jetta (2005 - 2007)

24,71 € Details

4-cylinder diesel engine (2.0 l engine, common rail, generation II)

Beispielseite für Reparaturanleitung 4-cylinder diesel engine (2.0 l engine, common rail, generation II)

Für Jetta (2005 - 2007) / Jetta 2-türig Rl (1980 - 1984) / Jetta 4-türig Ll (1980 - 1984) / Golf VI Variant (2010)

32,65 € Details

Brake systems

Beispielseite für Reparaturanleitung Brake systems

Für Golf Variant (2007) / Jetta (2005 - 2007)

14,00 € Details

4-cylinder injection engine, 2005▸

Beispielseite für Reparaturanleitung 4-cylinder injection engine, 2005▸

Für Golf (2004 - 2007) / Jetta (2005 - 2007)

11,89 € Details

Electrical system, General information

Beispielseite für Reparaturanleitung Electrical system, General information

Für New Beetle Cabrio (2003 - 2010) / New Beetle / New Beetle (USA) (1998 - 2007) / Golf Variant (2007) / Jetta (2005 - 2007) / Jetta 2-türig Rl (1980 - 1984) / Jetta 4-türig Ll (1980 - 1984) / New Beetle RSI (2001) / Golf VI Variant (2010) / Beetle (NBL) Limousine (2012) / Beetle (NBC) Cabrio (2012) / Jetta (Mexiko) (1998 - 2007) / Jetta (2014 >) / Golf (Mexiko) (2014 >) / Jetta (Malaysia) (2013 >) / Jetta GP (Russland) (2015) / Golf Variant (Mexiko) (2015 >) / Jetta GP (2015 >) / VW Beetle (2011) / Beetle (2017) / Golf [MX] (2018 >) / Golf Variant [MX] (2018 >) / Jetta [MX] (2018 >) / Taos [MX] (2021 >) / Taos [MX] (2021 >) / Tiguan [MX] (2022 >) / Jetta [MX] (2022 >)

16,19 € Details

Unsere Best Seller

Schon gewusst? Wir bieten auch originale Autoteile an.

Autoteil 1J0971921K Kappe

1J0971921K

Kappe

1,64 €

Details
Autoteil 3Q0131984AC Leitung

3Q0131984AC

Leitung

256,43 €

Details
Autoteil 06F198107A Dichtringe

06F198107A

Dichtringe

55,68 €

Details
Autoteil 3AB971557D Leitg.Satz

3AB971557D

Leitg.Satz

17,43 €

Details
Autoteil 3G9877439 Dichtung

3G9877439

Dichtung

114,06 €

Details

Verteilergetriebe und Achsantriebe

Beispielseite für Reparaturanleitung Verteilergetriebe und Achsantriebe

Für Touareg (2003 - 2007)

12,83 € Details

Ratgeber Räder, Reifen

Beispielseite für Reparaturanleitung Ratgeber Räder, Reifen

Für Touran (2016 > )

5,52 € Details

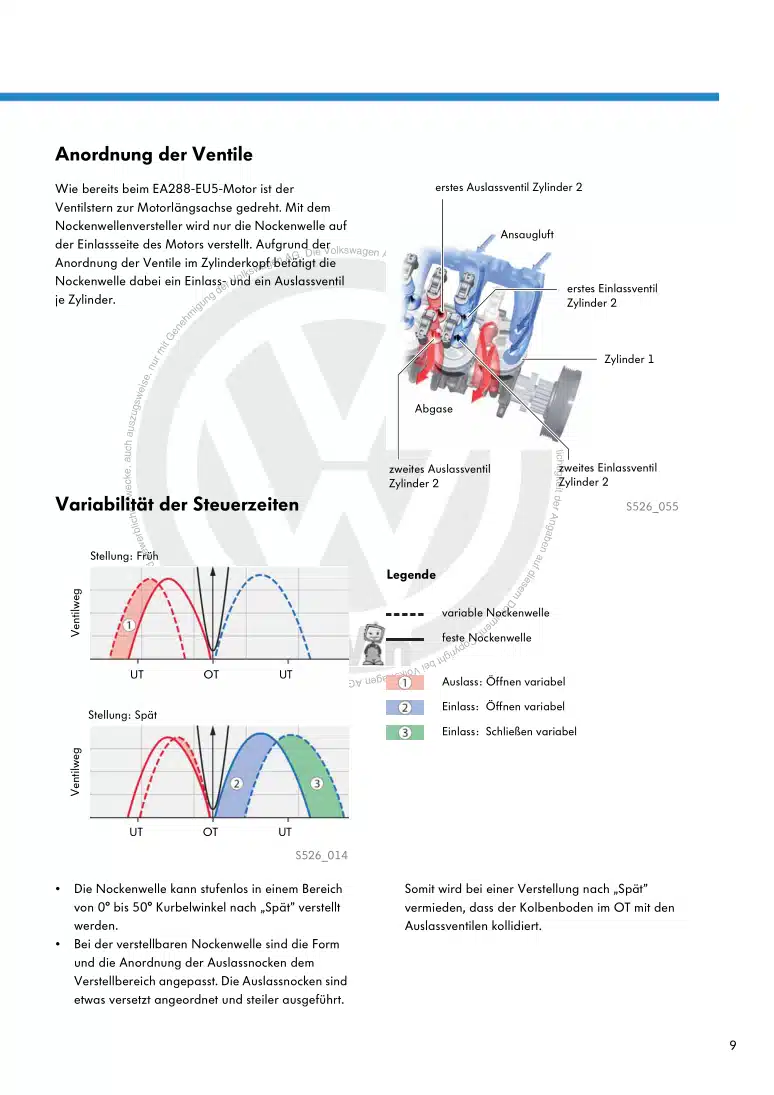
Nr. 526: Die Dieselmotoren-Baureihe EA288 mit Abgasnorm EU6

Beispielseite für Reparaturanleitung Nr. 526: Die Dieselmotoren-Baureihe EA288 mit Abgasnorm EU6

5,89 € Details

image/svg+xml Über Clonck

Originale Reparaturanleitungen und Ersatzteile

Unsere Reparaturanleitungen sind Originale, kommen direkt von Volkswagen und erfüllen die höchsten Qualitätsstandards.

In unserem Originalteile-Shop verkaufen wir hochwertige Originalersatzteile der Fahrzeughersteller. Mithilfe der Suche gibst du die gewünschte Teilenummer (OE-Nummer) ein und bestellst schnell und einfach das benötigte Ersatzteil.

Höchste Qualitätsstandards

Bei Clonck wollen wir Autoschrauber und Kfz-Profis glücklich machen. Aus diesem Grund findest du bei Clonck ausschließlich professionelle und hochwertige Reparaturanleitungen, mit deren Hilfe du dein Fahrzeug fachgerecht reparieren kannst.

Unsere Partner

Autohaus Schmidt GmbH
Automag GmbH Filiale Laim
KFZ-VERLAG GmbH
Zimpel und Franke GmbH

Clonck: Der Autoreparatur-Shop - gibt's auch als App!

Clonck App Logo Play Store

Clonck: Passende Autoteile für deine Autoreparatur

4,5 90

Mit Clonck bestellst du die richtigen Originalersatzteile im Handumdrehen.

  • Fahrzeugmodell hinzufügen
  • Baugruppe auswählen
  • Fahrzeug-Identifizierungsnummer (FIN) eingeben
  • Über 5.000 originale Reparaturanleitungen einsehen
Jetzt App starten
Clonck App Preview Auto Mobiltelefon Autoteile