Technical data
11 Safety precautions
11.1 Safety regulations for working on fuel supply
11.2 Releasing pressure in high-pressure area
22 Identification
62.1 Engine number/engine data
63 Repair instructions
83.1 Rules for cleanliness
8Removing and installing engine
91 Removing and installing engine
91.1 Removing engine
91.2 Separating engine and gearbox
201.3 Securing engine on engine and gearbox support
211.4 Installing engine
232 Assembly mountings
262.1 Assembly overview - assembly mountings
262.2 Checking adjustment of assembly mountings (engine and gearbox mountings)
282.3 Checking adjustment of assembly mountings (engine and gearbox mountings)
283 Motor cover
323.1 Removing and installing engine cover
32Crankshaft group
331 Cylinder block (pulley end)
331.1 Assembly overview - poly V-belt drive
331.2 Removing and installing poly-V belt
351.3 Removing and installing tensioner for poly V-belt
361.4 Removing and installing vibration damper
391.5 Renewing seal for vibration damper
461.6 Removing and installing bracket for ancillaries
472 Cylinder block, gearbox end
502.1 Assembly overview - cylinder block, gearbox end
502.2 Removing and installing flywheel
512.3 Removing and installing sealing flange on gearbox side
533 Crankshaft
553.1 Assembly overview - crankshaft
553.2 Crankshaft dimensions
563.3 Allocation of main bearing shells
573.4 Renewing needle bearing in crankshaft
583.5 Measuring axial clearance of crankshaft
603.6 Measuring radial clearance of crankshaft
613.7 Removing and installing sender wheel
624 Pistons and conrods
634.1 Assembly overview - pistons and conrods
634.2 Checking pistons and cylinder bores
644.3 Separating new conrod
67Cylinder head, valve gear
681 Cylinder head
681.1 Assembly overview - cylinder head
681.2 Removing and installing cylinder head
721.3 Removing and installing vacuum pump
901.4 Checking compression
912 Cover for timing chain
942.1 Assembly overview - cover for timing chain
942.2 Removing and installing timing chain cover (top)
962.3 Removing and installing timing chain cover (bottom)
973 Chain drive
1063.1 Assembly overview - camshaft timing chains
1063.2 Assembly overview - drive chain for balance shaft
1083.3 Removing and installing camshaft timing chain
1103.4 Removing and installing drive chain for balance shaft
1233.5 Removing and installing balance shaft for inlet camshaft
1253.6 Removing and installing balance shaft for exhaust camshaft
1283.7 Checking valve timing
1314 Valve gear
1344.1 Assembly overview - valve gear
1344.2 Measuring axial play of camshaft
1364.3 Removing and installing camshaft
1374.4 Removing and installing camshaft control valve 1 N205
1464.5 Removing and installing valve stem seals
1475 Inlet and exhaust valves
1525.1 Checking valve guides
152Lubrication
1531 Sump, oil pump
1531.1 Assembly overview - sump/oil pump
1531.2 Engine oil:
1551.3 Removing and installing coarse oil separator
1561.4 Removing and installing lower part of sump
1571.5 Removing and installing upper part of sump
1591.6 Removing and installing oil pump
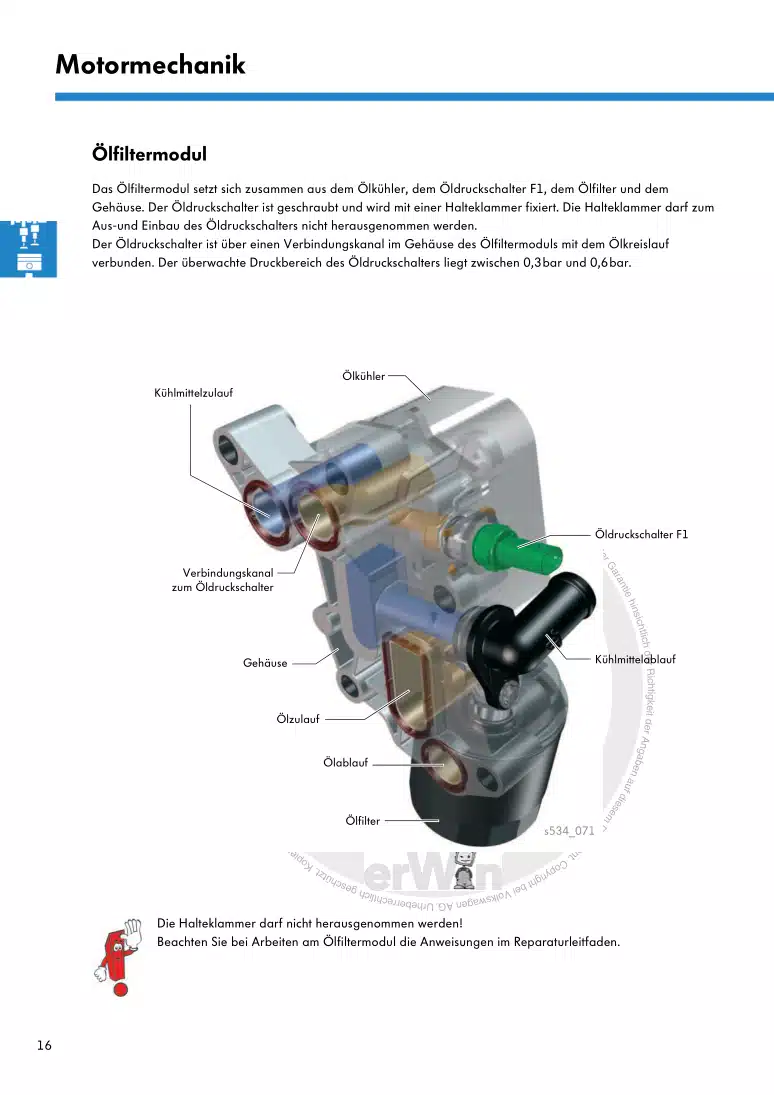
1642 Oil filter, oil pressure switch
1672.1 Assembly overview - oil filter housing, oil pressure switch F1
1672.3 Removing and installing engine oil cooler
1692.4 Checking oil pressure and oil pressure switch F1
1702.5 Checking oil pressure and oil pressure switch for reduced oil pressure F378
1732.6 Removing and installing oil pressure switch F22
1762.7 Removing and installing oil pressure switch for reduced oil pressure F378
1772.8 Removing and installing oil pressure regulating valve N428
178Cooling
1801 Cooling system/coolant
1801.1 Connection diagram - coolant hoses
1801.2 Checking cooling system for leaks
1821.3 Draining and adding coolant
1842 Coolant pump, regulation of cooling system
1912.1 Assembly overview - coolant pump, thermostat
1912.2 Assembly overview - electric coolant pump
1932.3 Removing and installing electric coolant pump
1932.4 Removing and installing thermostat
1952.5 Removing and installing coolant pump
1982.6 Removing and installing toothed belt for coolant pump
1992.7 Renewing seal for coolant pump drive
2012.8 Removing and installing coolant temperature sender G62
2023 Coolant pipes
2063.1 Assembly overview - coolant pipes
2063.2 Removing and installing front coolant pipes
2073.3 Removing and installing small coolant pipe
2104 Radiator, radiator fan
2124.1 Assembly overview - radiator/radiator fan
2124.2 Removing and installing radiator
2134.3 Removing and installing radiator cowl with radiator fan
2154.4 Removing and installing radiator fan V7 and radiator fan 2 V177
216Fuel supply system
2181 Fuel
2181.1 Assembly overview - fuel tank
2181.2 Emptying fuel tank
2231.3 Removing and installing fuel tank
2302 Fuel delivery unit, fuel gauge sender
2332.1 Removing and installing fuel delivery unit, fuel gauge sender
2332.2 Removing and installing fuel gauge sender G
2363 Fuel filter
2383.1 Assembly overview - fuel filter
2383.2 Removing and installing fuel filter
2384 Activated charcoal filter system
2414.1 Assembly overview - activated charcoal filter system
2414.2 Schematic overview of activated charcoal filter system
2454.3 Removing and installing activated charcoal filter
2464.4 Checking fuel tank breather
2474.5 Removing and installing fuel system diagnosis pump
2494.6 Checking vacuum supply of fuel system diagnostic pump
2504.7 Checking fuel system for leaks
2524.8 Checking double non-return valve
2554.9 Leak detection in fuel system
2565 Accelerator pedal
2595.1 Assembly overview - accelerator module
2595.2 Removing and installing accelerator pedal module
2596 Fuel pump
2626.1 Checking fuel system pressurisation pump G6
262Turbocharging/supercharging
2781 Exhaust turbocharger
2781.1 Assembly overview - turbocharger
2781.2 Removing and installing turbocharger
2841.3 Checking vacuum unit for turbocharger
2901.4 Renewing vacuum unit for turbocharger
2922 Charge air system
2942.1 Fitting hose connections with plug-in connectors
2942.2 Schematic overview - charge air system
2942.3 Assembly overview - charge air system
2952.4 Removing and installing charge air cooler
2962.5 Checking charge air system for leaks
299Mixture preparation - injection
3021 Injection system
3021.1 Overview of fitting locations - injection system
3022 Injectors
3082.1 Removing and installing injectors
3082.2 Renewing seals on injectors
3112.3 Cleaning injectors
3133 Air filter
3153.1 Assembly overview - air filter housing
3153.2 Removing and installing air filter
3163.3 Removing and installing air filter element
3184 Intake manifold
3214.1 Assembly overview - intake manifold
3214.2 Removing and installing intake manifold with fuel rail
3234.3 Removing and installing throttle valve module J338
3304.4 Cleaning throttle valve module
3324.5 Checking intake manifold change-over
3325 Senders and sensors
3355.1 Removing and installing fuel pressure sender G247
3355.2 Checking fuel pressure sender G247
3365.3 Removing and installing air mass meter
3406 Engine (motor) control unit
3416.1 Removing and installing engine (motor) control unit J623
3417 High-pressure pump
3457.1 Assembly overview - high-pressure pump
3457.2 Assembly overview - fuel pipes and fuel rail
3467.3 Removing and installing high-pressure pump
348Exhaust system
3521 Exhaust pipes and silencers
3521.1 Assembly overview - silencers
3521.2 Removing and installing front exhaust pipe
3541.3 Separating exhaust pipes from silencers
3571.4 Aligning exhaust system free of stress
3581.5 Check exhaust system for leaks
3602 Secondary air system
3612.1 Assembly overview - secondary air system
3612.2 Removing and installing secondary air pump motor V101
3612.3 Removing and installing secondary air inlet valve N112
362Ignition system
3641 Ignition system
3641.1 Safety precautions
3641.2 Assembly overview - ignition system
3641.3 Test data, spark plugs
3661.4 Removing and installing ignition coils with output stage
3661.5 Removing and installing knock sensor 1 G61
3681.6 Removing and installing engine speed sender G28
368