Technical data
11 Safety information
11.1 Safety regulations for working on fuel supply
11.2 Safety measures when working on vehicles with start/stop system
11.4 Safety precautions when working on the cooling system
21.5 Safety precautions when working on ignition system
21.6 Safety precautions when working on exhaust system
32 Identification
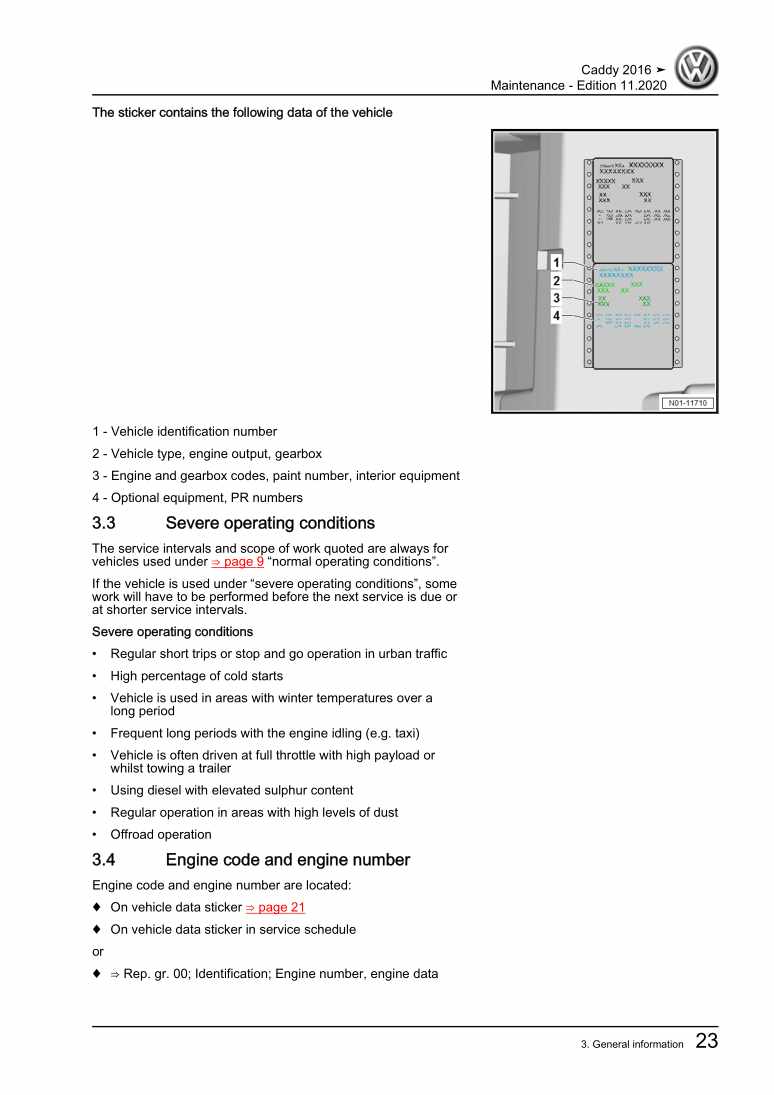
42.1 Engine number/engine data
43 Repair instructions
63.1 Rules for cleanliness
63.2 General information
73.3 Foreign objects in engine
73.4 Contact corrosion
83.5 Routing and attachment of lines
83.6 Fitting radiator and condensers
83.7 Checking vacuum system
8Removing and installing engine
101 Removing and installing engine
101.1 Removing engine
101.2 Separating engine and gearbox
201.3 Securing engine on engine and gearbox support
251.4 Installing engine
262 Assembly mountings
322.1 Assembly overview - assembly mountings
322.2 Removing and installing engine mounting
342.3 Removing and installing gearbox mounting
362.4 Removing and installing pendulum support
372.5 Supporting engine in installation position
392.6 Adjusting assembly mountings
422.7 Checking adjustment of assembly mountings
44Crankshaft group
461 Cylinder block (pulley end)
461.1 Assembly overview - poly V-belt drive
461.2 Assembly overview - sealing flange, belt pulley end
501.3 Removing and installing poly-V belt
521.4 Removing and installing tensioner for poly V-belt
561.5 Removing and installing vibration damper
571.6 Removing and installing engine support
581.7 Renewing crankshaft oil seal - belt pulley end
611.8 Removing and installing sealing flange on pulley end
642 Cylinder block, gearbox end
682.1 Assembly overview - cylinder block, gearbox end
682.2 Removing and installing flywheel
692.3 Removing and installing sealing flange on gearbox side
703 Crankshaft
813.1 Crankshaft dimensions
813.2 Renewing needle bearing in crankshaft
813.3 Measuring axial clearance of crankshaft
844 Pistons and conrods
864.1 Assembly overview - pistons and conrods
864.2 Removing and installing pistons
894.3 Checking pistons and cylinder bores
904.4 Separating new conrod
924.5 Checking radial clearance of conrods
934.6 Removing and installing oil spray jets
93Cylinder head, valve gear
951 Cylinder head
951.1 Assembly overview - cylinder head
951.2 Assembly overview - camshaft housing
981.3 Removing and installing cylinder head
1021.4 Removing and installing camshaft housing
1071.5 Checking compression
1122 Toothed belt drive
1152.1 Assembly overview - toothed belt cover
1152.2 Assembly overview - toothed belt
1152.3 Removing and installing toothed belt
1192.4 Checking valve timing
1322.5 Removing toothed belt from camshaft
1393 Valve gear
1513.1 Assembly overview - valve gear
1513.2 Measuring axial play of camshaft
1533.3 Removing and installing camshaft oil seal
1543.4 Removing and installing camshaft adjuster
1623.5 Removing and installing camshaft control valve 1 N205
1723.6 Removing and installing exhaust camshaft control valve 1 N318
1733.7 Removing and installing valve stem seals
1744 Inlet and exhaust valves
1844.1 Reworking valve seats
1844.2 Checking valve guides
1864.3 Checking valves
1874.4 Valve dimensions
187Lubrication
1881 Sump, oil pump
1881.1 Assembly overview - sump/oil pump
1881.2 Engine oil:
1911.3 Removing and installing lower part of sump
1921.4 Removing and installing upper part of sump
1971.5 Removing and installing oil pump
2021.6 Removing and installing oil level and oil temperature sender G266
2032 Engine oil cooler
2042.1 Assembly overview - engine oil cooler
2042.2 Removing and installing engine oil cooler
2043 Crankcase ventilation
2063.1 Assembly overview - crankcase breather system
2063.2 Removing and installing oil separator
2074 Oil filter, oil pressure switch
2114.1 Assembly overview - oil filter/oil pressure switch
2114.2 Removing and installing oil pressure switch F1
2124.3 Removing and installing oil pressure switch for reduced oil pressure F378
2144.4 Checking oil pressure and oil pressure switch
2154.5 Removing and installing oil pressure regulating valve N428
218Cooling
2191 Cooling system/coolant
2191.1 Connection diagram - coolant hoses
2191.2 Checking cooling system for leaks
2211.3 Draining and adding coolant
2232 Coolant pump, regulation of cooling system
2302.1 Assembly overview - coolant pump, thermostat
2302.2 Assembly overview - electric coolant pump
2332.3 Assembly overview - coolant temperature sender
2342.4 Removing and installing electric coolant pump
2352.5 Removing and installing coolant pump
2372.6 Removing and installing thermostat
2422.7 Removing and installing toothed belt pulley for coolant pump
2462.8 Removing and installing coolant temperature sender G62
2482.9 Removing and installing radiator outlet coolant temperature sender G83
2503 Coolant pipes
2523.1 Assembly overview - coolant pipes
2523.2 Removing and installing coolant pipes
2524 Radiator, radiator fan
2574.1 Assembly overview - radiator/radiator fan
2574.2 Assembly overview – radiator cowl and radiator fan
2594.3 Removing and installing radiator
2604.4 Removing and installing radiator cowl with radiator fan
2644.5 Removing and installing radiator fan VX57
2654.6 Removing and installing radiator fan 2 V177
266Turbocharging/supercharging
2671 Turbocharger
2671.1 Assembly overview - turbocharger
2671.2 Removing and installing turbocharger
2681.3 Removing and installing charge pressure positioner V465
2732 Charge air system
2742.1 Assembly overview - charge air system
2742.2 Removing and installing charge air cooler
2772.3 Removing and installing charge pressure sender GX26
2802.4 Checking charge air system for leaks
2802.5 Removing and installing air pipe
282Mixture preparation - injection
2851 Injection system
2851.1 Overview of fitting locations - injection system
2852 Injectors
2892.1 Assembly overview - fuel rail with injectors
2892.2 Removing and installing fuel rail
2912.3 Removing and installing injectors
2912.4 Renewing seals on injectors
2962.5 Cleaning injectors
3033 Air filter
3053.1 Assembly overview - air filter housing
3053.2 Removing and installing air filter housing
3074 Intake manifold
3084.1 Assembly overview – intake manifold
3084.2 Removing and installing intake manifold
3104.3 Removing and installing throttle valve module GX3
3124.4 Cleaning throttle valve module GX3
3135 Senders and sensors
3155.1 Removing and installing fuel pressure sender G247
3155.2 Checking fuel pressure sender G247
3166 Engine control unit
3196.1 Removing and installing engine (motor) control unit J623 with protective housing
3197 High-pressure pump
3227.1 Assembly overview - high-pressure pump
3227.2 Removing and installing high-pressure pump
3237.3 Removing and installing high-pressure pipe
3248 Lambda probe
3278.1 Assembly overview - Lambda probe
3278.2 Removing and installing Lambda probe
328Exhaust system
3301 Exhaust pipes and silencers
3301.1 Assembly overview – silencers
3301.2 Separating exhaust pipes from silencers
3311.3 Aligning exhaust system free of stress
3331.4 Checking exhaust system for leaks
3341.5 Installation position of clamp
3342 Emission control
3372.1 Assembly overview – emission control
3372.2 Removing and installing catalytic converter
340Ignition system
3441 Ignition system
3441.1 Assembly overview - ignition system
3441.2 Removing and installing ignition coils with output stage
3461.3 Removing and installing knock sensor 1 G61
3481.4 Removing and installing Hall sender
3491.5 Removing and installing engine speed sender G28
351
