DER AUTOREPARATUR-SHOP
0
Home » Anleitungen » 4-cyl. direct injection engine (2.0 l, 4 V, turbocharger, chain drive, generation II)
  • Beispielseite für Reparaturanleitung 4-cyl. direct injection engine (2.0 l, 4 V, turbocharger, chain drive, generation II)
  • Beispielseite für Reparaturanleitung 2 4-cyl. direct injection engine (2.0 l, 4 V, turbocharger, chain drive, generation II)
  • Beispielseite für Reparaturanleitung 3 4-cyl. direct injection engine (2.0 l, 4 V, turbocharger, chain drive, generation II)

4-cyl. direct injection engine (2.0 l, 4 V, turbocharger, chain drive, generation II)

Für Scirocco GP

Original VW-Reparaturanleitung


28,84 €inkl. 7% MwSt.

  • Deutsch
  • English

Sofort als Download verfügbar

Sprache: English

Digitale PDF Version

27.703 KB

379 Seiten

Detaillierte technische Daten

Sofort lesbar

Diese Reparaturanleitung umfasst: Removing and installing engine, Assembly mountings, Engine cover panel, Cylinder block (pulley end), Crankshaft, Pistons and conrods, Cover for timing chain, Chain drive, Valve gear, Sump, oil pump, Oil filter, oil pressure switch, Coolant pump, regulation of cooling system, Radiator, radiator fan, Turbocharger und Intake manifold. Mehr anzeigen
Sichere Zahlung per PayPal, Kreditkarte, Lastschrift, Sofort-Überweisung oder Giropay
PayPal Logo SEPA Lastschrift Logo Giropay Logo Sofort Überweisung Logo

Reparaturanleitung Scirocco GP 4-cyl. direct injection engine pdf Download mit dem Inhalt:

Kapitelübersicht

  • Technical data
    1
  • 1 Safety information
    1
  • 1.1 Safety regulations for working on fuel supply
    1
  • 1.2 Safety measures when working on vehicles with start/stop system
    1
  • 1.4 Safety precautions when working on ignition system
    2
  • 1.5 Safety precautions when working on the cooling system
    2
  • 2 Identification
    3
  • 2.1 Engine number/engine data
    3
  • 3 Repair instructions
    5
  • 3.1 Rules for cleanliness
    5
  • 3.2 Foreign objects in engine
    5
  • 3.3 Contact corrosion
    5
  • 3.4 Routing and attachment of lines
    5
  • 3.5 Fitting radiator and condensers
    6
  • 3.6 Checking vacuum system
    6
  • Removing and installing engine
    7
  • 1 Removing and installing engine
    7
  • 1.1 Removing engine
    7
  • 1.2 Separating engine and gearbox
    19
  • 1.3 Securing engine on engine and gearbox support
    20
  • 1.4 Installing engine
    22
  • 2 Assembly mountings
    25
  • 2.1 Assembly overview - assembly mountings
    25
  • 2.2 Supporting engine in installation position
    27
  • 2.3 Removing and installing engine mounting
    31
  • 2.4 Removing and installing gearbox mounting
    32
  • 2.5 Removing and installing pendulum support
    34
  • 2.6 Checking adjustment of assembly mountings
    35
  • 2.7 Adjusting assembly mountings
    35
  • 3 Engine cover panel
    38
  • 3.1 Removing and installing engine cover
    38
  • Crankshaft group
    39
  • 1 Cylinder block (pulley end)
    39
  • 1.1 Assembly overview - cylinder block (pulley end)
    39
  • 1.2 Removing and installing poly-V belt
    42
  • 1.3 Removing and installing tensioner for poly V-belt
    43
  • 1.4 Removing and installing bracket for ancillaries
    46
  • 1.5 Removing and installing vibration damper
    48
  • 1.6 Removing and installing engine support
    56
  • 2 Cylinder block, gearbox end
    58
  • 2.1 Assembly overview - cylinder block, gearbox end
    58
  • 2.2 Removing and installing flywheel
    59
  • 2.3 Removing and installing sealing flange on gearbox side
    61
  • 3 Crankshaft
    70
  • 3.1 Assembly overview - crankshaft
    70
  • 3.2 Crankshaft dimensions
    72
  • 3.3 Allocation of main bearing shells
    72
  • 3.4 Renewing needle bearing in crankshaft
    74
  • 3.5 Measuring axial clearance of crankshaft
    76
  • 3.6 Measuring radial clearance of crankshaft
    77
  • 3.7 Removing and installing sender wheel
    78
  • 4 Balancer shaft
    80
  • 4.1 Assembly overview - balance shaft
    80
  • 4.2 Removing and installing balance shaft
    83
  • 5 Pistons and conrods
    91
  • 5.1 Assembly overview - pistons and conrods
    91
  • 5.2 Removing and installing pistons
    95
  • 5.3 Removing and installing oil spray jets
    97
  • 5.4 Checking pistons and cylinder bores
    98
  • 5.5 Separating new conrod
    101
  • 5.6 Checking radial clearance of conrods
    101
  • Cylinder head, valve gear
    103
  • 1 Cylinder head
    103
  • 1.1 Assembly overview - cylinder head
    103
  • 1.2 Renewing oil non-return valve in cylinder head
    107
  • 1.3 Removing and installing cylinder head
    108
  • 1.4 Checking compression
    125
  • 1.5 Removing and installing vacuum pump
    127
  • 2 Cover for timing chain
    129
  • 2.1 Assembly overview - cover for timing chain
    129
  • 2.2 Removing and installing upper timing chain cover
    131
  • 2.3 Removing and installing timing chain cover (bottom)
    134
  • 2.4 Renewing seal for vibration damper
    139
  • 3 Chain drive
    143
  • 3.1 Assembly overview - camshaft timing chains
    143
  • 3.2 Removing and installing camshaft timing chain
    144
  • 3.3 Removing and installing drive chain for balance shaft
    161
  • 3.4 Checking valve timing
    162
  • 4 Valve gear
    165
  • 4.1 Assembly overview - valve gear
    165
  • 4.2 Removing and installing camshaft
    168
  • 4.3 Removing and installing camshaft control valve 1 N205
    187
  • 4.4 Measuring axial play of camshaft
    187
  • 4.5 Renewing valve stem seals
    188
  • 5 Inlet and exhaust valves
    201
  • 5.1 Checking valve guides
    201
  • Lubrication
    203
  • 1 Sump, oil pump
    203
  • 1.1 Assembly overview - sump/oil pump
    203
  • 1.2 Removing and installing lower part of sump
    206
  • 1.3 Removing and installing oil pump
    209
  • 1.4 Removing and installing upper part of sump
    211
  • 1.5 Engine oil:
    216
  • 2 Engine oil cooler
    218
  • 2.1 Removing and installing engine oil cooler
    218
  • 3 Crankcase ventilation
    220
  • 3.1 Removing and installing oil separator
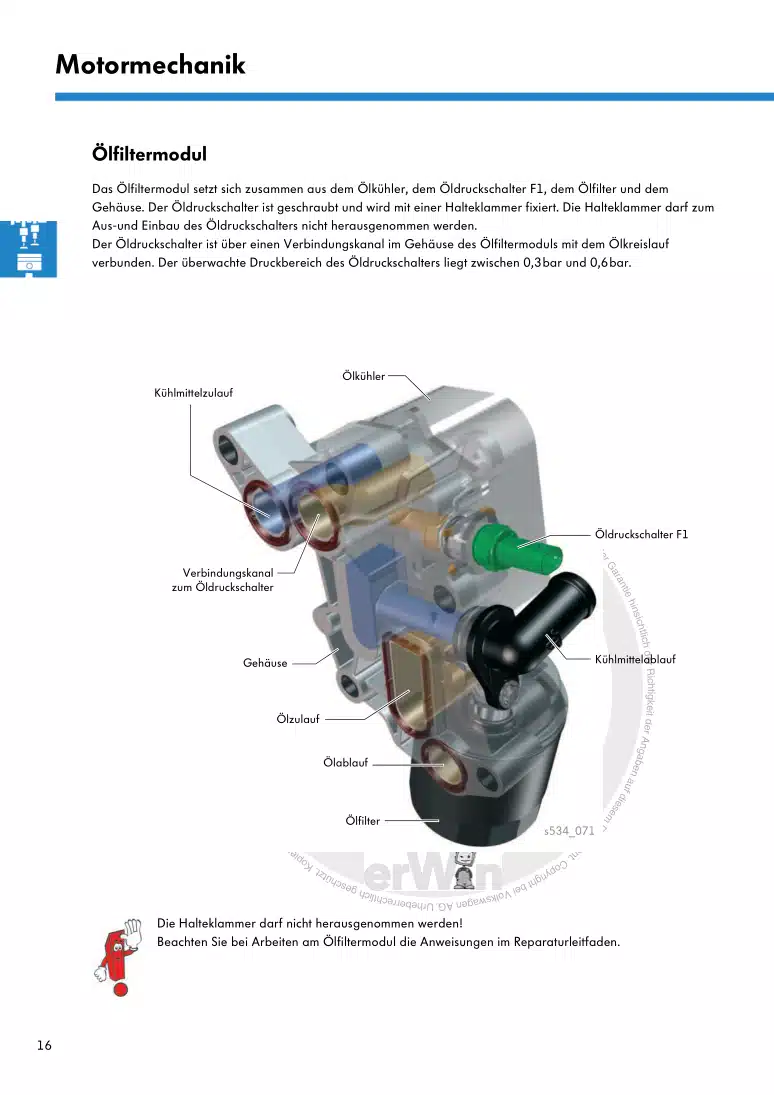
    220
  • 4 Oil filter, oil pressure switch
    221
  • 4.1 Assembly overview - oil filter/oil pressure switch
    221
  • 4.2 Removing and installing oil pressure regulating valve N428
    223
  • 4.3 Removing and installing oil pressure switch F1
    223
  • 4.4 Removing and installing oil pressure switch for reduced oil pressure F378
    225
  • 4.5 Checking oil pressure
    226
  • Cooling
    230
  • 1 Cooling system/coolant
    230
  • 1.1 Connection diagram - coolant hoses
    230
  • 1.2 Draining and adding coolant
    231
  • 1.3 Checking cooling system for leaks
    237
  • 2 Coolant pump, regulation of cooling system
    242
  • 2.1 Assembly overview - coolant pump, thermostat
    242
  • 2.2 Assembly overview - electric coolant pump
    245
  • 2.3 Removing and installing electric coolant pump
    246
  • 2.4 Removing and installing coolant pump with thermostat housing
    248
  • 2.5 Removing and installing coolant pump on thermostat housing
    250
  • 2.6 Removing and installing thermostat
    253
  • 2.7 Removing and installing toothed belt for coolant pump
    256
  • 2.8 Renewing oil seal for coolant pump drive
    259
  • 2.9 Removing and installing coolant temperature sender G62
    261
  • 3 Coolant pipes
    264
  • 3.1 Assembly overview - coolant pipes
    264
  • 3.2 Removing and installing lower coolant pipes
    264
  • 3.3 Removing and installing upper coolant pipes
    266
  • 4 Radiator, radiator fan
    270
  • 4.1 Assembly overview - radiator/radiator fan
    270
  • 4.2 Removing and installing radiator
    270
  • 4.3 Removing and installing radiator cowl
    271
  • 4.4 Removing and installing radiator fan V7 and radiator fan 2 V177
    273
  • Turbocharging/supercharging
    275
  • 1 Turbocharger
    275
  • 1.1 Assembly overview - turbocharger
    275
  • 1.2 Removing and installing turbocharger
    280
  • 1.3 Checking vacuum unit for turbocharger
    287
  • 1.4 Renewing vacuum unit for turbocharger
    289
  • 2 Charge air system
    290
  • 2.1 Schematic overview - charge air system
    290
  • 2.2 Assembly overview - charge air system
    291
  • 2.3 Assembly overview - charge-air hose connections
    292
  • 2.4 Removing and installing charge air cooler
    293
  • 2.5 Checking charge air system for leaks
    295
  • Mixture preparation - injection
    299
  • 1 Injection system
    299
  • 1.1 Overview of fitting locations - injection system
    299
  • 2 Injectors
    306
  • 2.1 Assembly overview - fuel rail with injectors
    306
  • 2.2 Removing and installing injectors
    308
  • 2.3 Renewing seals on injectors
    312
  • 2.4 Cleaning injectors
    314
  • 3 Air filter
    317
  • 3.1 Assembly overview - air filter housing
    317
  • 3.2 Removing and installing air filter housing
    319
  • 4 Intake manifold
    320
  • 4.1 Assembly overview – intake manifold
    320
  • 4.2 Removing and installing intake manifold with fuel rail
    322
  • 4.3 Removing and installing fuel rail
    329
  • 4.4 Removing and installing throttle valve module J338
    330
  • 4.5 Cleaning throttle valve module
    332
  • 4.6 Checking intake manifold change-over
    333
  • 5 Senders and sensors
    336
  • 5.2 Removing and installing air mass meter G70
    336
  • 5.3 Removing and installing fuel pressure sender G247
    337
  • 5.4 Checking fuel pressure sender G247
    339
  • 6 Engine (motor) control unit
    344
  • 6.1 Removing and installing engine control unit J623
    344
  • 7 High-pressure pump
    350
  • 7.1 Assembly overview - high-pressure pump
    350
  • 7.2 Removing and installing high-pressure pump
    352
  • Exhaust system
    355
  • 1 Exhaust pipes and silencers
    355
  • 1.1 Assembly overview – silencers
    355
  • 1.2 Separating exhaust pipes from silencers
    357
  • 1.3 Aligning exhaust system free of stress
    359
  • 1.4 Installation position of clamp
    360
  • 1.5 Checking exhaust system for leaks
    361
  • 2 Emission control
    362
  • 2.1 Assembly overview – emission control
    362
  • 2.2 Removing and installing catalytic converter
    364
  • 3 Exhaust manifold
    367
  • Ignition system
    368
  • 1 Ignition system
    368
  • 1.1 Assembly overview - ignition system
    368
  • 1.2 Removing and installing ignition coils with output stage
    369
  • 1.3 Removing and installing knock sensor 1 G61
    370
  • 1.4 Removing and installing engine speed sender G28
    371
  • 1.5 Test data, spark plugs
    372
Hersteller­bezeichnung 4-cyl. direct injection engine (2.0 l, 4 V, turbocharger, chain drive, generation II)
Hersteller Volkswagen
Passend für Scirocco GP (2015)
Passende Autotypen 138
Motor­kennbuchstaben CCZB
Kategorie Reparaturanleitung

Im Moment sind noch keine Bewertungen für dieses Produkt vorhanden.

Ähnliche Reparaturanleitungen

Heating, air conditioner

Beispielseite für Reparaturanleitung Heating, air conditioner

Für Scirocco GP (2015)

13,27 € Details

4-cylinder injection engine (1.4 l direct injection engine, turbocharger and supercharger)

Beispielseite für Reparaturanleitung 4-cylinder injection engine (1.4 l direct injection engine, turbocharger and supercharger)

Für Scirocco GP (2015)

19,87 € Details

Wheels and Tyres Guide

Beispielseite für Reparaturanleitung Wheels and Tyres Guide

Für Scirocco GP (2015)

5,57 € Details

Running gear, axles, steering

Beispielseite für Reparaturanleitung Running gear, axles, steering

Für Scirocco GP (2015)

23,02 € Details

General body repairs, interior

Beispielseite für Reparaturanleitung General body repairs, interior

Für Scirocco GP (2015)

20,65 € Details

6-speed manual gearbox 02Q Volkswagen R GmbH

Beispielseite für Reparaturanleitung 6-speed manual gearbox 02Q Volkswagen R GmbH

Für Scirocco GP (2015)

18,94 € Details

General body repairs, exterior

Beispielseite für Reparaturanleitung General body repairs, exterior

Für Scirocco GP (2015)

21,07 € Details

Fuel supply system - Diesel engines

Beispielseite für Reparaturanleitung Fuel supply system - Diesel engines

Für Scirocco GP (2015)

6,94 € Details

Electrical system

Beispielseite für Reparaturanleitung Electrical system

Für Scirocco GP (2015)

18,80 € Details

Fuel supply system, petrol engines

Beispielseite für Reparaturanleitung Fuel supply system, petrol engines

Für Scirocco GP (2015)

7,38 € Details

Unsere Best Seller

Schon gewusst? Wir bieten auch originale Autoteile an.

Autoteil D177500A1 Glasprimer

D177500A1

Glasprimer

73,63 €

Details
Autoteil 4KE998465C Rep.Satz

4KE998465C

Rep.Satz

30,45 €

Details
Autoteil 3W0122351 Ventil

3W0122351

Ventil

23,68 €

Details
Autoteil 1J0881671G4PK Knopf

1J0881671G4PK

Knopf

5,27 €

Details
Autoteil 8W6807134A Halter

8W6807134A

Halter

66,78 €

Details

Nr. 534: Der 1,4 l-3-Zylinder-TDI-Motor der Dieselmotoren-Baureihe EA288

Beispielseite für Reparaturanleitung Nr. 534: Der 1,4 l-3-Zylinder-TDI-Motor der Dieselmotoren-Baureihe EA288

5,89 € Details

Elektrische Anlage

Beispielseite für Reparaturanleitung Elektrische Anlage

Für New Beetle Cabrio (2003 - 2010) / New Beetle / New Beetle (USA) (1998 - 2007) / New Beetle (Europe) (1999 - 2002)

21,63 € Details

4-Zyl. Common Rail (1,6- und 2,0 l, 4V, Turbolader, EA 288)

Beispielseite für Reparaturanleitung 4-Zyl. Common Rail (1,6- und 2,0 l, 4V, Turbolader, EA 288)

Für Golf VII (2013) / Golf Variant (2014) / Golf Sportsvan (2014 >) / Touran (2016 > ) / Golf VII (2017) / Golf (2017) / Golf Sportsvan (2018 >)

47,69 € Details

image/svg+xml Über Clonck

Originale Reparaturanleitungen und Ersatzteile

Unsere Reparaturanleitungen sind Originale, kommen direkt von Volkswagen und erfüllen die höchsten Qualitätsstandards.

In unserem Originalteile-Shop verkaufen wir hochwertige Originalersatzteile der Fahrzeughersteller. Mithilfe der Suche gibst du die gewünschte Teilenummer (OE-Nummer) ein und bestellst schnell und einfach das benötigte Ersatzteil.

Höchste Qualitätsstandards

Bei Clonck wollen wir Autoschrauber und Kfz-Profis glücklich machen. Aus diesem Grund findest du bei Clonck ausschließlich professionelle und hochwertige Reparaturanleitungen, mit deren Hilfe du dein Fahrzeug fachgerecht reparieren kannst.

Unsere Partner

Autohaus Schmidt GmbH
Automag GmbH Filiale Laim
KFZ-VERLAG GmbH
Zimpel und Franke GmbH

Clonck: Der Autoreparatur-Shop - gibt's auch als App!

Clonck App Logo Play Store

Clonck: Passende Autoteile für deine Autoreparatur

4,5 90

Mit Clonck bestellst du die richtigen Originalersatzteile im Handumdrehen.

  • Fahrzeugmodell hinzufügen
  • Baugruppe auswählen
  • Fahrzeug-Identifizierungsnummer (FIN) eingeben
  • Über 5.000 originale Reparaturanleitungen einsehen
Jetzt App starten
Clonck App Preview Auto Mobiltelefon Autoteile