Self-diagnosis
11 Self-diagnosis
11.1 Tools
11.2 Connecting fault reader
22 Self-diagnosis of airbag system ▸ 08.94
42.1 Function
42.2 Starting self-diagnosis of airbag
42.3 Overview of the selectable functions
52.4 Interrogating control unit version
52.5 Interrogating fault memory
62.6 Fault table
72.7 Erasing fault memory
82.8 End output
93 Self-diagnosis of airbag system 09.94 ▸
103.1 Function
103.2 Starting self-diagnosis of airbag
103.3 Overview of the selectable functions
113.4 Interrogating control unit version
123.5 Interrogating fault memory
123.6 Erasing fault memory
133.7 End output
143.8 Fault table
143.9 Coding airbag control unit using fault reader V.A.G 1551
253.10 Read measured value block
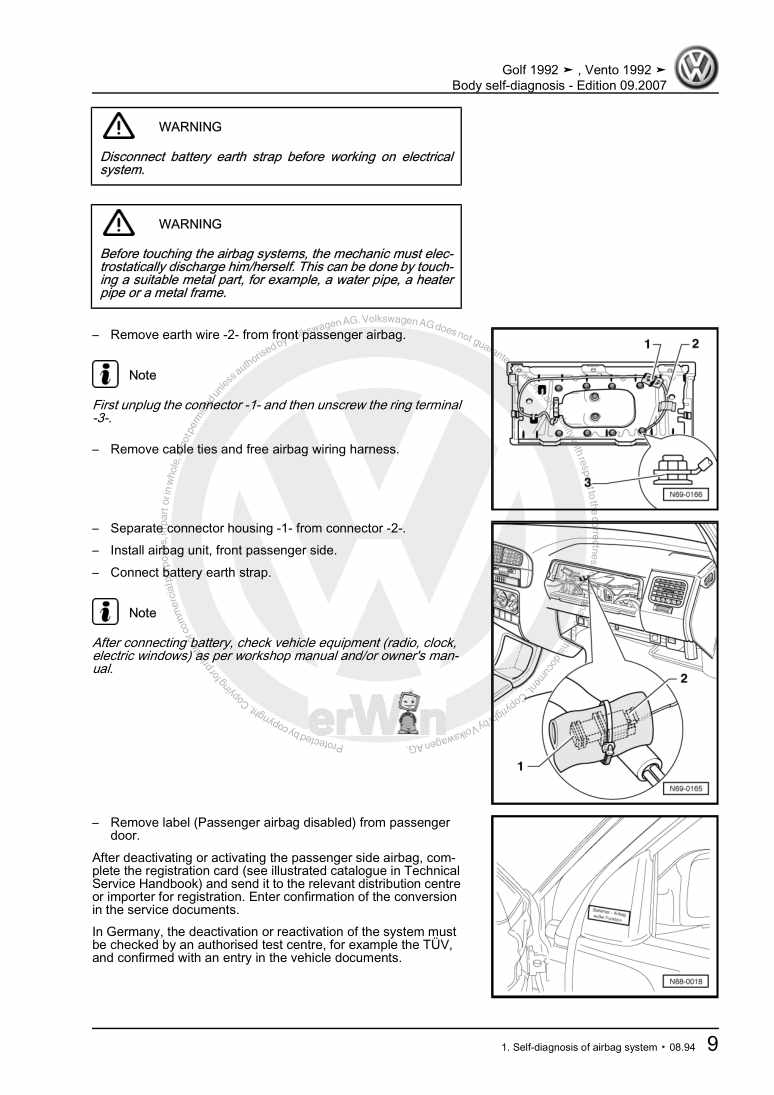
273.11 Deactivating and activating front passenger's airbag unit (matching) 09.94 ▸
313.12 Auxiliary airbag tester VAS 5056
373.13 Final control diagnosis
384 Self-diagnosis of central locking remote control
414.1 Functional description
414.2 Initiating self-diagnosis of central locking remote control
414.3 Overview of the selectable functions
424.4 Interrogating control unit version
424.5 Interrogating fault memory
434.6 Final control diagnosis
434.7 Erasing fault memory
444.8 End output
454.9 Fault table
454.10 Read measured value block
474.11 Display group overview
484.12 Adapting ignition keys to remote control
514.13 Adapting a new, additional key
534.14 Synchronising ignition keys to remote control
554.15 Removing and installing batteries for the main key with radio wave remote control
554.16 Removing and installing batteries for hinged main key with remote control system
57Body - front
591 Body - front
591.1 Repairing lock carrier with attachments
591.2 Removing and installing front wing
60Bonnet, rear lid
621 Bonnet
621.1 Removing and installing bonnet lock cable
621.2 Assembly overview - bonnet 03.98 ▸
631.3 Removing gas strut
642 Rear lid ▸ 02.98
652.1 Removing gas strut
652.2 Releasing gas from gas strut
652.3 Removing and installing rear lid lock
652.4 Adjusting pull rod
662.5 Removing the push button
672.6 Repairing push button
672.7 Maintaining single-key locking
683 Rear lid 03.98 ▸
693.1 Assembly overview
693.2 Assembly overview – lock components
703.3 Removing and installing rear lid lock
713.4 Assembly overview - handle and lock cylinder housing
723.5 Removing and installing lock cylinder housing
733.6 Removing and installing handle
77Front doors, door components, central locking
781 Front door
781.1 Tools
781.2 Assembly overview - front door
781.3 Removing and installing door
801.4 Removing and installing door window
801.5 Adjusting door window
801.6 Removing and installing window regulator
861.7 Repairing door lock with actuating components
861.8 Removing and installing door lock
871.9 Assembly overview - door handle
881.10 Removing and installing door handle
901.11 Maintaining single-key locking
911.12 Assembly overview - door handle with interior profile key
911.13 Removing and installing lock cylinder with interior profile key
921.14 Removing inner release handle
962 Repairing central locking system
972.1 Assembly overview
972.2 New couplings and distributor elements for pipe connections
982.3 Removing and installing dual pressure pump
982.4 Removing and installing positioning element for fuel tank flap
992.5 Removing and installing door lock positioning element
992.6 Removing and installing rear lid positioning element
1002.7 Functional check of central locking
1022.8 Activating separate opening of doors with central locking
103Convertible roof, hardtop, canopy
1041 Convertible top
1041.1 Tools
1041.2 Assembly overview ▸ 09.00
1041.3 Assembly overview 10.00 ▸
1061.4 Adjusting top
1071.5 Removing and installing convertible top
1071.6 Renewing top cover ▸ 09.00
1101.7 Renewing top cover 10.00 ▸
1151.8 Renewing padding ▸ 08.98
1201.9 Renewing padding 09.98 ▸
1231.10 Renewing top liner
1282 Electrical/hydraulic top
1302.1 Assembly overview
1302.2 Filling and bleeding the hydraulic system
1312.3 Removing and installing hydraulic pump
1322.4 Assembly overview - impeller for hydraulic pump
1332.5 Removing and installing impeller for hydraulic pump
1342.6 Assembly overview - oil reservoir, electrical/hydraulic top
1372.7 Removing and installing oil reservoir
1372.8 Removing and installing the hydraulic cylinder
1402.9 Removing and installing hydraulic hose
1413 Windscreen frame
1423.1 Removing and installing windscreen frame seal
142Bumpers
1441 Front bumper ▸ 02.98
1441.1 Removing front bumper
1441.2 Removing and installing cover
1442 Front bumper 03.98 ▸
1462.1 Assembly overview - bumper cover
1462.2 Assembly overview - bumper carrier
1483 Rear bumper ▸02.98
1493.1 Assembly overview
1493.2 Removing and installing rear bumper
1504 Rear bumper 03.98 ▸
1514.1 Assembly overview - bumper cover
1514.2 Assembly overview - bumper carrier
152Glazing
1531 Flush bonded windows
1531.1 Tools
1531.2 Materials
1551.3 Assembly overview - windscreen
1551.4 Removing and installing windscreen
1561.5 Removing and installing water deflector strips
1571.6 Preparing old undamaged window for glazing
1591.7 Preparing new window for glazing
1591.8 Preparing body flange for glazing
1601.9 Installation instructions
1611.10 Curing time
1611.11 Touching up paint damage
1611.12 Cleaning off excess adhesive sealing material
1622 Side window
1632.1 Assembly overview - side window
1632.2 Removing outer B-pillar trim
1632.3 Removing side window
1642.4 Adjusting side window
1642.5 Removing and installing electrical window regulator
167Exterior equipment
1681 Trim
1681.1 Removing and installing radiator grille ▸ 02.98
1681.2 Removing and installing radiator grille 03.98 ▸
1692 Removing and installing wheel housing liner
1712.1 Front wheel housing liner
1713 Exterior mirror
1723.1 Removing and installing exterior mirror
172Interior equipment
1731 Interior mirror
1731.1 Removing and installing interior mirror
1731.2 Repair method using glass-to-metal adhesive
1732 Compartments, covers and trims
1752.1 Removing and installing centre console
1753 Windbreak
1773.1 Assembly overview - windbreak
1773.2 Retrofitting windbreak
177Passenger protection
1791 Removing and installing seat belts
1791.1 Assembly overview - seat belts
1791.2 Removing and installing belt height adjustment
1791.3 Removing and installing front belt reel and anchor rail
1801.4 Safety regulations for belt tensioners
1811.5 Disposal of belt tensioner units
1821.6 Checking belt tensioner
1821.7 Removing and installing front seat belt with belt tensioner
1821.8 Assembly overview - belt reel with tensioner unit
1841.9 Removing and installing belt reel with tensioner unit
1841.10 Removing and installing rear belt reel
1851.11 Removing and installing rear belt buckle
1861.12 Removing and installing front belt buckle
1872 Inspecting seat belts
1882.1 Points to check
1883 Airbag
1923.1 Overview - installation locations
1923.2 Safety precautions when working on the airbag
1923.3 Disposal of airbag units
1933.4 Deactivating the airbag
1933.5 Renewing airbag units following an accident
1933.6 Assembly overview - driver airbag unit ▸ 02.98
1943.7 Removing and installing driver's airbag unit ▸ 02.98
1953.8 Assembly overview - driver airbag unit 03.98 ▸
1973.9 Removing and installing driver's airbag unit 03.98 ▸
1983.10 Removing and installing steering wheel
2013.11 Removing and installing return spring with slip ring
2033.12 Removing and installing front passenger airbag unit
2033.13 Removing and installing driver and front passenger side airbag
2053.14 Assembly overview - driver/front passenger side airbag sensor
2073.15 Removing and installing sensor for driver's/front passenger's side airbag
2073.16 Removing and installing airbag control unit (J 234)
209Trim, insulation
2111 Dash panel
2111.1 Removing and installing centre console
2111.2 Removing and installing dash panel
2121.3 Removing and installing cover for relay plate
2141.4 Removing and installing driver side storage compartment
2141.5 Removing and installing passenger side storage compartment
2151.6 Removing and installing heating controls
2151.7 Removing and installing instrument panel
2161.8 Repairing glove box
2162 Door trims
2182.1 Removing trim
2182.2 Renewing insulation film
2193 Pillar and side trims
2213.1 Removing and installing windscreen frame trim
2213.2 Removing and installing A-pillar trim
2213.3 Removing and installing B-pillar trim
2223.4 Removing and installing side trim
2233.5 Removing and installing roll bar trim
2244 Rear lid trim
2254.1 Removing and installing rear lid trim
225Seat frames
2261 Front seats
2261.1 Tools
2261.2 Removing and installing front seat
2261.3 Assembly overview - backrest
2301.4 Removing and installing backrest
2302 Rear seats
2322.1 Removing and installing lower part of backrest
2322.2 Removing and installing upper part of backrest
2322.3 Removing and installing rear seat
234Seat - padding, covers
2351 Front seat covers and padding
2351.1 Removing and installing seat cover and padding
2351.2 Removing and installing backrest cover and padding
2362 Seat heater elements
2372.1 Removing and installing seat heater element
2372.2 Removing and installing heater element for backrest
2373 Rear seat covers and padding
2393.1 Removing and installing cover and padding for rear seat bench
2393.2 Removing and installing backrest cover and padding
240
