Technical data
11 Safety information
11.1 Safety regulations for working on fuel supply
11.2 Safety precautions when working on charge air system
21.3 Safety regulations for working on fuel supply
21.4 Safety precautions when working on the SCR system
31.6 Safety measures when working on vehicles with a start/stop system
41.7 Safety precautions when working on fuel system
42 Identification
52.1 Engine number/engine data
53 Repair instructions
73.1 Rules for cleanliness when working on fuel supply system
73.2 Rules for cleanliness and instructions for working on fuel system
73.3 Rules for cleanliness during work on fuel system
93.4 Rules for cleanliness when working on the SCR system
93.5 General notes on the lubrication system
103.6 General notes on cooling system
103.7 General notes on fuel system
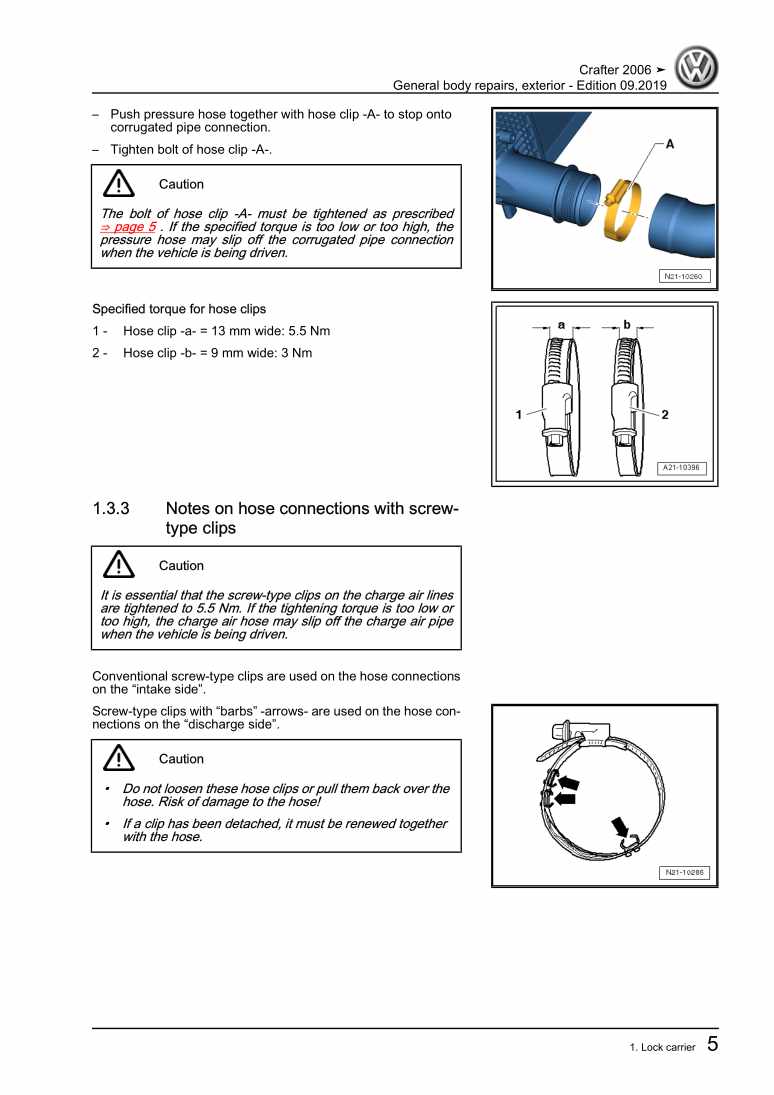
113.8 Notes on hose connections with screw-type clips
12Removing and installing engine
141 Removing and installing engine
141.1 Removing engine
141.2 Securing engine on engine and gearbox support
241.3 Removing engine, Crafter 4MOTION with Achleitner four-wheel drive
251.4 Installing engine
362 Assembly mountings
382.1 Assembly overview - assembly mountings
382.2 Supporting engine in installation position
40Crankshaft group
431 Cylinder block (pulley end)
431.1 Assembly overview - poly V-belt drive
431.2 Assembly overview - cylinder block (pulley end)
471.3 Assembly overview - sealing flange, belt pulley end
491.4 Removing and installing poly-V belt
501.5 Removing and installing tensioner for poly V-belt
531.6 Removing and installing poly V-belt for viscous fan
541.7 Removing and installing vibration damper
571.8 Removing and installing bracket for ancillaries
581.9 Removing and installing bracket with belt pulley
601.10 Renewing crankshaft oil seal - belt pulley end
611.11 Removing and installing sealing flange on pulley end
642 Cylinder block, gearbox end
692.1 Assembly overview - cylinder block, gearbox end
692.2 Removing and installing flywheel
702.3 Removing and installing sealing flange on gearbox side
713 Crankshaft
833.1 Assembly overview - crankshaft
833.2 Renewing needle bearing in crankshaft
843.3 Crankshaft dimensions
863.4 Measuring axial clearance of crankshaft
873.5 Measuring radial clearance of crankshaft
884 Auxiliary drive
894.1 Assembly overview - ancillary drive
894.2 Retrofitting auxiliary drive (genuine parts set)
974.3 Removing and installing poly V-belt for auxiliary drive
1015 Pistons and conrods
1035.1 Assembly overview - pistons and conrods
1035.2 Measuring piston projection at TDC
1055.3 Checking pistons and cylinder bores
1075.4 Separating new conrod
1105.5 Checking radial clearance of conrods
1105.6 Installation position of bearing shells
111Cylinder head, valve gear
1121 Cylinder head
1121.1 Assembly overview - cylinder head
1121.2 Assembly overview - cylinder head cover
1161.3 Removing and installing cylinder head
1181.4 Removing and installing cylinder head cover
1301.5 Removing and installing injector seals
1361.6 Removing and installing vacuum pump
1371.7 Checking compression
1392 Fully enclosing toothed belt guard
1412.1 Assembly overview - fully enclosing toothed belt guard
1412.2 Removing and installing upper toothed belt guard (fully enclosing)
1432.3 Removing and installing lower toothed belt guard (fully enclosed)
1442.4 Removing and installing rear toothed belt guard (fully enclosing)
1463 Toothed belt drive
1503.1 Assembly overview - toothed belt
1503.2 Removing and installing toothed belt
1524 Valve gear
1674.1 Assembly overview - valve gear
1674.2 Removing and installing valve stem seals
1694.3 Renewing valve stem seals with cylinder head removed
1744.4 Removing and installing camshaft
1774.5 Measuring axial play of camshaft
1864.6 Measuring radial play of camshaft
1874.7 Removing and installing camshaft oil seal
1874.8 Checking hydraulic compensation elements
1925 Inlet and exhaust valves
1945.1 Reworking valve seats
1945.2 Checking valve guides
1945.3 Checking valves
1955.4 Valve dimensions
195Lubrication
1961 Sump, oil pump
1961.1 Assembly overview - sump/oil pump
1961.2 Removing and installing oil sump
1991.3 Removing and installing oil pump
2031.4 Engine oil:
2041.5 Removing and installing oil level and oil temperature sender G266
2041.6 Measuring oil consumption
2052 Oil filter, oil pressure switch
2062.1 Assembly overview - oil filter housing with engine oil cooler
2062.2 Removing and installing engine oil cooler
2082.3 Removing and installing oil filter housing
2102.4 Removing and installing oil pressure switch F1
2122.5 Checking oil pressure switch F1
2132.6 Checking oil pressure
2153 Oil circuit
2173.1 Removing and installing oil supply line, single turbo
2173.2 Removing and installing oil supply line, bi-turbo
218Cooling
2231 Cooling system/coolant
2231.1 Connection diagram - coolant hoses
2231.2 Draining and adding coolant
2331.3 Checking cooling system for leaks
2422 Coolant pump, regulation of cooling system
2452.1 Assembly overview - coolant pump, thermostat
2452.2 Assembly overview - electric coolant pump
2452.3 Removing and installing coolant pump
2462.4 Removing and installing 4/2-way valve with thermostat
2482.5 Removing and installing coolant temperature sender G62
2512.6 Removing and installing radiator outlet coolant temperature sender G83
2522.7 Removing and installing coolant flange
2532.8 Removing and installing Y-thermostat
2552.9 Removing and installing coolant circulation pump V50
2572.10 Removing and installing 3/2-way valve, Euro 6 vehicles
2583 Coolant pipes/coolant hoses
2603.1 Assembly overview - coolant pipe/coolant hose
2603.2 Removing and installing coolant pipe with coolant hose
2614 Radiator, radiator fan
2654.1 Assembly overview - radiator/radiator fan
2654.2 Assembly overview - viscous fan
2664.3 Removing and installing viscous fan
2684.4 Removing and installing cowling
2714.5 Removing and installing radiator
272Turbocharging/supercharging
2761 Turbocharger
2761.1 Assembly overview - turbocharger, single turbo
2761.2 Assembly overview - turbocharger, bi-turbo
2791.3 Removing and installing turbocharger, single turbo
2821.4 Removing and installing turbocharger, bi-turbo
2881.6 Assembly overview - turbocharger, bi-turbo, dismantling
3031.7 Renewing gasket between bi-turbo turbine housings
3061.8 Removing and installing regulating flap potentiometer G584
3101.9 Renewing vacuum unit for turbocharger
3172 Charge air system
3242.1 Assembly overview - charge air system
3242.2 Removing and installing charge air cooler
3262.5 Removing and installing charge pressure control solenoid valve N75
3282.6 Removing and installing exhaust gas flap valve N220
3292.7 Removing and installing charge air pipe
3302.8 Checking charge air system for leaks
332Mixture preparation - injection
3361 Injection system
3361.1 Schematic overview - fuel system
3361.2 Overview of fitting locations - injection system
3381.3 Checking fuel system for leaks
3452 Vacuum system
3462.1 Connection diagram - vacuum system
3463 Intake manifold
3493.1 Assembly overview – intake manifold
3493.2 Removing and installing intake manifold
3503.3 Removing and installing throttle valve module J338
3544 Air filter
3564.1 Assembly overview - air filter housing
3564.2 Removing and installing air filter housing
3575 Injectors/high-pressure accumulator (rail)
3585.1 Assembly overview - injectors
3585.2 Removing and installing injectors
3615.3 Adapting correction values for injectors
3665.4 Testing injectors
3675.5 Testing jammed-open injectors
3675.6 Checking return flow rate of injectors with engine running
3695.7 Checking return flow rate of injectors at starter speed
3725.8 Removing and installing fuel rail
3745.9 Removing and installing high-pressure lines
3776 Senders and sensors
3816.1 Removing and installing fuel pressure regulating valve N276
3816.2 Checking fuel pressure regulating valve N276
3836.3 Removing and installing fuel pressure sender G247
3846.4 Removing and installing air mass meter G70
3877 Engine control unit
3897.1 Removing and installing engine control unit J623
3897.2 Removing and installing engine (motor) control unit J623 with protective housing
3908 High-pressure pump
3928.1 Assembly overview - high-pressure pump
3928.2 Removing and installing high-pressure pump
3948.3 Initial fuel filling after installation of the high-pressure pump
3978.4 Checking high-pressure pump
3989 Lambda probe
4019.1 Removing and installing Lambda probe
401Exhaust system
4051 Exhaust pipes and silencers
4051.1 Assembly overview – silencers
4051.5 Checking exhaust system for leaks
4091.6 Removing and installing rear silencer
4092 Emission control
4182.1 Assembly overview – emission control
4182.2 Removing and installing particulate filter
4203 SCR system (selective catalytic reduction)
4283.1 Assembly overview – reducing agent tank
4283.2 Removing and installing reducing agent tank
4303.3 Removing and installing reducing agent supply line
4323.4 Removing and installing injector for reduction agent N474
4353.5 Removing and installing control unit for reducing-agent heater J891
4363.6 Removing and installing delivery unit for reducing agent metering system GX19
4373.7 Draining reducing agent tank
4413.8 Removing and installing filler neck for reducing agent
4443.9 Removing and installing NOx sender G295/control unit for NOx sender J583
4453.10 Removing and installing NOx sender 2 G687/control unit for NOx sender 2 J881
4473.11 Removing and installing exhaust gas temperature sender 2 G448
4504 Exhaust gas recirculation
4534.1 Assembly overview – exhaust gas recirculation
4534.2 Removing and installing exhaust gas recirculation valve N18
4544.3 Removing and installing exhaust gas recirculation cooler
4554.4 Checking exhaust gas recirculation cooler for leaks
4584.5 Removing and installing pump for exhaust gas recirculation cooler V400
4624.6 Removing and installing exhaust gas recirculation temperature sensor G98
463Glow plug system
4651 Glow plug system
4651.1 Removing and installing glow plug
4651.2 Checking glow plug system
4671.3 Removing and installing Hall sender G40
4671.4 Removing and installing engine speed sender G28
469
