DER AUTOREPARATUR-SHOP
0
Home » Anleitungen » Heating, air conditioning
  • Beispielseite für Reparaturanleitung Heating, air conditioning
  • Beispielseite für Reparaturanleitung 2 Heating, air conditioning
  • Beispielseite für Reparaturanleitung 3 Heating, air conditioning
  • Beispielseite für Reparaturanleitung Heating, air conditioning
  • Beispielseite für Reparaturanleitung 2 Heating, air conditioning
  • Beispielseite für Reparaturanleitung 3 Heating, air conditioning

Heating, air conditioning

Für Lupo / Lupo 3L

Original VW-Reparaturanleitung


12,18 €inkl. 7% MwSt.

  • Deutsch
  • English

Sofort als Download verfügbar

Sprache: English

Digitale PDF Version

2.942 KB

139 Seiten

Detaillierte technische Daten

Sofort lesbar

Diese Reparaturanleitung umfasst: Repairing heating system, Heater unit, Dismantling and assembling heater unit, Dismantling and assembling heated air and fresh air controls, Installing and adjusting cables, Air conditioning system with manual controls, Climatronic air conditioning with automatic regulation, Bracket for air conditioner compressor und Capacities. Mehr anzeigen
Sichere Zahlung per PayPal, Kreditkarte, Lastschrift, Sofort-Überweisung oder Giropay
PayPal Logo SEPA Lastschrift Logo Giropay Logo Sofort Überweisung Logo

Reparaturanleitung Lupo / Lupo 3L Heating, air conditioning pdf Download mit dem Inhalt:

Kapitelübersicht

  • Heating
    1
  • 1 Repairing heating system
    1
  • 1.1 Passenger compartment heating
    1
  • 1.2 Removing and installing fresh air blower V2
    2
  • 1.3 Removing and installing activated charcoal filter or dust and pollen filter
    3
  • 1.4 Removing leaf screen
    4
  • 1.5 Removing centre vents
    5
  • 1.6 Removing and installing vent on front passenger side
    6
  • 1.7 Removing and installing vent on driver side
    6
  • 1.8 Removing footwell vent
    7
  • 1.9 Removing and installing controls for fresh and heated air
    8
  • 1.10 Notes on mapped cooling, engine code ARR
    10
  • 1.11 Mapped cooling layout, engine code ARR
    11
  • 1.12 Mapped cooling components in engine compartment, engine code ARR
    13
  • 1.13 Connection diagram for mapped cooling vacuum hoses, engine code ARR
    14
  • 1.14 Checking ventilation
    14
  • 1.15 Checking auxiliary air heater element Z35
    15
  • 1.16 Removing auxiliary heating heater element contact switch F268
    19
  • 2 Heater unit
    21
  • 2.1 Removing and installing heater unit
    21
  • 3 Dismantling and assembling heater unit
    24
  • 3.1 Dismantling heater unit
    25
  • 4 Dismantling and assembling heated air and fresh air controls
    28
  • 5 Installing and adjusting cables
    29
  • 5.1 Adjusting cable at temperature flap
    30
  • 5.2 Adjusting cable at footwell/defroster flap
    30
  • 5.3 Adjusting cable at centre flap
    30
  • Air conditioning system
    32
  • 2 Air conditioning system with manual controls
    33
  • 2.1 Air conditioning and heating - passenger compartment
    33
  • 2.2 Removing and installing fresh air blower V2
    34
  • 2.3 Removing and installing heating and air conditioning controls
    35
  • 2.4 Dismantling and assembling heating and air conditioning controls
    37
  • 2.5 Installing and adjusting heating and air conditioning cables
    38
  • 2.6 Adjusting cable at temperature flap
    39
  • 2.7 Adjusting cable at footwell/defroster flap
    40
  • 2.8 Adjusting cable at centre flap
    40
  • 2.9 Air conditioning system and heating - engine compartment, vehicles ▸ 02.00
    41
  • 2.10 Checking water drain valve
    43
  • 2.11 Removing high-pressure sender G65
    44
  • 2.13 Air conditioning system and heating - engine compartment, vehicles ▸ 03.00
    44
  • 2.14 Air conditioning system and heating - engine compartment, engine codes ANY and AYZ
    47
  • 2.15 Checking water drain valve
    49
  • 2.16 Removing high-pressure sender G65
    49
  • 2.17 Checking coolant temperature sender G62
    50
  • 2.18 Repairing Sanden magnetic clutch for air conditioning system N25
    51
  • 3 Climatronic air conditioning with automatic regulation
    56
  • 3.1 Procedure for checking and adjusting components
    56
  • 3.2 Function of operating and display unit for Climatronic air conditioning system E87
    56
  • 3.3 Connectors on Climatronic control unit J255
    58
  • 3.4 Climatronic - passenger compartment
    60
  • 3.5 Removing and installing footwell vent temperature sender G192
    64
  • 3.6 Removing and installing sunlight penetration photosensor G107
    65
  • 3.7 Removing and installing fresh air blower control unit J126
    65
  • 3.8 Removing and installing fresh air blower V2
    65
  • 3.10 Removing and installing air flow flap control motor V71
    67
  • 3.11 Removing and installing temperature flap control motor V68
    68
  • 3.12 Removing and installing centre flap control motor V70
    69
  • 3.13 Removing and installing footwell and defroster flap control motor V85
    70
  • 3.14 Climatronic - engine compartment
    70
  • 3.15 Removing high-pressure sender G65
    72
  • 3.16 Checking water drain valve
    73
  • 3.17 Removing ambient temperature sensor G17
    73
  • 4 Bracket for air conditioner compressor
    74
  • 4.1 Removing and installing air conditioner compressor bracket, engine code AHT
    74
  • 4.4 Removing and installing air conditioner compressor bracket, engine code AMF
    80
  • 4.6 Removing and installing air conditioner compressor bracket, engine code ARR
    84
  • 4.7 Removing and installing air conditioner compressor bracket, engine code AVY
    86
  • 5.1 Renewing refrigerant circuit components, vehicles ▸ 02.00
    89
  • 5.2 Renewing refrigerant circuit components, vehicles 03.00 ▸
    94
  • 5.3 Renewing components of refrigerant system, engine codes ANY and AYZ
    98
  • 5.4 Removing receiver with dryer
    101
  • 5.5 Evacuating and charging valve, low-pressure side
    103
  • 5.6 Evacuating and charging valve, high-pressure side
    105
  • 5.7 Quick release coupling
    106
  • 5.10 Removing and installing air conditioner compressor, engine codes ARR
    114
  • 5.11 Notes on installing air conditioner compressor
    117
  • 5.12 Removing and installing heater and air conditioning unit
    118
  • 5.13 Dismantling and assembling evaporator housing
    122
  • 5.14 Expansion valve, function and removal
    123
  • 5.15 Expansion valve - function and removing, engine codes ANY, ARR, AVY and AYZ
    125
  • 5.16 Removing and installing condenser, vehicles ▸ 02.00
    128
  • 5.17 Removing and installing condenser, vehicles 03.00 ▸
    130
  • 5.18 Removing and installing condenser engine codes ANY, ARR, AVY and AYZ
    132
  • 6 Capacities
    135
  • 6.1 Refrigerant R134a
    135
  • 6.2 Refrigerant oil
    135
Hersteller­bezeichnung Heating, air conditioning
Hersteller Volkswagen
Passend für Lupo (1998 - 2006) / Lupo 3L (1999 - 2006)
Passende Autotypen 6X, 6E
Kategorie Reparaturanleitung

Im Moment sind noch keine Bewertungen für dieses Produkt vorhanden.

Ähnliche Reparaturanleitungen

General body repairs, exterior

Beispielseite für Reparaturanleitung General body repairs, exterior

Für Lupo (1998 - 2006) / Lupo 3L (1999 - 2006)

10,89 € Details

Motronic injection and ignition system ARR

Beispielseite für Reparaturanleitung Motronic injection and ignition system ARR

Für Lupo (1998 - 2006) / Lupo 3L (1999 - 2006)

15,24 € Details

Basic equipment, from September 1998

Beispielseite für Reparaturanleitung Basic equipment, from September 1998

Für Lupo (1998 - 2006) / Lupo 3L (1999 - 2006)

45,41 € Details

Maintenance

Beispielseite für Reparaturanleitung Maintenance

Für Lupo (1998 - 2006) / Lupo 3L (1999 - 2006)

12,83 € Details

General body repairs, interior

Beispielseite für Reparaturanleitung General body repairs, interior

Für Lupo (1998 - 2006) / Lupo 3L (1999 - 2006)

12,33 € Details

Simos injection and ignition system

Beispielseite für Reparaturanleitung Simos injection and ignition system

Für Lupo (1998 - 2006) / Lupo 3L (1999 - 2006)

10,47 € Details

Electrical system

Beispielseite für Reparaturanleitung Electrical system

Für Lupo (1998 - 2006) / Lupo 3L (1999 - 2006)

15,68 € Details

4-Cyl. injection engine (1.6 ltr., 4 valve)

Beispielseite für Reparaturanleitung 4-Cyl. injection engine (1.6 ltr., 4 valve)

Für Lupo (1998 - 2006) / Lupo 3L (1999 - 2006)

16,70 € Details

Direct injection and glow plug system with unit injectors

Beispielseite für Reparaturanleitung Direct injection and glow plug system with unit injectors

Für Lupo (1998 - 2006) / Lupo 3L (1999 - 2006)

9,56 € Details

Communication

Beispielseite für Reparaturanleitung Communication

Für Lupo (1998 - 2006) / Lupo 3L (1999 - 2006)

5,95 € Details

Unsere Best Seller

Schon gewusst? Wir bieten auch originale Autoteile an.

Autoteil ASE44726700000 Bloecke

ASE44726700000

Bloecke

483,76 €

Details
Autoteil 5NB857189GHZG Blende

5NB857189GHZG

Blende

327,15 €

Details
Autoteil 5N0941607 Kappe

5N0941607

Kappe

25,40 €

Details
Autoteil 5GM819728DDAR Ausstroem.

5GM819728DDAR

Ausstroem.

190,89 €

Details
Autoteil 8E0972112A Gehaeuse

8E0972112A

Gehaeuse

10,21 €

Details

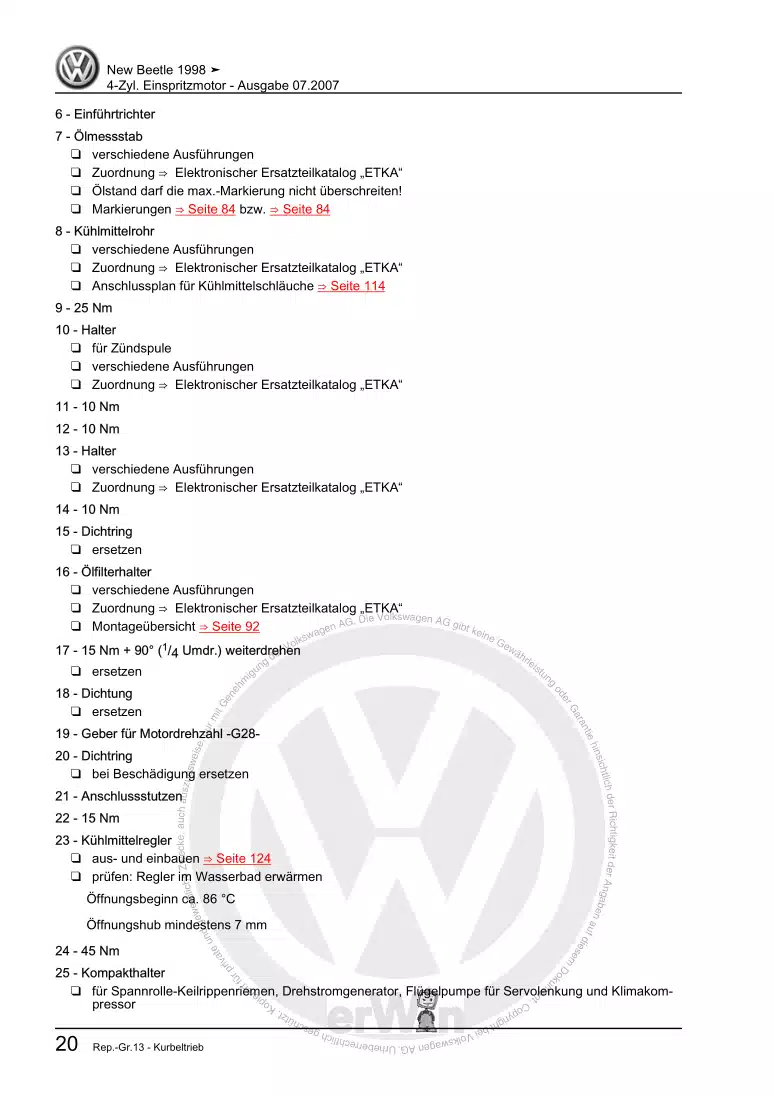
4-Zyl. Einspritzmotor

Beispielseite für Reparaturanleitung 4-Zyl. Einspritzmotor

Für New Beetle Cabrio (2003 - 2010) / New Beetle / New Beetle (USA) (1998 - 2007) / New Beetle (Europe) (1999 - 2002)

21,00 € Details

Nr. 534: Der 1,4 l-3-Zylinder-TDI-Motor der Dieselmotoren-Baureihe EA288
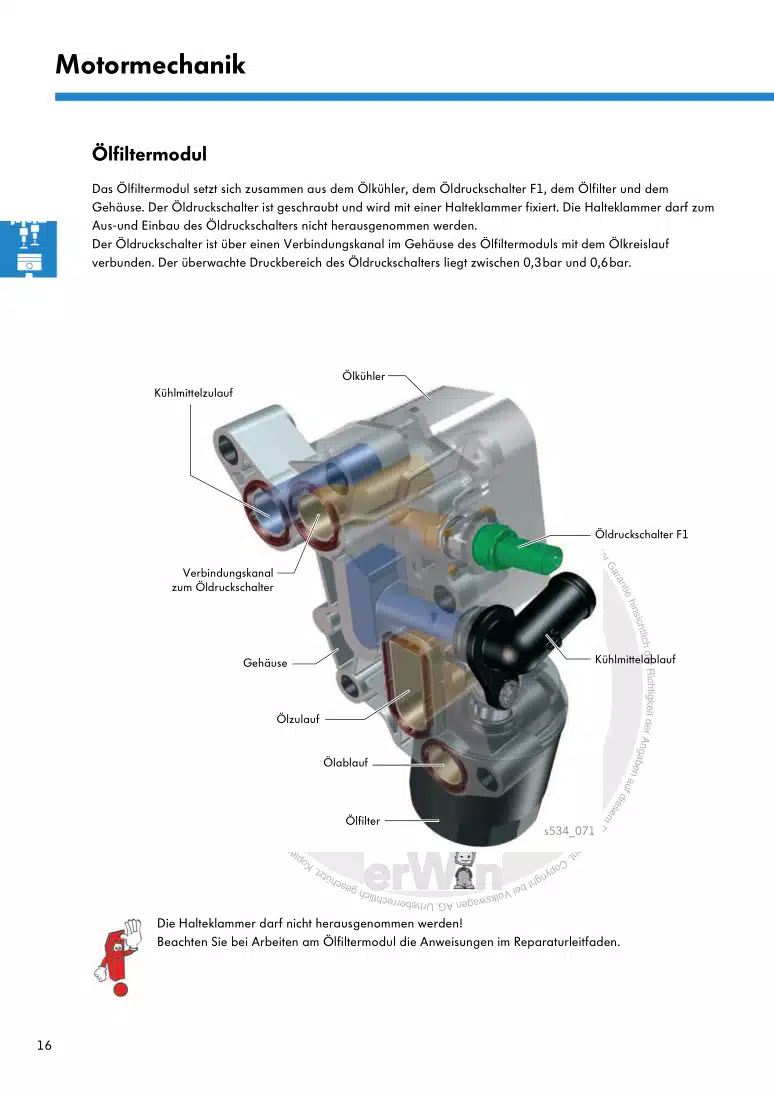
Beispielseite für Reparaturanleitung Nr. 534: Der 1,4 l-3-Zylinder-TDI-Motor der Dieselmotoren-Baureihe EA288

5,89 € Details

4-Zyl.-Dieselmotor (1,5- und 1,6 l-Motor) 068.2 / 068.5 / 068.A / ADK

Beispielseite für Reparaturanleitung 4-Zyl.-Dieselmotor (1,5- und 1,6 l-Motor) 068.2 / 068.5 / 068.A / ADK

Für Industriemotoren - Industrial Engines ()

8,15 € Details

image/svg+xml Über Clonck

Originale Reparaturanleitungen und Ersatzteile

Unsere Reparaturanleitungen sind Originale, kommen direkt von Volkswagen und erfüllen die höchsten Qualitätsstandards.

In unserem Originalteile-Shop verkaufen wir hochwertige Originalersatzteile der Fahrzeughersteller. Mithilfe der Suche gibst du die gewünschte Teilenummer (OE-Nummer) ein und bestellst schnell und einfach das benötigte Ersatzteil.

Höchste Qualitätsstandards

Bei Clonck wollen wir Autoschrauber und Kfz-Profis glücklich machen. Aus diesem Grund findest du bei Clonck ausschließlich professionelle und hochwertige Reparaturanleitungen, mit deren Hilfe du dein Fahrzeug fachgerecht reparieren kannst.

Unsere Partner

Autohaus Schmidt GmbH
Automag GmbH Filiale Laim
KFZ-VERLAG GmbH
Zimpel und Franke GmbH

Clonck: Der Autoreparatur-Shop - gibt's auch als App!

Clonck App Logo Play Store

Clonck: Passende Autoteile für deine Autoreparatur

4,5 90

Mit Clonck bestellst du die richtigen Originalersatzteile im Handumdrehen.

  • Fahrzeugmodell hinzufügen
  • Baugruppe auswählen
  • Fahrzeug-Identifizierungsnummer (FIN) eingeben
  • Über 5.000 originale Reparaturanleitungen einsehen
Jetzt App starten
Clonck App Preview Auto Mobiltelefon Autoteile