DER AUTOREPARATUR-SHOP
0
Home » Anleitungen » General body repairs, interior
  • Beispielseite für Reparaturanleitung General body repairs, interior
  • Beispielseite für Reparaturanleitung 2 General body repairs, interior
  • Beispielseite für Reparaturanleitung 3 General body repairs, interior
  • Beispielseite für Reparaturanleitung General body repairs, interior
  • Beispielseite für Reparaturanleitung 2 General body repairs, interior
  • Beispielseite für Reparaturanleitung 3 General body repairs, interior

General body repairs, interior

Für Lupo / Lupo 3L

Original VW-Reparaturanleitung


12,33 €inkl. 7% MwSt.

  • Deutsch
  • English

Sofort als Download verfügbar

Sprache: English

Digitale PDF Version

9.905 KB

141 Seiten

Detaillierte technische Daten

Sofort lesbar

Diese Reparaturanleitung umfasst: Interior mirror, Compartments, covers and trims, Grab handles, Seat belts, Checking child seat anchors (ISOFIX) after an accident und Airbag. Mehr anzeigen
Sichere Zahlung per PayPal, Kreditkarte, Lastschrift, Sofort-Überweisung oder Giropay
PayPal Logo SEPA Lastschrift Logo Giropay Logo Sofort Überweisung Logo

Reparaturanleitung Lupo / Lupo 3L General body repairs, interior pdf Download mit dem Inhalt:

Kapitelübersicht

  • Interior equipment
    1
  • 1 Interior mirror
    1
  • 1.1 Removing interior rear-view mirror
    1
  • 1.2 Installing interior rear-view mirror
    1
  • 1.3 Bonding retaining plate for interior mirror
    1
  • 1.4 Automatic anti-dazzle interior mirror
    2
  • 1.5 Removing and installing interior mirror on vehicles with a rain sensor
    3
  • 1.6 Bonding on interior mirror base with rain sensor
    4
  • 2 Compartments, covers and trims
    6
  • 2.1 Removing and installing centre console ▸ 04.00
    6
  • 2.2 Removing and installing centre console 05.00 ▸
    8
  • 2.3 Installing and removing centre console, Lupo 3L and Lupo FSI
    13
  • 2.4 Removing ashtray
    16
  • 2.5 Removing handbrake lever handle
    17
  • 2.6 Removing driver side compartment
    18
  • 2.7 Removing front passenger side compartment
    19
  • 2.8 Removing glove box
    19
  • 2.9 Removing glove box lock cylinder
    20
  • 2.10 Removing sun visor
    21
  • 3 Grab handles
    22
  • 3.1 Removing roof grab handle ▸ 04.00
    22
  • 3.2 Removing roof grab handle 05.00 ▸
    22
  • 4 Sill panel trims
    23
  • 4.1 Removing and installing sill panel trim
    23
  • Passenger protection
    25
  • 1 Seat belts
    25
  • 1.1 Safety regulations for belt tensioners
    25
  • 1.2 Disposal of belt tensioner units
    25
  • 1.3 Checking belt tensioner
    25
  • 1.4 Removing and installing front seat belts with belt tensioner
    25
  • 1.5 Removing and installing belt height adjustment
    27
  • 1.6 Removing belt anchor rail
    28
  • 1.7 Removing front belt buckle
    29
  • 1.8 Removing and installing rear seat belts
    29
  • 1.9 Removing and installing belt reel
    29
  • 1.10 Removing and installing double buckle
    30
  • 1.11 Removing and installing lap belt
    31
  • 2 Inspecting seat belts
    32
  • 2.1 Checks
    32
  • 3 Checking child seat anchors (ISOFIX) after an accident
    36
  • 3.1 Points to check
    36
  • 4 Airbag
    37
  • 4.1 Tools
    37
  • 4.2 Overview - installation locations
    37
  • 4.3 Safety precautions when working on the airbag
    38
  • 4.4 Disposal of airbag units
    39
  • 4.5 Deactivating the airbag
    39
  • 4.6 Renewing airbag units following an accident
    39
  • 4.7 Removing and installing driver airbag unit
    40
  • 4.8 Removing and installing driver airbag unit (Lupo 3L)
    43
  • 4.9 Removing and installing steering wheel
    47
  • 4.10 Removing and installing steering wheel (Lupo 3L)
    49
  • 4.11 Removing and installing coil connector with slip ring
    50
  • 4.12 Removing and installing coil connector with slip ring (Lupo 3L)
    51
  • 4.13 Removing and installing front passenger airbag unit
    51
  • 4.14 Removing and installing airbag control unit (J 234)
    54
  • 4.15 Removing and installing driver and front passenger side airbag
    54
  • 4.16 Removing and installing sensor for driver/front passenger side airbag
    57
  • 4.17 Adapting components
    59
  • Trim, insulation
    60
  • 1 Dash panel
    60
  • 1.1 Tools
    60
  • 1.2 Removing and installing dash panel ▸ 04.00
    60
  • 1.3 Removing and installing dash panel 05.00 ▸
    66
  • 2 Door trims
    73
  • 2.1 Tools
    73
  • 2.2 Removing and installing door trims
    73
  • 2.3 Removing and installing door insulation films
    76
  • 3 Pillar and side trims
    79
  • 3.1 Tools
    79
  • 3.2 Removing and installing upper A-pillar trim
    79
  • 3.3 Removing lower A-pillar trim
    82
  • 3.4 Removing and installing B-pillar trim
    83
  • 3.5 Removing and installing C-pillar trim
    84
  • 3.6 Removing and installing rear seat trim
    84
  • 3.7 Removing and installing side window trim
    86
  • 3.8 Removing and installing rear storage compartment
    88
  • 4 Luggage compartment trims
    91
  • 4.1 Tools
    91
  • 4.2 Removing and installing rear lock carrier cover
    91
  • 4.3 Removing and installing luggage compartment side trim
    91
  • 4.4 Removing and installing rear lid trim
    94
  • 5 Roof trims
    95
  • 5.1 Tools
    95
  • 5.2 Removing and installing moulded headliner (vehicles with sunroof)
    95
  • 5.3 Removing and installing moulded headlining
    100
  • 5.4 Removing and installing roof insulation/reinforcement (DVD)
    102
  • Seat frames
    105
  • 1 Front seats
    105
  • 1.1 Tools
    105
  • 1.2 Removing and installing front seat
    105
  • 1.3 Removing and installing front seat (Lupo 3L)
    108
  • 1.4 Front seat - assembly overview
    109
  • 1.5 Removing and installing front backrest
    110
  • 1.6 Removing and installing front backrest (Lupo 3L)
    112
  • 1.7 Removing and installing seat height adjustment element
    115
  • 1.8 Removing and installing cable for locking backrest
    117
  • 1.9 Removing and installing cable for locking backrest (Lupo 3L)
    119
  • 1.10 Removing and installing Bowden cable for locking backrest (Lupo 3L)
    121
  • 1.11 Removing head restraint guides
    122
  • 2 Rear seats
    124
  • 2.1 Removing bench seat
    124
  • 2.2 Removing backrest
    124
  • 2.3 Removing backrest locking hooks
    125
  • Seat - padding, covers
    126
  • 1 Front seat covers and padding
    126
  • 1.1 Tools
    126
  • 1.2 Removing and installing front seat cover and padding
    126
  • 1.3 Removing and installing front backrest cover and padding
    129
  • 1.4 Rear seat covers and padding
    131
Hersteller­bezeichnung General body repairs, interior
Hersteller Volkswagen
Passend für Lupo (1998 - 2006) / Lupo 3L (1999 - 2006)
Passende Autotypen 6X, 6E
Kategorie Reparaturanleitung

Im Moment sind noch keine Bewertungen für dieses Produkt vorhanden.

Ähnliche Reparaturanleitungen

4-Cyl. injection engine (1.6 ltr., 4 valve)

Beispielseite für Reparaturanleitung 4-Cyl. injection engine (1.6 ltr., 4 valve)

Für Lupo (1998 - 2006) / Lupo 3L (1999 - 2006)

16,70 € Details

Simos injection and ignition system

Beispielseite für Reparaturanleitung Simos injection and ignition system

Für Lupo (1998 - 2006) / Lupo 3L (1999 - 2006)

10,47 € Details

Basic equipment, from September 1998

Beispielseite für Reparaturanleitung Basic equipment, from September 1998

Für Lupo (1998 - 2006) / Lupo 3L (1999 - 2006)

45,41 € Details

Communication

Beispielseite für Reparaturanleitung Communication

Für Lupo (1998 - 2006) / Lupo 3L (1999 - 2006)

5,95 € Details

Maintenance

Beispielseite für Reparaturanleitung Maintenance

Für Lupo (1998 - 2006) / Lupo 3L (1999 - 2006)

12,83 € Details

Electrical system

Beispielseite für Reparaturanleitung Electrical system

Für Lupo (1998 - 2006) / Lupo 3L (1999 - 2006)

15,68 € Details

Motronic injection and ignition system ARR

Beispielseite für Reparaturanleitung Motronic injection and ignition system ARR

Für Lupo (1998 - 2006) / Lupo 3L (1999 - 2006)

15,24 € Details

Direct injection and glow plug system with unit injectors

Beispielseite für Reparaturanleitung Direct injection and glow plug system with unit injectors

Für Lupo (1998 - 2006) / Lupo 3L (1999 - 2006)

9,56 € Details

Heating, air conditioning

Beispielseite für Reparaturanleitung Heating, air conditioning

Für Lupo (1998 - 2006) / Lupo 3L (1999 - 2006)

12,18 € Details

General body repairs, exterior

Beispielseite für Reparaturanleitung General body repairs, exterior

Für Lupo (1998 - 2006) / Lupo 3L (1999 - 2006)

10,89 € Details

Unsere Best Seller

Schon gewusst? Wir bieten auch originale Autoteile an.

Autoteil ASE44726700000 Bloecke

ASE44726700000

Bloecke

483,76 €

Details
Autoteil 5NB857189GHZG Blende

5NB857189GHZG

Blende

327,15 €

Details
Autoteil 5N0941607 Kappe

5N0941607

Kappe

25,40 €

Details
Autoteil 5GM819728DDAR Ausstroem.

5GM819728DDAR

Ausstroem.

190,89 €

Details
Autoteil 8E0972112A Gehaeuse

8E0972112A

Gehaeuse

10,21 €

Details

4-Zyl. Einspritzmotor

Beispielseite für Reparaturanleitung 4-Zyl. Einspritzmotor

Für New Beetle Cabrio (2003 - 2010) / New Beetle / New Beetle (USA) (1998 - 2007) / New Beetle (Europe) (1999 - 2002)

21,00 € Details

Nr. 534: Der 1,4 l-3-Zylinder-TDI-Motor der Dieselmotoren-Baureihe EA288
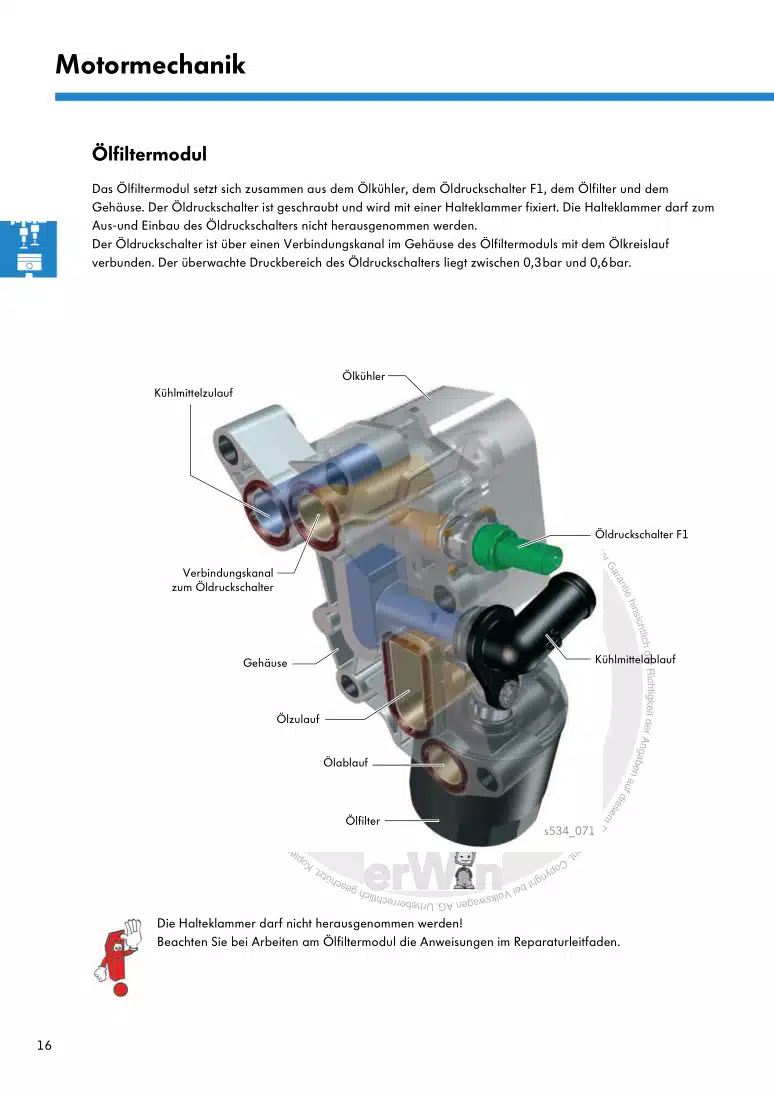
Beispielseite für Reparaturanleitung Nr. 534: Der 1,4 l-3-Zylinder-TDI-Motor der Dieselmotoren-Baureihe EA288

5,89 € Details

4-Zyl.-Dieselmotor (1,5- und 1,6 l-Motor) 068.2 / 068.5 / 068.A / ADK

Beispielseite für Reparaturanleitung 4-Zyl.-Dieselmotor (1,5- und 1,6 l-Motor) 068.2 / 068.5 / 068.A / ADK

Für Industriemotoren - Industrial Engines ()

8,15 € Details

image/svg+xml Über Clonck

Originale Reparaturanleitungen und Ersatzteile

Unsere Reparaturanleitungen sind Originale, kommen direkt von Volkswagen und erfüllen die höchsten Qualitätsstandards.

In unserem Originalteile-Shop verkaufen wir hochwertige Originalersatzteile der Fahrzeughersteller. Mithilfe der Suche gibst du die gewünschte Teilenummer (OE-Nummer) ein und bestellst schnell und einfach das benötigte Ersatzteil.

Höchste Qualitätsstandards

Bei Clonck wollen wir Autoschrauber und Kfz-Profis glücklich machen. Aus diesem Grund findest du bei Clonck ausschließlich professionelle und hochwertige Reparaturanleitungen, mit deren Hilfe du dein Fahrzeug fachgerecht reparieren kannst.

Unsere Partner

Autohaus Schmidt GmbH
Automag GmbH Filiale Laim
KFZ-VERLAG GmbH
Zimpel und Franke GmbH

Clonck: Der Autoreparatur-Shop - gibt's auch als App!

Clonck App Logo Play Store

Clonck: Passende Autoteile für deine Autoreparatur

4,5 90

Mit Clonck bestellst du die richtigen Originalersatzteile im Handumdrehen.

  • Fahrzeugmodell hinzufügen
  • Baugruppe auswählen
  • Fahrzeug-Identifizierungsnummer (FIN) eingeben
  • Über 5.000 originale Reparaturanleitungen einsehen
Jetzt App starten
Clonck App Preview Auto Mobiltelefon Autoteile