Technical data
11 Tipper body (Henschel)
11.1 Data
12 Box body (Junge)
22.1 Data
23 Box body (Spier)
43.1 Data
44 Box body (Schmitz Cargobull)
64.1 General information
64.2 Data
65 Tail lift (Sörensen)
85.1 General information
85.2 Data
96 Tail lift (BÄR - Cargolift)
126.1 General information
126.2 Data
137 Tail lift (Palfinger)
157.1 General information
157.2 Data
168 Design double tube bar
178.1 Safety information
179 Hazard classification of high-voltage system
18Starter, current supply, CCS
191 Preparation for second battery
191.1 System overview – preparation for second battery
191.2 Overview of fitting locations – preparation for second battery
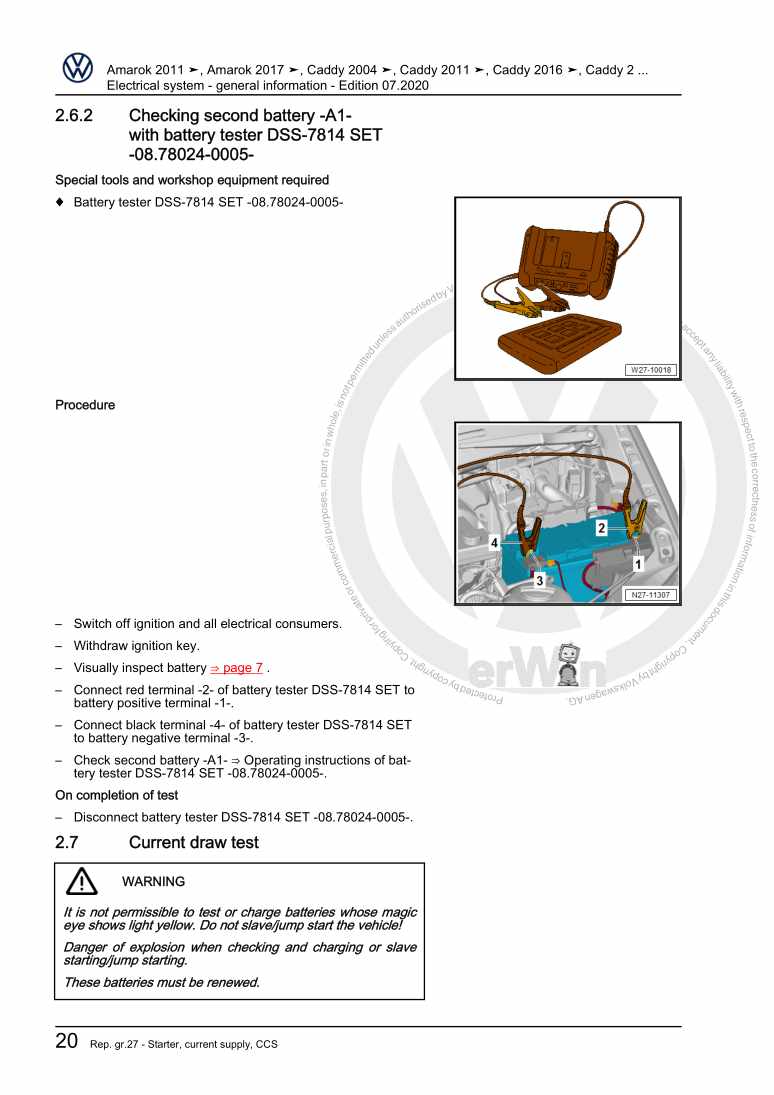
201.3 Removing and installing second battery charging circuit relay J713
221.4 Notes on function of second battery charging circuit relay J713
23Body - rear
241 Storage well liner and load compartment trim for rear lid
241.1 Assembly overview - storage well liner
241.2 Removing and installing storage well liner
251.3 Removing and installing load compartment for rear lid
262 Aluminium load compartment trim
292.1 General notes
292.2 Assembly overview - aluminium load compartment trim
292.3 Removing and installing load compartment trim, aluminium
313 Bracket and wing for single and twin tyres, tipper body
383.1 Assembly overviews - wing bracket
383.2 Removing and installing wing
413.3 Removing and installing wing bracket
42Convertible roof, hardtop, canopy
441 Hardtop
441.1 Assembly overview - hardtop
441.2 Removing and installing hardtop
441.3 Renewing adhesive film
481.4 Renewing seals
491.5 Removing and installing gas strut
501.6 Removing and installing vent window
50Exterior equipment
531 Tipper body (Henschel)
531.1 Load bed
531.2 Hydraulic system
632 Tipper body (Schoon)
732.1 Load bed
732.2 Hydraulic system
763 Box body (Junge)
863.1 Box body, exterior
863.2 Box body, rear
864 Box body (Spier)
914.1 Box body, exterior
914.2 Box body, rear
945 Box body (Schmitz Cargobull)
995.1 Box body, exterior
995.2 Box body, rear
1036 Tail lift (Sörensen)
1146.1 Platform
1146.2 Hydraulic system
1197 Tail lift (BÄR - Cargolift)
1297.1 Platform
1297.2 Hydraulic system
1338 Tail lift (Palfinger)
1448.1 Platform
1448.2 Hydraulic system
1499 Repairing box body
1609.1 Repairing plywood panel
1609.2 Repairing sandwich panel
1649.3 Repairing transparent roof
18010 Trim film and protective film
18410.1 Assembly overview - protective films
18410.2 Renewing protective films
18611 Taxi roof sign preparation
19111.1 Removing and installing taxi roof sign preparation
19112 Taxi roof sign preparation
19312.1 Removing and installing taxi roof sign preparation
19313 Roof spoiler
19513.1 Removing and installing roof spoiler
19514 Mounting bracket for towing bracket
19714.1 Assembly overview - mounting bracket for towing bracket
19714.2 Removing and installing mounting bracket for towing bracket
19715 Roof basket
19915.1 Assembly overview - roof basket
19915.2 Removing and installing roof basket
20116 Storage box on drop-side
20516.1 Assembly overview - storage box on drop-side
20516.2 Removing and installing storage box on drop-side
20517 Cross strut
20717.1 Assembly overview - cross strut
20717.2 Removing and installing cross strut
20918 Storage box under drop-side
21318.1 Assembly overview - storage box bracket
21318.2 Removing and installing bracket for storage box
21619 Side underbody guard
21819.1 Assembly overview - side underbody guard
21819.2 Removing and installing side underbody guard
21820 Storage box
22020.1 Assembly overview - storage compartment
22020.2 Removing and installing storage compartment
22021 Ladder carrier
22221.1 Assembly overview - ladder carrier
22221.2 Removing and installing ladder carrier
22422 Roof carrier system with securing device
22722.1 Assembly overview - roof carrier system with securing device
22722.2 Removing and installing roof carrier system with securing device
22723 Easy Entry, right rear wing door
22923.1 Assembly overview – Easy Entry, right rear wing door
22923.2 Removing and installing Easy Entry, right rear wing door
22924 Underbody guard (protection package)
23324.1 Assembly overview - underbody guard (protection package)
23324.2 Removing and installing underbody guard (protection package)
23525 Roof ventilator
23925.1 Assembly overview - roof ventilator
23925.2 Removing and installing roof ventilator
23926 Ladder support
24326.1 Assembly overview - ladder support
24326.2 Removing and installing ladder support
24427 Design double tube bar
24827.1 Assembly overview - design double tube bar
24827.2 Removing and installing design double tube bar
25027.3 Installation instructions - design double tube bar
25228 Load compartment partition
26028.1 Assembly overview - load compartment partition
26028.2 Removing and installing locking device
26028.3 Removing and installing grille
26128.4 Removing and installing frame
26229 Loading edge protection
26429.1 Assembly overview - loading edge protection
26429.2 Removing and installing loading edge protection
26530 Loading edge protection
27030.1 Removing and installing loading edge protection
27031 Load compartment cover, aluminium
27131.1 Assembly overview - load compartment cover
27131.2 Removing and installing load compartment cover
27131.3 Removing and installing gas strut
27331.4 Removing and installing hinge for load compartment cover
27432 Protective grille for rear window
27632.1 Assembly overview - protective grille for rear window
27632.2 Removing and installing protective grille for rear window
27632.3 Removing and installing retaining bracket
27733 Rail system for load bed
27933.1 Assembly overview - rail system
27933.2 Removing and installing cross bars
28133.3 Removing and installing retaining brackets for cross bars
28133.4 Removing and installing guide rails
28234 Side bar
28534.1 Assembly overview - side bars
28534.2 Removing and installing side bar
28734.3 Removing and installing bracket for side bar
28934.4 Removing and installing step panel
29035 Fuel tank skid plate
29235.1 Assembly overview - fuel tank skid plate
29235.2 Removing and installing underbody guard for fuel tank
29236 Bumper trim
29436.1 Assembly overview - bumper trim
29436.2 Removing and installing bumper trim
29437 Towing bracket (for Australia only)
29737.1 Assembly overview – towing bracket
29737.2 Removing and installing towing bracket
29738 Roof load carrier
30038.1 Assembly overview - roof rails/cross bars
30038.2 Assembly overview - ladder holder
30138.3 Assembly overview - loading roller with holder
30238.4 Removing and installing roof rails
30338.5 Removing and installing cross bars
30438.6 Removing and installing ladder holder
30538.7 Removing and installing loading roller with holder
30639 Skid plate
30839.1 Assembly overview – skid plate
30839.2 Removing and installing skid plate
30840 Cross bars
31140.1 Assembly overview – cross bars
31140.2 Removing and installing cross bars
311Interior equipment
3131 Box body (Junge)
3131.1 Removing and installing fastening rail
3131.2 Removing and installing securing strap recesses
3141.3 Removing and installing pull strap
3152 Box body (Spier)
3172.1 Removing and installing fastening rail
3172.2 Removing and installing securing strap recess
3192.3 Pull strap
3203 Box body (Schmitz Cargobull)
3213.1 Removing and installing roof cross strut
3213.2 Removing and installing fastening rail
3233.3 Removing and installing pull strap
3254 Equipment
3274.1 Universal floor
3274.2 Removable floor panel
3314.3 Roof carrier in load compartment
3334.4 Removing and installing grab handle, A-pillar
3344.5 Partition panel (Holland DOKA)
3365 Box body (Plus)
3435.1 Assembly overview - box body (Plus)
3435.2 Removing and installing seat bench padding
3485.3 Removing and installing upper partition
3495.4 Removing and installing lower partition
3505.5 Removing and installing connection to side panel
3515.6 Removing and installing side panel
3525.7 Removing and installing sliding door step
3555.8 Removing and installing front and rear bench trim
3565.9 Removing and installing bench seat
3585.10 Removing and installing floor items
3595.11 Removing and installing headliner
3605.12 Removing and installing roof items
3616 Tool cabinet
3636.1 Assembly overview - tool cabinet
3636.2 Removing and installing tool cabinet
3657 Fastening rails
3717.1 Assembly overview - fastening rails
3717.2 Removing and installing fastening rail
3728 Load bed covering, wood
3778.1 Assembly overview - load bed covering, wood
3778.2 Removing and installing load bed covering, wood
3779 C-pillar partition
3819.1 Assembly overview - C-pillar partition
3819.2 Removing and installing C-pillar partition
38210 Rear window protective grille
38910.1 Assembly overview - rear window protective grille
38910.2 Removing and installing rear window protective grille
38911 Toolbox
39111.1 Assembly overview - tool box
39111.2 Removing and installing toolbox
39112 Wheel housing trim
39312.1 Assembly overview – wheel housing trim
39312.2 Removing and installing wheel housing trim
39313 Stowage cases on wing door
39513.1 Assembly overview - stowage cases
39513.2 Removing and installing stowage cases
39613.3 Removing and installing brackets for stowage cases
39614 Floor ventilation, load bed
39814.1 Assembly overview - floor ventilation
39814.2 Removing and installing floor ventilation
39815 High load floor with drawers
40015.1 Assembly overview - high load floor with drawers
40015.2 Removing and installing load floor, upper part
40215.3 Removing and installing load floor, lower part
40315.4 Removing and installing frame for drawers
40516 Storage compartment on wheel housing
40716.1 Assembly overview - storage compartment on wheel housing
40716.2 Removing and installing storage compartment
40717 Protective grille on wing door
40917.1 Assembly overview - protective grille on wing door
40917.2 Removing and installing protective grille
40918 Interior mirror
41118.1 Removing and installing mirror taximeter G511
41119 Interior mirror
41219.1 Removing and installing interior mirror, mirror taximeter G511
412Passenger protection
4131 Seat belts
4131.1 Removing and installing front three-point seat belt, bench seat (Holland-DOKA)
4131.2 Removing and installing belt buckle, bench seat (Holland-DOKA)
414Trim, insulation
4171 Interior trims
4171.1 Removing and installing bench seat trim (Holland DOKA)
417Seat frames
4181 Bench seats
4181.1 Removing and installing bench seat (Holland DOKA)
418Seat - padding, covers
420Communication
4211 Fitting locations
4212 Sound system
4222.1 Overview of fitting locations – sound system
4222.2 Removing and installing two-way radio loudspeaker R25
4233 Aerial systems
4243.1 Removing and installing roof aerial R295
4244 Aerial systems
4264.1 Removing and installing roof aerial RX5
4265 Aerial systems
4285.1 Removing and installing roof aerial R295
4286 Aerial systems
4306.1 Removing and installing roof aerial R295
4307 Taximeter
4327.1 Removing and installing taximeter G41
4327.2 Removing and installing mounting for taximeter G41
4338 Taximeter
4358.1 Removing and installing taximeter G41
4358.2 Removing and installing mirror taximeter G511
4359 Two-way radio
4399.1 Assembly overview – two-way radio
4399.2 Removing and installing two-way radio R8
4409.3 Removing and installing two-way radio bracket
4409.4 Removing and installing two-way radio unit microphone R122
44110 Two-way radio
44210.1 Removing and installing two-way radio R8
44210.2 Removing and installing microphone 2 on driver side R225
44210.3 Removing and installing two-way radio loudspeaker R25
443Lights, bulbs, switches - exterior
4441 Tipper body (Henschel)
4441.1 Lights
4441.2 Electrical system, general
4462 Tipper body (Schoon)
4522.1 Electrics
4523 Box body (Junge)
4583.1 Removing and installing tail light MX3/MX4
4583.2 Removing and installing rear fog light L46/L47
4593.3 Removing and installing number plate light X4/X5
4603.4 Removing and installing additional brake light M25
4613.5 Removing and installing upper marker lights
4623.7 Removing and installing lower marker light
4634 Box body (Spier)
4654.1 Removing and installing tail light MX3/MX4
4654.2 Removing and installing number plate light X4/X5
4664.3 Removing and installing high-level brake light
4674.4 Removing and installing upper marker lights
4674.5 Removing and installing side marker light M33/M34/M37/M38/M39/M40
4685 Box body (Schmitz Cargobull)
4715.1 Removing and installing tail light cluster
4715.2 Removing and installing number plate light
4725.3 Removing and installing high-level brake light
4745.4 Removing and installing rear upper marker light
4755.5 Removing and installing front upper marker light
4765.6 Removing and installing side marker light
4766 Tail lift (Sörensen)
4796.1 Removing and installing hazard warning light M115/M116
4796.2 Removing and installing foot switch F558
4806.3 Removing and installing tail lift operating unit EX56
4806.4 Removing and installing tilt angle sensor
4817 Tail lift (BÄR - Cargolift)
4847.1 Removing and installing hazard warning light M115/M116
4847.2 Removing and installing foot switch F556/F557
4857.3 Removing and installing operating unit EX56
4867.4 Removing and installing foot switch unit F558
4878 Tail lift (Palfinger)
4918.1 Removing and installing hazard warning light
4918.2 Removing and installing foot controls
4928.3 Removing and installing tilt switch
4928.4 Removing and installing angle sensor
4938.5 Removing and installing control box
4949 Roof spoiler elevated side light
4979.1 Removing and installing roof spoiler elevated side light
49710 Cross strut/tarpaulin lighting
49910.1 Removing and installing cross strut/tarpaulin lighting
49911 Cross strut/tarpaulin wiring harness
50011.1 Removing and installing cross strut/tarpaulin wiring harness
50012 LED rotating light
50112.1 Removing and installing LED rotating light
50113 Taxi roof sign
50313.1 Assembly overview – taxi roof sign
50313.2 Removing and installing taxi roof sign J1066
50413.3 Removing and installing bracket for taxi roof sign J1066
50514 Taxi roof sign
50714.1 Assembly overview – taxi roof sign
50714.2 Removing and installing taxi roof sign J1066
50814.3 Removing and installing bracket for taxi roof sign J1066
509Lights, bulbs, switches - interior
5111 Box body (Junge)
5111.1 Removing and installing load area illumination switch E481
5111.2 Removing and installing interior lighting
5112 Box body (Spier)
5132.1 Removing and installing load area illumination switch E481
5132.2 Removing and installing interior lighting
5133 Box body (Schmitz Cargobull)
5153.1 Removing and installing interior lighting
5154 Tail lift (Sörensen)
5174.1 Tail lift switch E629
5175 Tail lift (BÄR - Cargolift)
5185.1 Tail lift switch E629
5186 Tail lift (Palfinger)
5196.1 Tail lift switch
5197 Controls
5207.1 Overview of fitting locations - controls in dash panel, Taxi
5207.2 Removing and installing interior light switch (taxi) E115
5207.3 Removing and installing taxi sign switch E138
5217.4 Removing and installing alarm system off switch E217
5217.5 Removing and installing hands-free system button E487
5218 Control elements
5228.1 Removing and installing taxi alarm active button E485
5228.2 Removing and installing passive taxi alarm button E580
5229 Control elements
5259.1 Removing and installing taxi alarm active button E485
5259.2 Removing and installing passive taxi alarm button E580
5259.3 Removing and installing taxi alarm off button E486
5269.4 Removing and installing switch module for taxi functions EX62
52610 Anti-theft alarm
52810.1 Assembly overview - treble horn H2
52810.2 Removing and installing treble horn H2
52811 LED spot lights
53111.1 Assembly overview - LED spot lights
53111.2 Removing and installing LED spot lights
53212 Cigarette lighter, socket
53512.1 Assembly overview - DC/AC converter/socket
53512.2 Removing and installing DC/AC converter with socket, 12 V - 230 V U13
53612.3 Overview of fitting locations - 230 V components
53912.4 Assembly overview - exterior socket, 230 V, 110 V U8
54012.5 Assembly overview - interior socket, 230 V, 110 V U11
54112.6 Assembly overview - 220 V automatic personnel protection circuit breaker S59
54212.7 Removing and installing interior socket, 230 V, 110 V U11
54312.8 Removing and installing 220 V automatic personnel protection circuit breaker S59
54812.9 Removing and installing exterior socket, 230 V, 110 V U8
54912.10 Removing and installing battery charger, 230 V or 110 V/12 V A10
55112.11 Removing and installing DC/AC converter with socket, 12 V-230 V U13
556Wiring
5591 Control units
5591.1 Removing and installing special vehicle control unit J608
5592 Control units
5622.1 Removing and installing special vehicle control unit J608
562
