DER AUTOREPARATUR-SHOP
0
Home » Anleitungen » Electrical system
  • Beispielseite für Reparaturanleitung Electrical system
  • Beispielseite für Reparaturanleitung 2 Electrical system
  • Beispielseite für Reparaturanleitung 3 Electrical system
  • Beispielseite für Reparaturanleitung Electrical system
  • Beispielseite für Reparaturanleitung 2 Electrical system
  • Beispielseite für Reparaturanleitung 3 Electrical system

Electrical system

Für Passat / Passat Variant

Original VW-Reparaturanleitung


10,26 €inkl. 7% MwSt.

  • Deutsch
  • English

Sofort als Download verfügbar

Sprache: English

Digitale PDF Version

2.651 KB

112 Seiten

Detaillierte technische Daten

Sofort lesbar

Diese Reparaturanleitung umfasst: Vehicle diagnosis, testing and information systems, Immobilizer self-diagnosis, Guided functions for immobilizer, Battery, Alternator with poly-V-belt, Dash panel insert, Radio systems, Suppression measures, Front fog lights und Side mounted repeater turn signals. Mehr anzeigen
Sichere Zahlung per PayPal, Kreditkarte, Lastschrift, Sofort-Überweisung oder Giropay
PayPal Logo SEPA Lastschrift Logo Giropay Logo Sofort Überweisung Logo

Reparaturanleitung Passat / Passat Variant Electrical system pdf Download mit dem Inhalt:

Kapitelübersicht

  • Self-diagnosis
    1
  • 1 Vehicle diagnosis, testing and information systems
    1
  • 1.1 Connecting vehicle diagnosis, testing and information system VAS 5051A
    1
  • 2 Immobilizer self-diagnosis
    3
  • 2.1 Performing immobilizer self-diagnosis
    3
  • 2.2 Fault table
    7
  • 2.3 Measured value blocks
    10
  • 2.4 Coding immobilizer control unit J362
    11
  • 3 Guided functions for immobilizer
    13
  • 3.2 Online system test
    14
  • 3.3 Adaptation of ignition keys
    14
  • 3.4 Adaption after changing engine control unit
    15
  • 3.5 Adapting immobilizer
    15
  • Starter, current supply, CCS
    16
  • 1 Battery
    16
  • 1.1 Battery handling instructions
    16
  • 1.2 Removing and installing battery
    16
  • 1.3 Visual check
    18
  • 1.4 Checking electrolyte level
    18
  • 1.5 No load voltage measurement
    20
  • 1.6 Checking specific gravity of all cells
    21
  • 1.7 Battery load test
    23
  • 1.8 Charging battery
    24
  • 1.9 Quick charging/starting boost
    25
  • 2 Starter
    26
  • 2.1 Removing and installing starter
    26
  • 3 Alternator with poly-V-belt
    30
  • 3.2 4-cylinder diesel engine with air conditioner compressor
    31
  • 3.3 4-cylinder fuel injection petrol engine with air conditioner compressor
    32
  • 3.4 6-cylinder fuel injection petrol engine with air conditioner compressor
    33
  • 3.5 Removing and installing poly-V-belt, 4-cylinder engine
    35
  • 3.6 Removing and installing poly-V-belt, 6-cylinder engine
    37
  • 3.7 Checking alternator carbon brushes
    38
  • 3.8 Renewing poly-V-belt pulley on alternator
    38
  • 3.9 Removing and installing poly-V-belt pulley with freewheel
    39
  • Gauges, instruments
    40
  • 1 Dash panel insert
    40
  • 1.1 Removing and installing dash panel insert
    40
  • 2 Repairing dash panel insert
    42
  • 2.1 Vehicles with rev counter and digital clock
    42
  • 2.2 Vehicles with multifunction indicator (MFI)
    43
  • 2.3 Checking LED
    49
  • 2.4 Installing speedometer (G54)
    50
  • Radio, telephone, navigation
    52
  • 1 Radio systems
    52
  • 1.1 Radio system “alpha”
    52
  • 1.2 Radio system “beta”
    53
  • 1.3 Radio system “gamma” and “gamma with CD changer”
    54
  • 1.4 Removing and installing radio
    55
  • 1.5 Activating anti-theft coding on radio
    57
  • 1.6 Removing and installing cassette storage box
    57
  • 1.7 Fitting location of CD changer
    57
  • 2 Aerial system
    59
  • 2.1 Roof aerial
    59
  • 3 Suppression measures
    60
  • 4 Loudspeaker system
    61
  • 4.1 Removing and installing front right treble loudspeaker
    62
  • 4.2 Removing and installing front left treble loudspeaker
    63
  • 4.3 Removing and installing rear bass loudspeaker
    63
  • 4.4 Removing and installing rear treble loudspeaker
    63
  • 4.5 Removing and installing front bass loudspeakers
    64
  • Windscreen wash/wipe system
    65
  • 1 Windscreen wiper system
    65
  • 1.1 Assembly overview - windscreen wiper system
    65
  • 1.2 Setting park position
    66
  • 1.3 Adjusting wiper blade park position
    66
  • 1.4 Removing and installing wiper blade rubber insert
    66
  • 2 Windscreen washer system
    67
  • 2.1 Assembly overview - windscreen washer system
    67
  • 2.2 Adjusting washer spray jets
    67
  • 2.3 Connection to windscreen washer pump
    68
  • 3 Rear window wipe/wash system
    69
  • 3.1 Assembly overview - rear window wipe/wash system
    69
  • 3.2 Adjusting rear window wiper park position
    69
  • 3.3 Adjusting washer spray jet
    70
  • 4 Headlight washer system
    71
  • 4.1 Assembly overview - headlight washer system
    71
  • 4.2 Adjusting washer spray jets
    71
  • Lights, bulbs, switches - exterior
    72
  • 1 Headlight
    72
  • 1.1 Removing and installing headlight housing
    72
  • 1.2 Removing headlight bulbs
    73
  • 1.3 Removing and installing headlight range control motor
    74
  • 1.4 Adjusting headlights
    74
  • 2 Front fog lights
    76
  • 2.1 Removing or adjusting fog light
    76
  • 2.2 Removing and installing fog light bulb
    77
  • 3 Front turn signals
    78
  • 3.1 Removing front turn signals
    78
  • 3.2 Removing and installing turn signal bulb
    78
  • 4 Side mounted repeater turn signals
    79
  • 4.1 Removing and installing side mounted repeater turn signal
    79
  • 5 Number plate lights
    80
  • 5.1 Removing and installing registration plate light
    80
  • 5.2 Replacing number plate light bulb
    80
  • 6 Tail lights
    81
  • 6.1 Removing and installing tail light on saloon
    81
  • 6.2 Removing and installing tail light on Variant
    81
  • 7 Steering column switch and ignition and starter switch
    83
  • 7.1 Assembly overview - steering wheel
    83
  • 7.2 Removing and installing cover
    84
  • 7.3 Removing and installing horn button
    85
  • 7.4 Removing and installing horn button on vehicles with a driver airbag
    85
  • 7.5 Contact ring for horn plate
    86
  • 7.6 Removing and installing steering lock housing
    86
  • 7.7 Removing and installing turn signal and windscreen wiper switches
    86
  • 7.8 Removing and installing lock cylinder
    87
  • 7.9 Pin assignment on steering column switch
    87
  • Lights, bulbs, switches - interior
    89
  • 1 Cruise control system (CCS)
    89
  • 1.1 Assembly overview - cruise control system (CCS)
    89
  • 1.2 Removing control element
    90
  • 1.3 Adjusting control element
    91
  • 1.4 Removing and installing breather valve
    91
  • 1.5 Removing and installing vacuum pump for automatic distance control system V18
    91
  • 1.6 Checking vacuum system for leaks
    91
  • 2 Anti-theft alarm system (ATA)
    92
  • 2.1 Removing alarm system warning lamp K95
    93
  • 2.3 Removing and installing anti-theft alarm and vermin repellent system contact switch F120
    93
  • 2.4 Removing and installing anti-theft alarm system horn H8
    94
  • 2.5 Removing and installing anti-theft alarm system control unit J284
    94
  • 3 Interior lights and switches
    95
  • 3.1 Removing and installing light switch
    95
  • 3.2 Removing combi-warning lamp
    95
  • 3.3 Removing and installing interior light
    96
  • 3.4 Replacing front passenger reading light bulb
    96
  • 3.5 Removing and installing luggage compartment light W3 , Variant
    97
  • 3.6 Removing and installing luggage compartment light W3 , saloon
    97
  • 3.7 Removing and installing luggage compartment light switch
    97
  • 3.8 Removing and installing rear reading lights
    97
  • 3.9 Removing and installing sliding sunroof switch E8
    98
  • 3.10 Removing and installing door contact switch
    98
  • 3.11 Removing and installing electric window switch
    98
  • 4 Immobilizer
    100
  • 4.1 Removing and installing immobilizer
    100
  • 4.2 Removing and installing immobilizer control unit J362
    100
  • 4.3 Removing and installing immobilizer reader coil D2
    101
  • 4.4 Transponder
    101
  • 4.5 Retrofitting fuel shut-off valve control unit J366
    101
  • 4.6 Installing fuel shut-off valve control unit J366
    102
  • 4.7 Adapting fuel shut-off valve control unit to immobilizer control unit
    104
  • 4.8 Functional check of immobilizer
    104
  • Wiring
    105
  • 1 Relay plate
    105
  • 1.1 Removing and installing relay plate
    105
  • 1.2 Removing and installing multi-pin connector on back of relay plate
    105
Hersteller­bezeichnung Electrical system
Hersteller Volkswagen
Passend für Passat / Passat Variant (1994 - 1997)
Passende Autotypen 3A
Kategorie Reparaturanleitung

Im Moment sind noch keine Bewertungen für dieses Produkt vorhanden.

Ähnliche Reparaturanleitungen

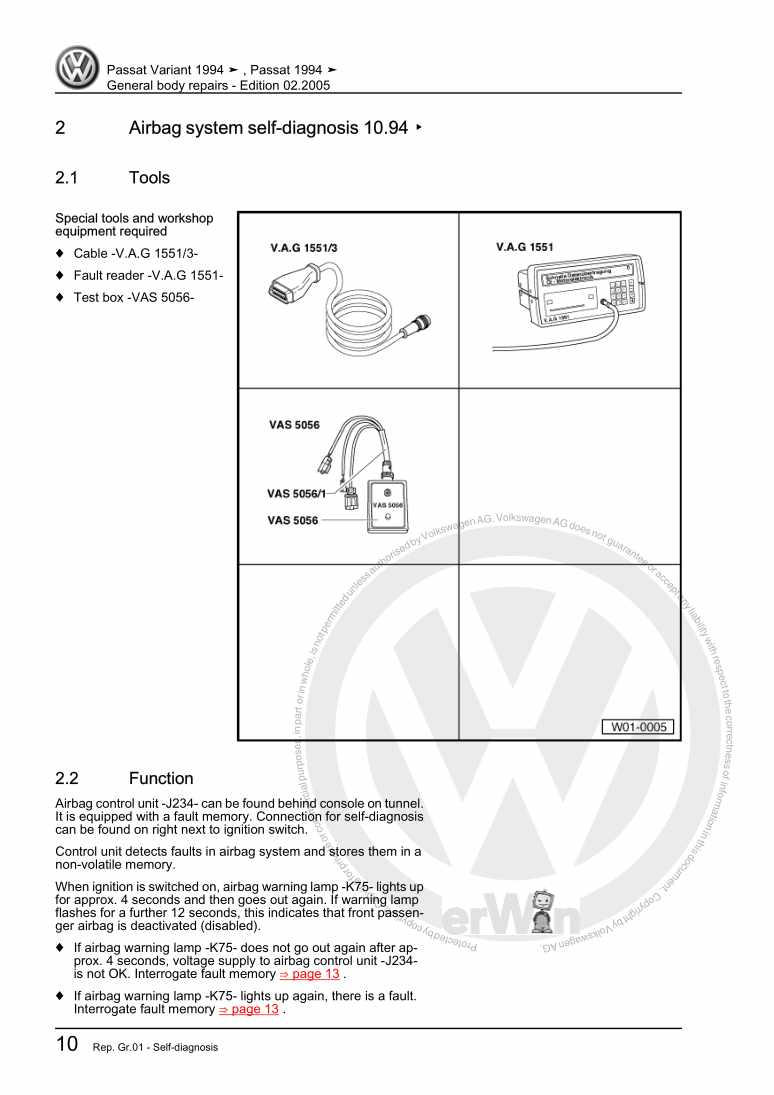
General body repairs

Beispielseite für Reparaturanleitung General body repairs

Für Passat / Passat Variant (1994 - 1997)

19,23 € Details

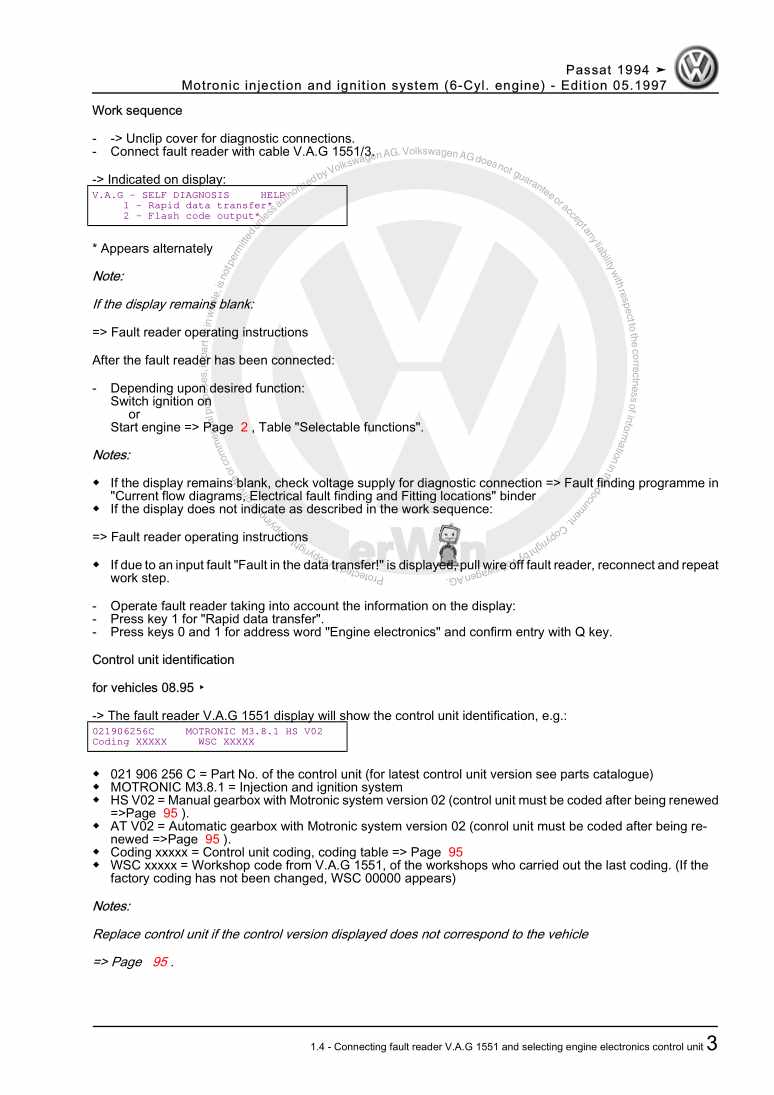
Motronic injection and ignition system (6-Cyl. engine)

Beispielseite für Reparaturanleitung Motronic injection and ignition system (6-Cyl. engine)

Für Passat / Passat Variant (1994 - 1997)

10,82 € Details

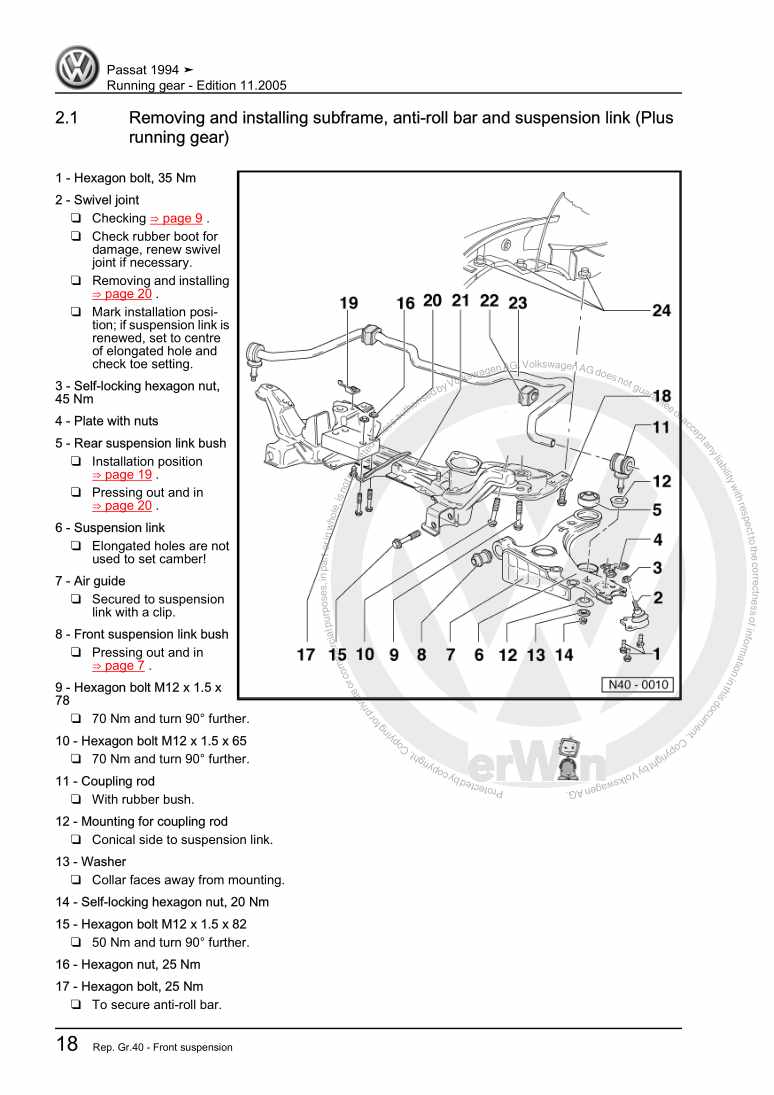
Running gear

Beispielseite für Reparaturanleitung Running gear

Für Passat / Passat Variant (1994 - 1997)

14,36 € Details

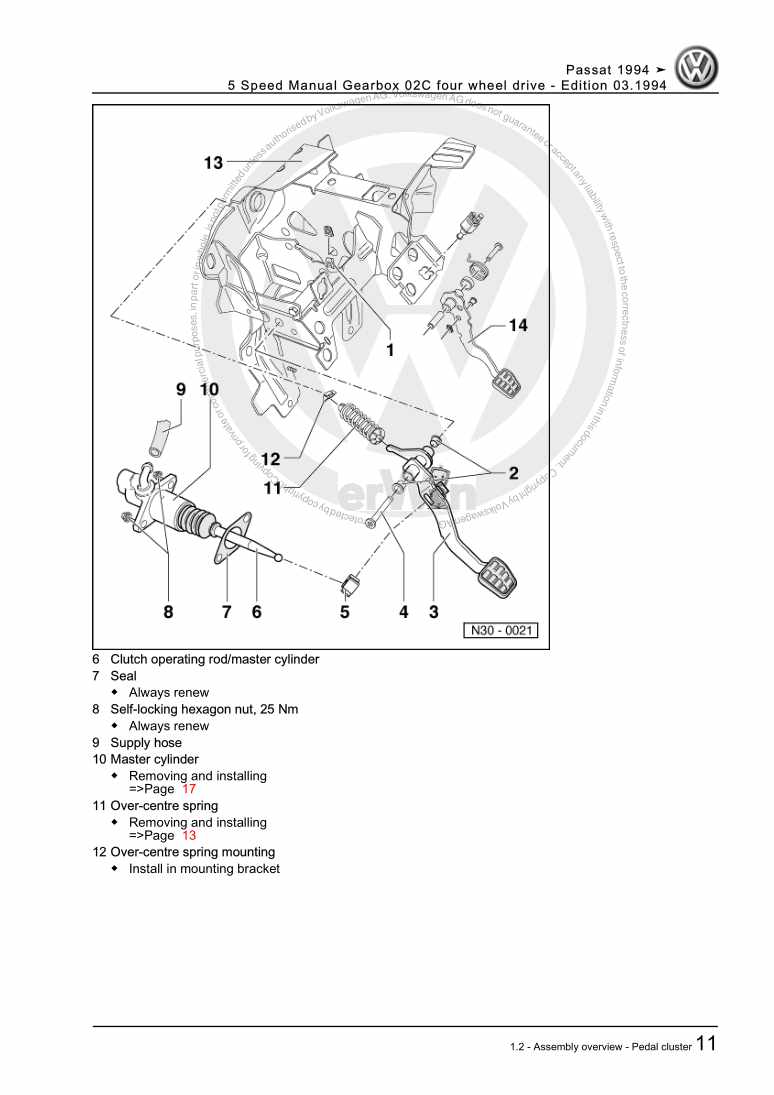
5 Speed Manual Gearbox 02C four wheel drive

Beispielseite für Reparaturanleitung 5 Speed Manual Gearbox 02C four wheel drive

Für Passat / Passat Variant (1994 - 1997)

23,22 € Details

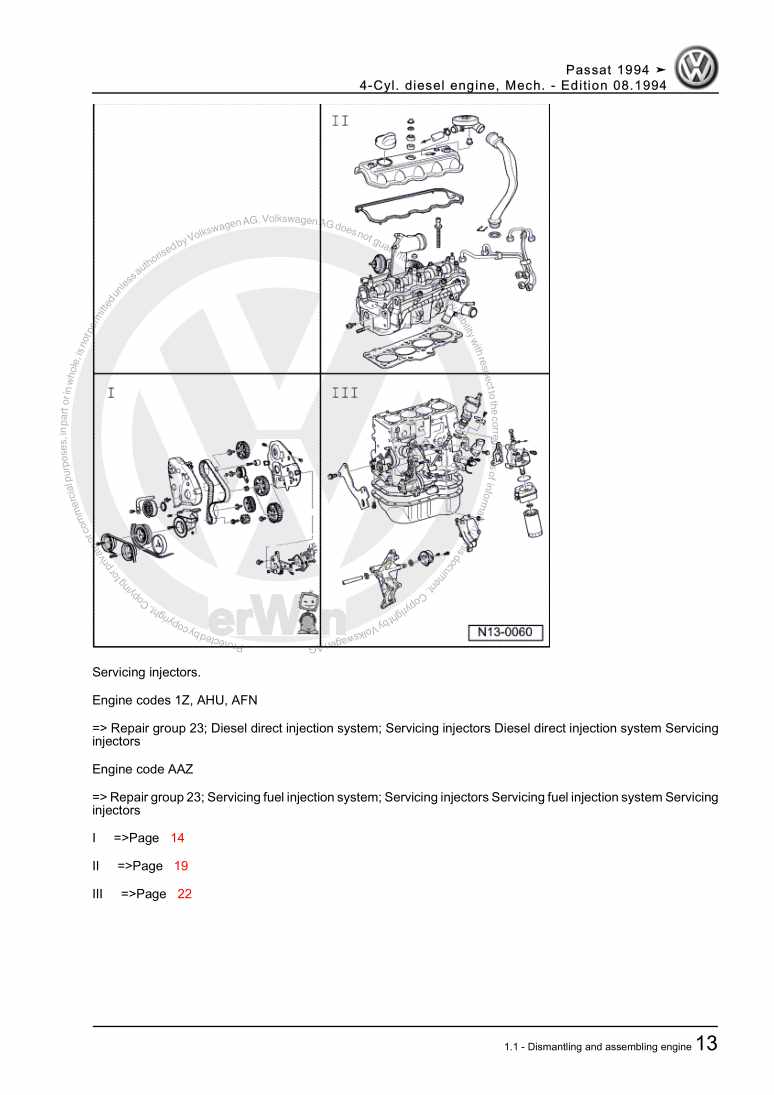
4-Cyl. diesel engine, Mech.

Beispielseite für Reparaturanleitung 4-Cyl. diesel engine, Mech.

Für Passat / Passat Variant (1994 - 1997)

14,36 € Details

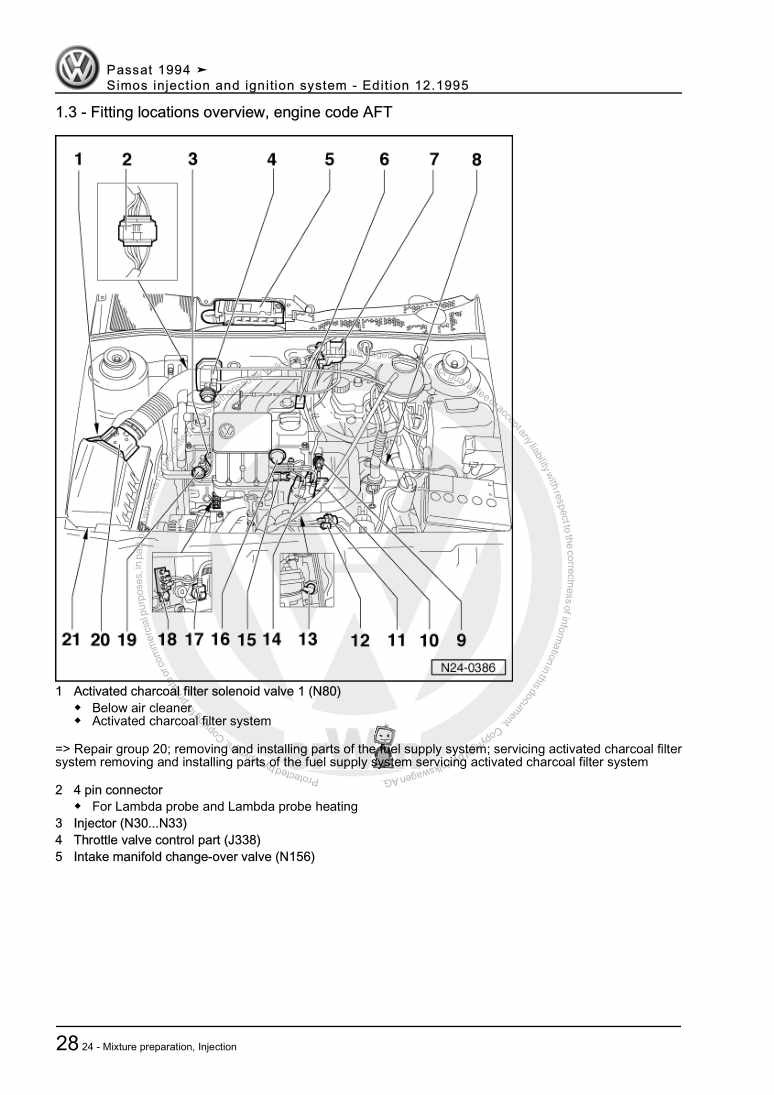
Simos injection and ignition system

Beispielseite für Reparaturanleitung Simos injection and ignition system

Für Passat / Passat Variant (1994 - 1997)

10,33 € Details

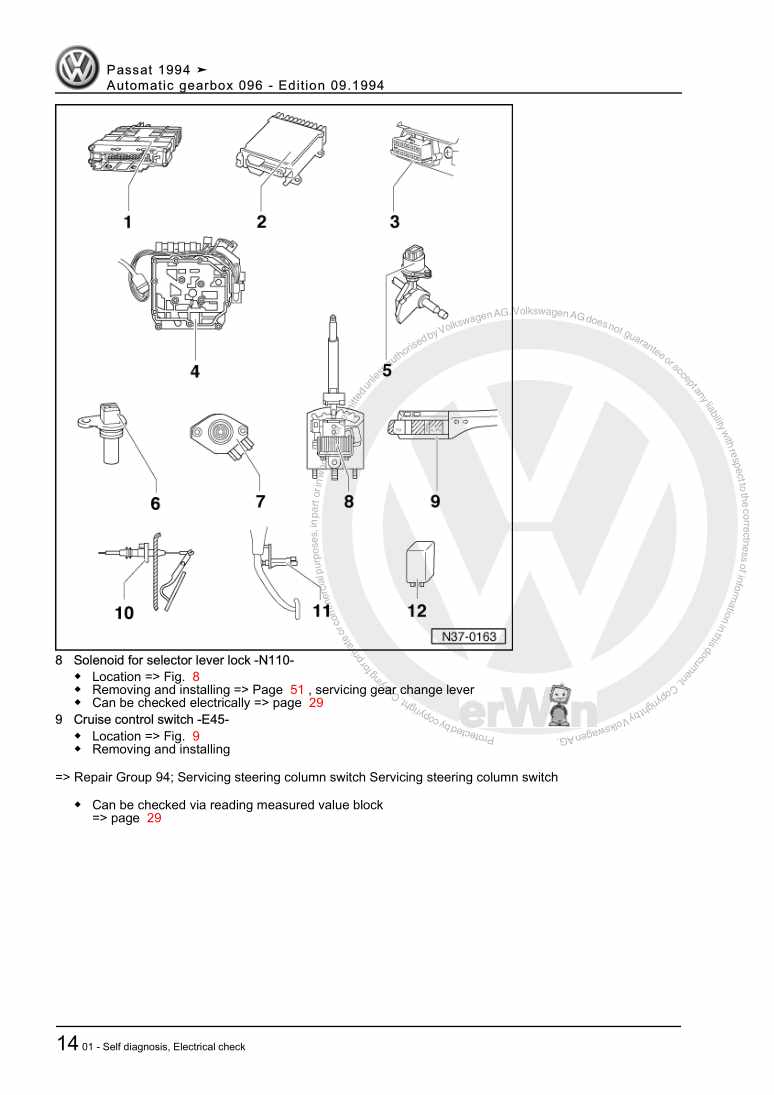
Automatic gearbox 096

Beispielseite für Reparaturanleitung Automatic gearbox 096

Für Passat / Passat Variant (1994 - 1997)

17,13 € Details

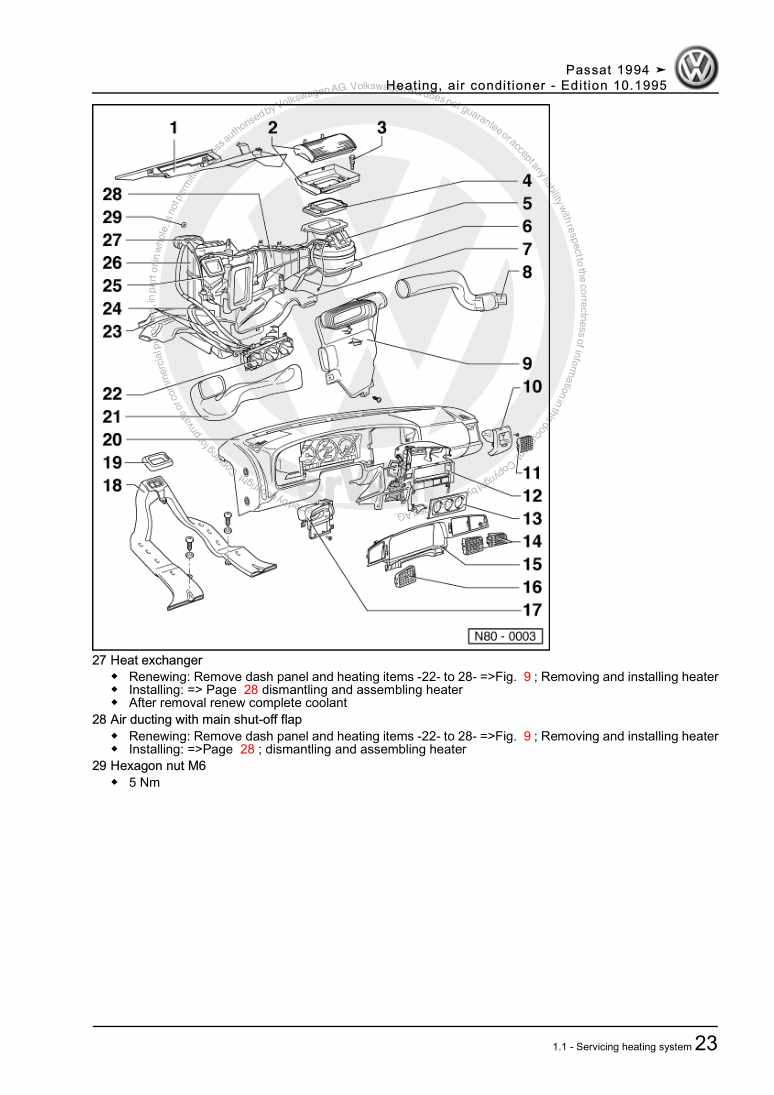
Heating, air conditioner

Beispielseite für Reparaturanleitung Heating, air conditioner

Für Passat / Passat Variant (1994 - 1997)

10,19 € Details

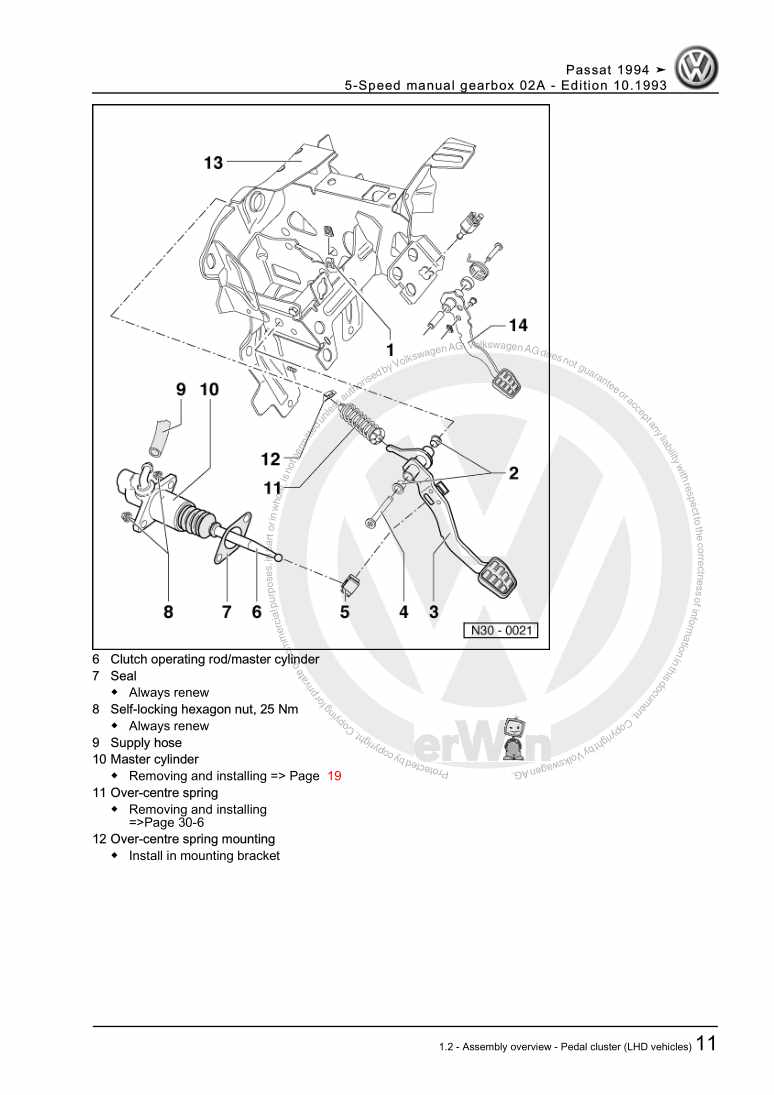
5-Speed manual gearbox 02A

Beispielseite für Reparaturanleitung 5-Speed manual gearbox 02A

Für Passat / Passat Variant (1994 - 1997)

15,97 € Details

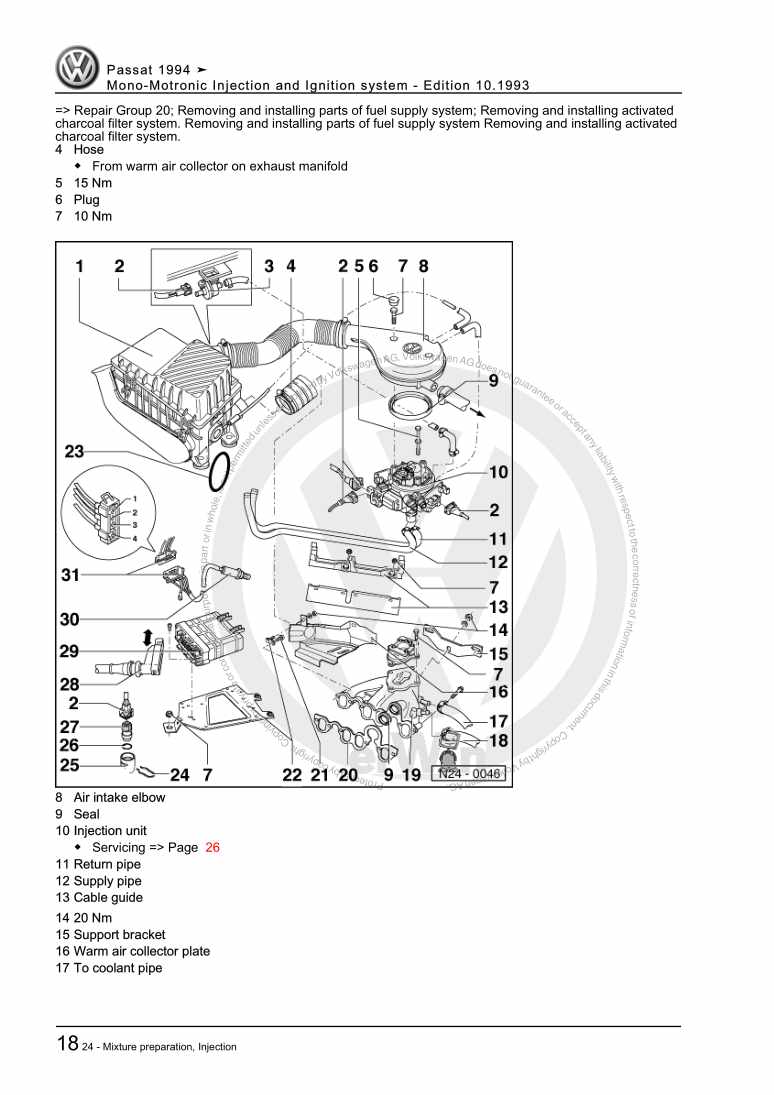
Mono-Motronic Injection and Ignition system

Beispielseite für Reparaturanleitung Mono-Motronic Injection and Ignition system

Für Passat / Passat Variant (1994 - 1997)

7,13 € Details

Unsere Best Seller

Schon gewusst? Wir bieten auch originale Autoteile an.

Autoteil 4KE998465C Rep.Satz

4KE998465C

Rep.Satz

30,45 €

Details
Autoteil 021133687A Halter

021133687A

Halter

10,26 €

Details
Autoteil 06F198107A Dichtringe

06F198107A

Dichtringe

48,99 €

Details
Autoteil 1J0971921K Kappe

1J0971921K

Kappe

1,44 €

Details
Autoteil 5N0941607 Kappe

5N0941607

Kappe

24,22 €

Details

Nr. 528: Der Erdgasantrieb im Golf/Golf Variant TGI BlueMotion

Beispielseite für Reparaturanleitung Nr. 528: Der Erdgasantrieb im Golf/Golf Variant TGI BlueMotion

5,26 € Details

Standheizung, Zusatzheizung

Beispielseite für Reparaturanleitung Standheizung, Zusatzheizung

Für Touareg (2011) / Touareg FL (2015 > )

6,64 € Details

Nr. 547: Der 2,0l-176kW-TDI-Biturbo-Motor der Dieselmotoren-Baureihe EA288

Beispielseite für Reparaturanleitung Nr. 547: Der 2,0l-176kW-TDI-Biturbo-Motor der Dieselmotoren-Baureihe EA288

5,89 € Details

image/svg+xml Über Clonck

Originale Reparaturanleitungen und Ersatzteile

Unsere Reparaturanleitungen sind Originale, kommen direkt von Volkswagen und erfüllen die höchsten Qualitätsstandards.

In unserem Originalteile-Shop verkaufen wir hochwertige Originalersatzteile der Fahrzeughersteller. Mithilfe der Suche gibst du die gewünschte Teilenummer (OE-Nummer) ein und bestellst schnell und einfach das benötigte Ersatzteil.

Höchste Qualitätsstandards

Bei Clonck wollen wir Autoschrauber und Kfz-Profis glücklich machen. Aus diesem Grund findest du bei Clonck ausschließlich professionelle und hochwertige Reparaturanleitungen, mit deren Hilfe du dein Fahrzeug fachgerecht reparieren kannst.

Unsere Partner

Autohaus Schmidt GmbH
Automag GmbH Filiale Laim
KFZ-VERLAG GmbH
Zimpel und Franke GmbH

Clonck: Der Autoreparatur-Shop - gibt's auch als App!

Clonck App Logo Play Store

Clonck: Passende Autoteile für deine Autoreparatur

4,5 90

Mit Clonck bestellst du die richtigen Originalersatzteile im Handumdrehen.

  • Fahrzeugmodell hinzufügen
  • Baugruppe auswählen
  • Fahrzeug-Identifizierungsnummer (FIN) eingeben
  • Über 5.000 originale Reparaturanleitungen einsehen
Jetzt App starten
Clonck App Preview Auto Mobiltelefon Autoteile