

DER AUTOREPARATUR-SHOP
0
Home » Anleitungen » Heating, air conditioner
  • Beispielseite für Reparaturanleitung Heating, air conditioner
  • Beispielseite für Reparaturanleitung 2 Heating, air conditioner
  • Beispielseite für Reparaturanleitung 3 Heating, air conditioner
  • Beispielseite für Reparaturanleitung Heating, air conditioner
  • Beispielseite für Reparaturanleitung 2 Heating, air conditioner
  • Beispielseite für Reparaturanleitung 3 Heating, air conditioner

Heating, air conditioner

Für EOS

Original VW-Reparaturanleitung


12,61 €inkl. 7% MwSt.

  • Deutsch
  • English

Sofort als Download verfügbar

Sprache: English

Digitale PDF Version

4.442 KB

145 Seiten

Detaillierte technische Daten

Sofort lesbar

Diese Reparaturanleitung umfasst: Heater, Control motors, Air duct, Operating and display unit, Other controlling and regulating components, Overview of fitting locations - air conditioning system, Refrigerant circuit, Air conditioner compressor und Front heater and air conditioning unit. Mehr anzeigen
Sichere Zahlung per PayPal, Kreditkarte, Lastschrift, Sofort-Überweisung oder Giropay
PayPal Logo SEPA Lastschrift Logo Giropay Logo Sofort Überweisung Logo

Reparaturanleitung EOS Heating, air conditioner pdf Download mit dem Inhalt:

Kapitelübersicht

  • Technical data
    1
  • 1 Safety information
    1
  • 1.1 Safety precautions when working on air conditioning systems
    1
  • 1.2 Safety measures when working on vehicles with a start/stop system
    1
  • 1.3 Safety precautions when working on the cooling system
    1
  • 2 General information
    3
  • 2.1 Notes concerning odours in air conditioned vehicles
    3
  • 2.2 Notes for vehicles with start-stop system
    3
  • 3 Repair instructions
    4
  • 3.1 Working on refrigerant circuit
    4
  • 3.2 Refrigerant circuit seals
    4
  • 3.3 Notes on control motors
    5
  • 4 Technical data
    11
  • 4.1 Capacities for refrigerant R134a
    11
  • 4.2 Refrigerant oil
    11
  • 4.3 Oil distribution
    11
  • Heating
    12
  • 1 Heater
    12
  • 1.1 Removing and installing fresh air blower V2
    12
  • 1.2 Removing and installing fresh air blower series resistor with overheating fuse N24
    13
  • 1.3 Removing and installing heater unit
    13
  • 1.4 Dismantling and assembling heater unit
    17
  • 2 Control motors
    20
  • 3 Air duct
    21
  • 4 Operating and display unit
    22
  • 5 Other controlling and regulating components
    23
  • Air conditioning system
    24
  • 1 Overview of fitting locations - air conditioning system
    24
  • 2 Refrigerant circuit
    30
  • 2.1 System overview - refrigerant circuit
    30
  • 2.2 Removing and installing high-pressure sender G65
    31
  • 2.3 Removing and installing expansion valve
    32
  • 2.4 Removing and installing condenser
    35
  • 2.5 Removing and installing receiver
    38
  • 2.6 Removing and installing desiccant bag or cartridge
    39
  • 2.7 Removing and installing evacuating and charging valves on low and high-pressure side
    41
  • 3 Air conditioner compressor
    43
  • 3.1 Assembly overview - drive unit of air conditioner compressor
    43
  • 3.2 Removing and installing air conditioner compressor
    43
  • 3.3 Checking high-pressure safety valve on air conditioner compressor
    48
  • 3.4 Ancillary bracket for air conditioner compressor
    49
  • 4 Front heater and air conditioning unit
    61
  • 4.1 Assembly overview – heater and air conditioning unit
    61
  • 4.2 Removing and installing heater and air conditioning unit
    66
  • 4.3 Removing and installing evaporator
    71
  • 4.4 Dismantling and assembling evaporator housing
    72
  • 4.5 Removing fresh air blower V2 with fresh air blower control unit J126
    73
  • 4.6 Removing and installing evaporator output temperature sender G263
    74
  • 4.7 Removing and installing evaporator temperature sensor G308
    75
  • 4.8 Removing and installing dust and pollen filter
    75
  • 4.9 Removing and installing heat exchanger
    76
  • 4.10 Removing and installing auxiliary air heater element Z35
    80
  • 4.11 Checking condensation drain
    83
  • 4.12 Removing and installing glove box cooling
    83
  • 5 Air duct
    85
  • 5.1 Removing and installing fresh air intake
    85
  • 5.2 Removing and installing air intake duct
    86
  • 5.3 Removing vents
    87
  • 5.4 Checking forced ventilation for passenger compartment
    89
  • 5.5 Removing and installing forced ventilation for passenger compartment
    89
  • 6 Operating and display unit
    91
  • 6.1 Overview of operating and display unit
    91
  • 6.2 Removing and installing operating and display unit
    102
  • 6.3 Multi-pin connector pin assignment on back of operating and display unit
    103
  • 7 Control motors
    110
  • 7.1 Removing and installing temperature flap control motor V68
    110
  • 7.2 Removing and installing centre flap control motor V70
    112
  • 7.3 Removing and installing air flow flap control motor V71
    113
  • 7.4 Removing and installing defroster flap control motor V107
    117
  • 7.5 Removing and installing air recirculation flap control motor V113
    119
  • 7.7 Removing and installing left temperature flap control motor V158
    124
  • 7.8 Removing and installing right temperature flap control motor V159
    126
  • 7.9 Removing and installing fresh air/air recirculation, air flow flap control motor V425
    128
  • 7.10 Removing and installing front air distribution flap control motor V426
    130
  • 7.11 Removing and installing air distribution flap control motor V428
    131
  • 7.12 Removing and installing air distribution flap actuator
    132
  • 7.13 Removing and installing flexible shaft, vehicles up to week 21/08
    133
  • 8 Other controlling and regulating components
    135
  • 8.1 Removing and installing ambient temperature sensor G17
    135
  • 8.3 Principle of operation of air quality sensor G238
    136
  • 8.4 Removing and installing air quality sensor G238 , vehicles from week 22/08
    137
  • 8.5 Removing and installing left vent temperature sender G150
    138
  • 8.6 Removing and installing right vent temperature sender G151
    139
  • 8.7 Removing and installing centre vent temperature sender G191
    139
  • 8.8 Removing and installing footwell vent temperature sender G192
    139
  • 8.9 Removing and installing left footwell vent temperature sender G261
    140
  • 8.10 Removing and installing right footwell vent temperature sender G262
    140
Hersteller­bezeichnung Heating, air conditioner
Hersteller Volkswagen
Passend für EOS (2006)
Passende Autotypen 1F
Kategorie Reparaturanleitung

Im Moment sind noch keine Bewertungen für dieses Produkt vorhanden.

Ähnliche Reparaturanleitungen

Body Repairs

Beispielseite für Reparaturanleitung Body Repairs

Für EOS (2006)

15,82 € Details

4-cylinder injection engine (1.6 l engine, direct injection)

Beispielseite für Reparaturanleitung 4-cylinder injection engine (1.6 l engine, direct injection)

Für EOS (2006)

13,70 € Details

General body repairs, interior

Beispielseite für Reparaturanleitung General body repairs, interior

Für EOS (2006)

16,33 € Details

Maintenance

Beispielseite für Reparaturanleitung Maintenance

Für EOS (2006)

16,33 € Details

Fuel supply system - Diesel engines

Beispielseite für Reparaturanleitung Fuel supply system - Diesel engines

Für EOS (2006)

6,52 € Details

4-cylinder diesel engine (2.0 l engine, 2 valve)

Beispielseite für Reparaturanleitung 4-cylinder diesel engine (2.0 l engine, 2 valve)

Für EOS (2006)

13,85 € Details

Running gear, axles, steering

Beispielseite für Reparaturanleitung Running gear, axles, steering

Für EOS (2006)

28,09 € Details

Communication

Beispielseite für Reparaturanleitung Communication

Für EOS (2006)

13,20 € Details

6-cylinder injection engine

Beispielseite für Reparaturanleitung 6-cylinder injection engine

Für EOS (2006)

21,70 € Details

Fuel supply system - Petrol engines

Beispielseite für Reparaturanleitung Fuel supply system - Petrol engines

Für EOS (2006)

6,88 € Details

Unsere Best Seller

Schon gewusst? Wir bieten auch originale Autoteile an.

Autoteil 4G0919268H Aufnahme

4G0919268H

Aufnahme

24,58 €

Details
Autoteil 8W0973737 Gehaeuse

8W0973737

Gehaeuse

7,38 €

Details
Autoteil 06F198107A Dichtringe

06F198107A

Dichtringe

55,68 €

Details
Autoteil 1J1857351B4J4 Deckel

1J1857351B4J4

Deckel

65,67 €

Details
Autoteil 3Q0713128 Modul

3Q0713128

Modul

109,44 €

Details

Nr. 547: Der 2,0l-176kW-TDI-Biturbo-Motor der Dieselmotoren-Baureihe EA288

Beispielseite für Reparaturanleitung Nr. 547: Der 2,0l-176kW-TDI-Biturbo-Motor der Dieselmotoren-Baureihe EA288

5,89 € Details

Karosserie-Instandsetzung

Beispielseite für Reparaturanleitung Karosserie-Instandsetzung

Für New Beetle / New Beetle (USA) (1998 - 2007) / New Beetle (Europe) (1999 - 2002)

10,12 € Details

Nr. 540: Das Abgasnachbehandlungssystem Selective-Catalytic-Reduction
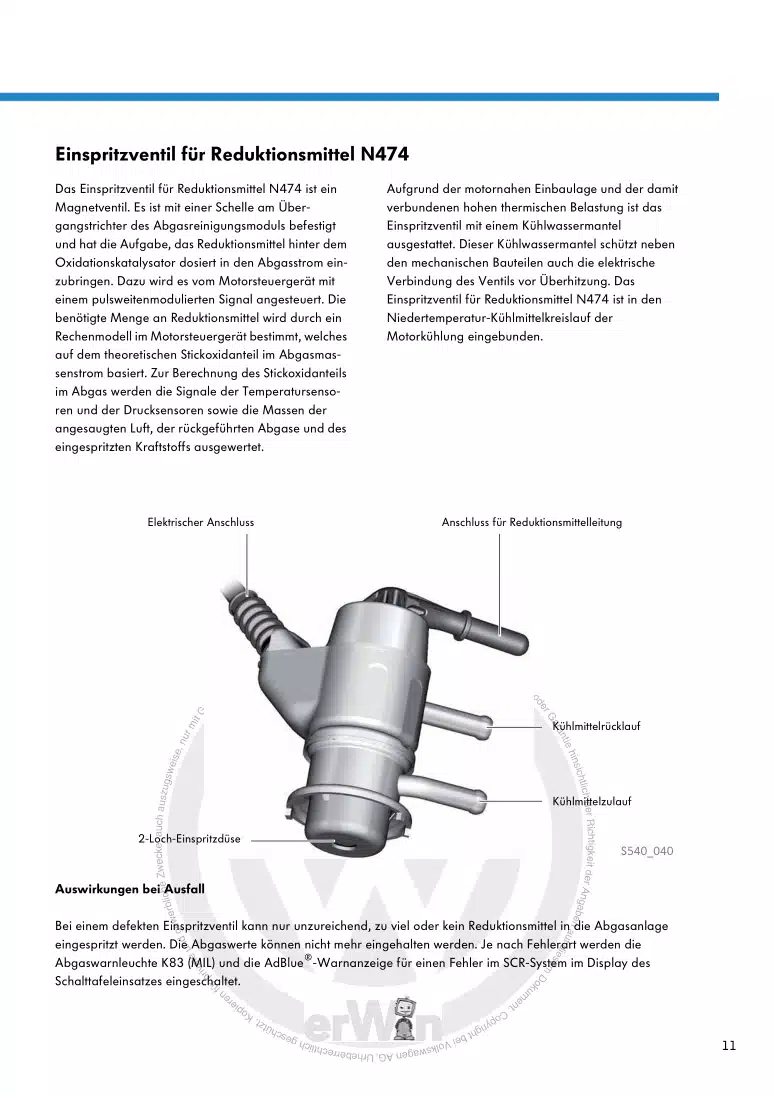
Beispielseite für Reparaturanleitung Nr. 540: Das Abgasnachbehandlungssystem Selective-Catalytic-Reduction

5,67 € Details

image/svg+xml Über Clonck

Originale Reparaturanleitungen und Ersatzteile

Unsere Reparaturanleitungen sind Originale, kommen direkt von Volkswagen und erfüllen die höchsten Qualitätsstandards.

In unserem Originalteile-Shop verkaufen wir hochwertige Originalersatzteile der Fahrzeughersteller. Mithilfe der Suche gibst du die gewünschte Teilenummer (OE-Nummer) ein und bestellst schnell und einfach das benötigte Ersatzteil.

Höchste Qualitätsstandards

Bei Clonck wollen wir Autoschrauber und Kfz-Profis glücklich machen. Aus diesem Grund findest du bei Clonck ausschließlich professionelle und hochwertige Reparaturanleitungen, mit deren Hilfe du dein Fahrzeug fachgerecht reparieren kannst.

Unsere Partner

Autohaus Schmidt GmbH
Automag GmbH Filiale Laim
KFZ-VERLAG GmbH
Zimpel und Franke GmbH

Clonck: Der Autoreparatur-Shop - gibt's auch als App!

Clonck App Logo Play Store

Clonck: Passende Autoteile für deine Autoreparatur

4,5 90

Mit Clonck bestellst du die richtigen Originalersatzteile im Handumdrehen.

  • Fahrzeugmodell hinzufügen
  • Baugruppe auswählen
  • Fahrzeug-Identifizierungsnummer (FIN) eingeben
  • Über 5.000 originale Reparaturanleitungen einsehen
Jetzt App starten
Clonck App Preview Auto Mobiltelefon Autoteile




