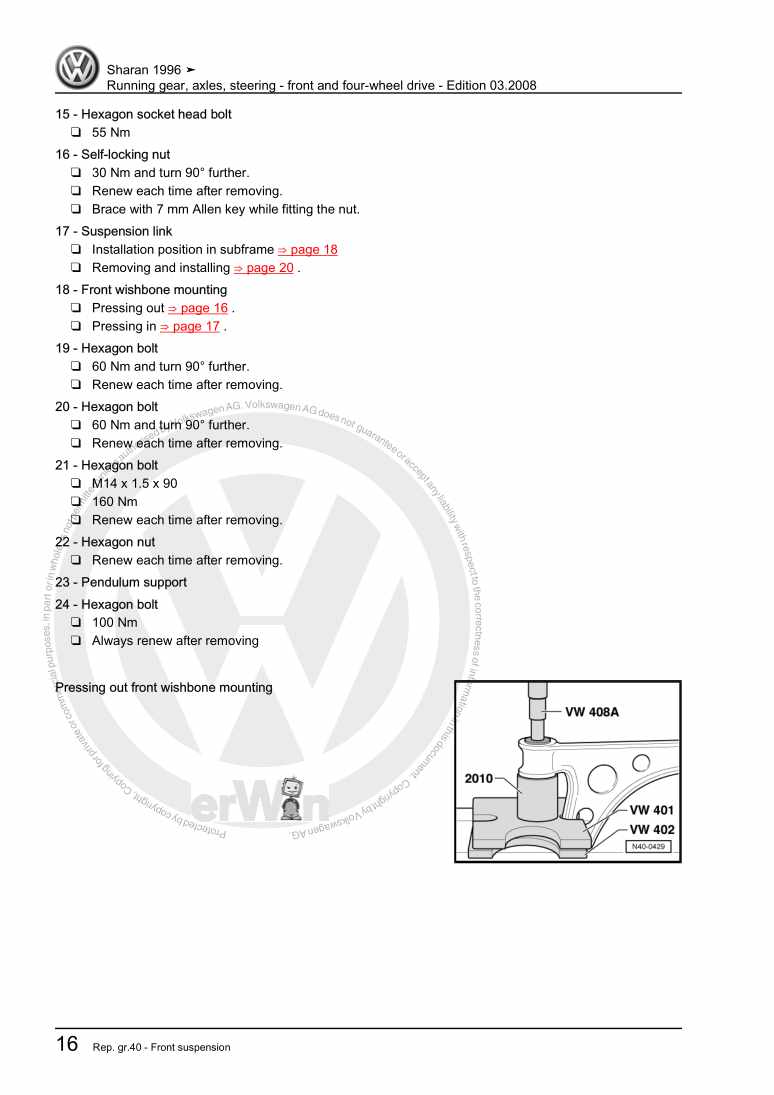
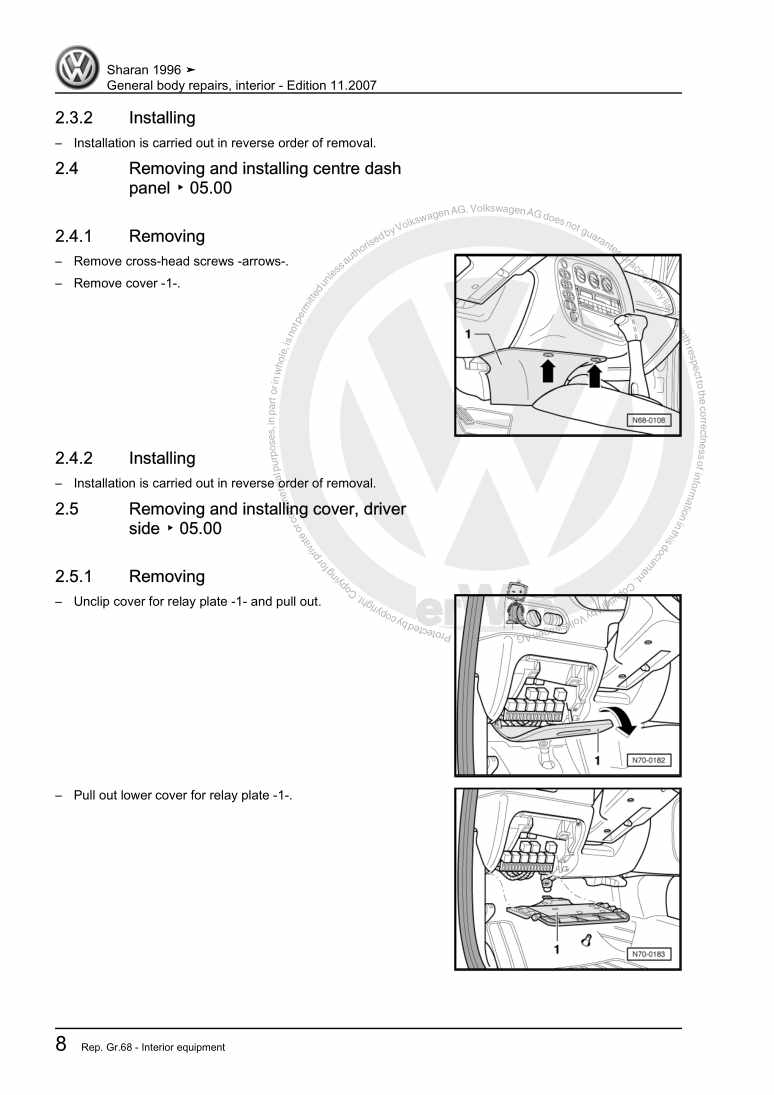
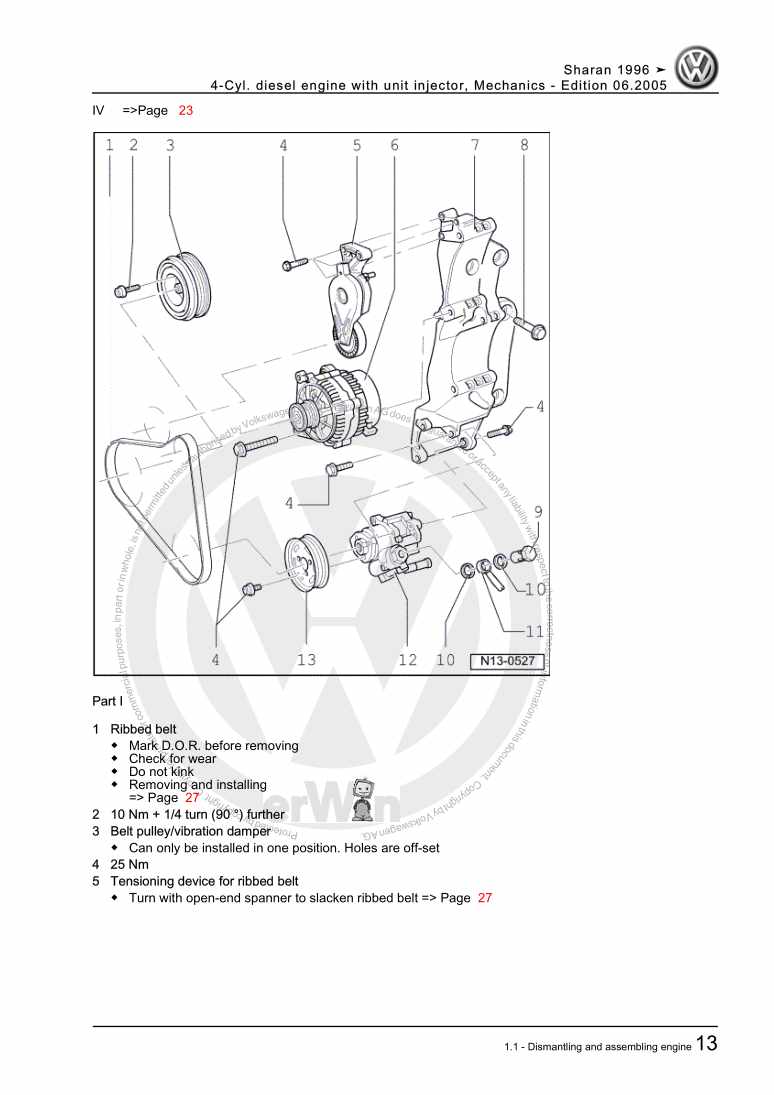
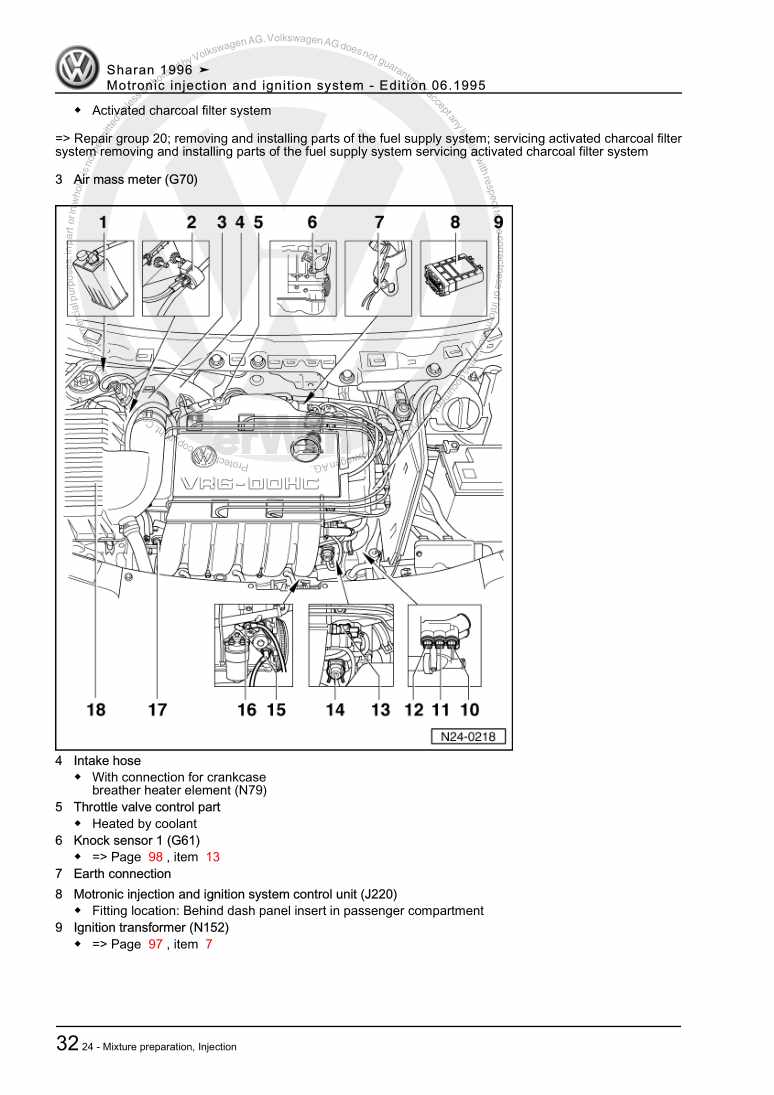
Starter, current supply, CCS
11 Battery A
11.1 Fundamentals for batteries
11.2 Types of battery
11.3 Warning notices and safety regulations
11.4 Battery terminal connection
12 Checking battery
23 Charging battery
34 Disconnecting and reconnecting batteries
44.1 Disconnecting and reconnecting battery, vehicles with one-battery concept
44.3 Steps after connecting battery
75 Removing and installing battery
95.1 Removing and installing battery in engine compartment
95.2 Removing and installing second battery under front right seat
116 Specified torques: battery
147 Starter
157.1 Checking starter B
157.2 Removing and installing starter, vehicles ▸ 05.00
167.3 Removing and installing starter, vehicles 06.00 ▸
218 Specified torques: starter
258.1 General specified torques for all vehicles
258.2 Vehicles ▸ 05.00
258.3 Vehicles 06.00 ▸
259 Alternator C
279.1 Securing B+ (battery positive) wire to alternator
279.2 Checking poly V-belt
279.3 Checking alternator C
289.4 Characteristics of compact alternators with poly V-belt drive ▸ 05.00
299.5 Characteristics of compact alternators with poly V-belt drive 06.00 ▸
299.6 Alternator for 4-cylinder petrol injection engine ▸ 05.00
299.7 Alternator for 6-cylinder petrol injection engine ▸ 05.00
339.8 Alternator for 4-cylinder diesel engine ▸ 05.00
3506.00 ▸
389.10 Alternator for 2.0 l 4-cylinder diesel engine
429.11 Alternator for 6-cylinder petrol injection engine 06.00 ▸
469.12 Removing and installing poly V-belt pulley on alternator
509.13 Voltage regulator for alternator
5410 Specified torques: alternator
5710.1 General specified torques for all vehicles
5710.2 4-cylinder fuel injection engine ▸ 05.00
5710.3 6-cylinder fuel injection engine ▸ 05.00
5710.4 4-cylinder diesel engine ▸ 05.00
5710.6 2.0 l 4-cylinder diesel engine
5810.7 6-cylinder fuel injection engine 06.00 ▸
5811 Cruise control system (CCS)
5911.1 Cruise control system (CCS) for vehicles with petrol engine ▸ 05.00
5911.2 Cruise control system (CCS) for vehicles with a TDI diesel engine ▸ 05.00
6111.3 Cruise control system (CCS) for vehicles 06.00 ▸
6211.4 Activating and deactivating cruise control system (CCS)
62Gauges, instruments
631 Dash panel insert
631.1 Dash panel insert, vehicles ▸ 05.00
631.2 Dash panel insert, vehicles 06.00 ▸
672 Service interval display
772.1 Resetting service interval display
77Windscreen wash/wipe system
781 Windscreen wiper system
781.1 Removing windscreen wiper system (vehicles ▸ 09.98)
781.2 Dismantling windscreen wiper system (vehicles ▸ 09.98)
801.3 Installing windscreen wiper system (vehicles ▸ 09.98)
821.4 Removing windscreen wiper system (vehicles 10.98 ▸ 05.00)
841.5 Dismantling windscreen wiper system (vehicles 10.98 ▸ 05.00)
871.6 Installing windscreen wiper system (vehicles 10.98 ▸ 05.00)
891.7 Removing windscreen wiper system (vehicles 06.00 ▸ 04.01)
921.8 Dismantling windscreen wiper system (vehicles 06.00 ▸ 04.01)
941.9 Installing windscreen wiper system (vehicles 06.00 ▸ 04.01)
961.10 Removing windscreen wiper system (vehicles 05.01 ▸ 10.03)
991.11 Dismantling windscreen wiper system (vehicles 05.01 ▸ 10.03)
1021.12 Installing windscreen wiper system (vehicles 05.01 ▸ 10.03)
1051.13 Removing windscreen wiper system (vehicles 11.03 ▸)
1081.14 Dismantling windscreen wiper system (vehicles 11.03 ▸)
1111.15 Installing windscreen wiper system (vehicles 11.03 ▸)
1151.16 Removing and installing wiper rubber blade
1181.17 Removing and installing aerodynamic wipers
1191.18 Checking intermittent wiper regulator E38
1192 Windscreen washer system
1202.1 Assembly overview - windscreen washer system
1202.2 Removing and installing reservoir for windscreen and headlight washer system
1212.3 Removing and installing windscreen and rear window washer pump V59
1222.4 Removing and installing windscreen washer fluid level sender G33
1222.5 Removing and installing windscreen washer jets
1232.6 Checking and adjusting windscreen washer system spray jets
1263 Rear window wiper system
1293.1 Removing and installing rear window wiper
1293.2 Installing wiper arm
1303.3 Adjusting rear window wiper park position
1314 Rear window washer system
1324.1 Assembly overview - rear window washer system
1324.2 Renewing washer jet
1334.3 Adjusting washer jet
1345 Headlight washer system
1355.1 Assembly overview - headlight washer system
1355.2 Removing and installing headlight washer system pump V11
1365.3 Removing and installing pop-up washer jet cylinder
1375.4 Removing and installing washer jet assembly
1375.5 Adjusting headlight washer system jets
1385.6 Bleeding headlight washer system
1396 Washer fluid line hose couplings
1406.1 Headlight washer system
1407 Hose repair
1418 Specified torques: window wash/wipe system
1428.1 Specified torques for vehicles ▸ 09.98
1428.2 Specified torques for vehicles 10.98 ▸ 05.00
1428.3 Specified torques for vehicles 06.00 ▸ 04.01
1428.4 Specified torques for vehicles 05.01 ▸ 10.03
1438.5 Specified torques for vehicles 11.03 ▸
143Lights, bulbs, switches - exterior
1441 Headlight
1441.1 Assembly overview - headlight, vehicles ▸ 05.00
1441.2 Assembly overview - headlight, vehicles 06.00 ▸
1451.3 Removing and installing headlight housing, vehicles ▸ 05.00
1461.4 Removing and installing headlight housing, vehicles 06.00 ▸
1461.5 Removing and installing headlight lens glass, vehicles ▸ 05.00
1471.6 Removing and installing reflector, vehicles ▸ 05.00
1481.7 Removing and installing front turn signals, vehicles ▸ 05.00
1491.8 Replacing headlight bulbs, vehicles ▸ 05.00
1491.9 Replacing headlight bulbs, vehicles 06.00 ▸
1501.10 Removing and installing headlight range control motor, vehicles ▸ 05.00
1521.11 Removing and installing headlight range control motor, vehicles 06.00 ▸
1531.12 Converting headlights for use when driving on the left or right (vehicles 06.00 ▸)
1541.13 Adjusting headlight
1572 Headlights with gas discharge bulbs, vehicles 06.00 ▸
1582.1 Components and senders of headlights with gas discharge bulbs
1582.2 Removing and installing headlight with gas discharge bulb
1602.3 Renewing bulbs for gas discharge headlights
1622.5 Removing and installing front left vehicle level sender G78 on front axle
1662.6 Removing and installing rear left vehicle level sender G76 on rear axle
1672.7 Removing and installing headlight range control motor
1672.8 Adapting components, headlights with gas discharge bulbs
1682.9 Converting headlights for use when driving on the left or right
1692.10 Adjusting headlights with gas discharge bulb
1713 Fog light
1723.1 Removing and installing front fog light, vehicles ▸ 05.00
1723.2 Removing and installing front fog light, vehicles 06.00 ▸
1723.3 Replacing front fog light bulb, vehicles ▸ 05.00
1733.4 Replacing front fog light bulb, vehicles 06.00 ▸
1734 Side mounted repeater turn signals
1744.1 Removing and installing side mounted repeater turn signal
1745 Removing and installing turn signal bulb in exterior mirror
1756 Rear lights
1766.1 Assembly overview - rear light in side panel, vehicles ▸ 05.00
1766.2 Assembly overview - rear light in side panel, vehicles 06.00 ▸ 10.03
1776.3 Assembly overview - rear light in side panel, vehicles 11.03 ▸
1786.4 Removing and installing rear light, vehicles ▸ 05.00
1786.5 Removing and installing rear light, vehicles 06.00 ▸ 10.03
1796.6 Removing and installing rear light, vehicles 11.03 ▸
1806.7 Removing and installing rear light bulb holder, vehicles ▸ 05.00
1816.8 Removing and installing rear light bulb holder, vehicles 06.00 ▸ 10.03
1816.9 Removing and installing rear light bulb holder, vehicles 11.03 ▸
1826.10 Assembly overview - rear light in rear lid, vehicles ▸ 05.00
1826.11 Assembly overview - rear light in rear lid, vehicles 11.03 ▸
1836.12 Removing and installing rear light bulb holder in rear lid, vehicles ▸ 05.00
1846.13 Removing and installing rear light bulb holder in rear lid, vehicles 06.00 ▸ 10.03
1846.14 Removing and installing rear light bulb holder in rear lid, vehicles 11.03 ▸
1846.15 Removing and installing rear light in rear lid, vehicles ▸ 05.00
1856.16 Removing and installing rear light in rear lid, vehicles 06.00 ▸ 10.03
1856.17 Removing and installing rear light in rear lid, vehicles 11.03 ▸
1876.18 Dismantling rear light in rear lid, vehicles ▸ 10.03
1886.19 Dismantling rear light in rear lid, vehicles 11.03 ▸
1887 Number plate light X
1907.1 Removing and installing number plate light X , vehicles ▸ 05.00
1907.2 Replacing number plate light X bulb, vehicles ▸ 05.00
1907.3 Removing and installing number plate light X , vehicles ▸ 06.00
1917.4 Removing and installing number plate light X , vehicles 11.03 ▸
1917.5 Replacing number plate light X bulb, vehicles 11.03 ▸
1928 Additional brake light
1938.2 Removing and installing additional brake light housing, vehicles ▸ 05.00
1949 Steering column switch
1969.1 Assembly overview - steering wheel, vehicles ▸ 05.00
1969.2 Removing and installing steering wheel, vehicles ▸ 05.00
1969.3 Removing and installing coil connector with slip ring, vehicles ▸ 05.00
1979.5 Removing and installing steering column switch, vehicles 06.00 ▸
1999.6 Removing and installing signal horn activation, vehicles 06.00 ▸
2029.7 Pin assignment for steering column switch, vehicles 06.00 ▸
20310 Ignition/starter switch and lock cylinder
20510.1 Removing and installing lock cylinder, vehicles ▸ 05.00
20510.2 Removing and installing lock cylinder, vehicles 06.00 ▸
20610.3 Removing and installing ignition switch, vehicles 06.00 ▸
20810.4 Pin assignment for ignition/starter switch
20811 Parking aid, vehicles 06.00 ▸
20911.1 General description
20911.2 Assembly overview - parking aid
20911.3 Removing and installing parking aid control unit
21011.4 Removing and installing front parking aid sender
21111.5 Removing and installing rear parking aid sender
21111.6 Removing and installing rear parking aid warning buzzer
21211.7 Removing and installing front parking aid warning buzzer
212Lights, bulbs, switches - interior
2131 Immobilizer
2131.1 Assembly overview - immobilizer
2131.2 Removing and installing immobilizer control unit J362
2141.3 Removing and installing immobilizer reader coil D2
2151.4 Ignition key
2152 Voltage converter
2172.1 Removing and installing voltage converter
2172.2 Pin assignment of voltage converter
2173 Anti-theft alarm (ATA)
2183.2 Removing and installing immobilizer warning lamp K117
2193.3 Removing and installing alarm horn H12 for anti-theft alarm system
2203.7 Removing and installing rear lid release switch E165
2223.8 Removing and installing engine compartment light switch F214
2233.9 Removing and installing door contact switch rear (rear lid) F160
2234 Interior lights and switches
2244.1 Removing and installing light switch
2244.2 Removing and installing headlight range control adjuster E102
2254.3 Removing and installing switches in centre of dash panel
2264.4 Removing and installing interior light
2274.5 Removing and installing sliding sunroof switch E8
2284.6 Removing and installing glove compartment light W6
2284.7 Removing and installing door contact switch
2295 Horn and dual tone horn H1
2325.1 Removing and installing treble horn H2 and bass horn H7
2325.2 Removing and installing dual tone horn relay J4
2336 Taxi equipment
2347 Specified torques: lights, bulbs, switches - interior
2357.1 Specified torque: dual tone horn
2357.2 Specified torque: alarm horn H12
235Wiring
2361 Vehicle diagnosis, test and information systems
2362 Relay carrier ▸ 08.97
2372.1 Removing and installing relay carrier
2372.2 Removing and installing multi-pin connector on back of relay carrier
2383 Multifunction unit (electronic central electrics) 09.97 ▸
2403.1 Removing and installing multifunction unit with relay carriers and fuse holder
2403.2 Multifunction unit control unit J501
2474 Wiring harness and connector repairs
2495 Renewal of aerial wiring
250

