

DER AUTOREPARATUR-SHOP
0
Home » Anleitungen » 4-cylinder injection engine
  • Beispielseite für Reparaturanleitung 4-cylinder injection engine
  • Beispielseite für Reparaturanleitung 2 4-cylinder injection engine
  • Beispielseite für Reparaturanleitung 3 4-cylinder injection engine
  • Beispielseite für Reparaturanleitung 4-cylinder injection engine
  • Beispielseite für Reparaturanleitung 2 4-cylinder injection engine
  • Beispielseite für Reparaturanleitung 3 4-cylinder injection engine

4-cylinder injection engine

Für Bora / Bora Variant / Golf / Golf Variant

Original VW-Reparaturanleitung


13,12 €inkl. 7% MwSt.

  • Deutsch
  • English

Sofort als Download verfügbar

Sprache: English

Digitale PDF Version

3.801 KB

152 Seiten

Detaillierte technische Daten

Sofort lesbar

Diese Reparaturanleitung umfasst: Removing and installing engine, Cylinder head, Power control und Activated charcoal filter system. Mehr anzeigen
Sichere Zahlung per PayPal, Kreditkarte, Lastschrift, Sofort-Überweisung oder Giropay
PayPal Logo SEPA Lastschrift Logo Giropay Logo Sofort Überweisung Logo

Reparaturanleitung Bora / Bora Variant / Golf / Golf Variant 4-cylinder injection engine pdf Download mit dem Inhalt:

Kapitelübersicht

  • Technical data
    1
  • 1 Technical data
    1
  • 1.1 Engine number
    1
  • 1.2 Engine data
    1
  • Removing and installing engine
    2
  • 1 Removing and installing engine
    2
  • 1.1 Notes on removing
    3
  • 1.2 Securing engine to assembly stand
    7
  • 1.3 Notes on installing
    8
  • 1.4 Torque settings
    9
  • 1.5 Assembly mountings
    10
  • 1.6 Additional notes and repair work on vehicles with air conditioning
    12
  • Crankshaft group
    13
  • 1 Dismantling and assembling engine
    13
  • 1.1 Assembly overview
    13
  • 1.2 Removing and installing poly V-belt
    17
  • 2 Removing and installing sealing flange and flywheel or drive plate
    20
  • 2.1 Renewing crankshaft oil seal - pulley end-
    21
  • 2.2 Removing and installing front sealing flange
    23
  • 2.3 Removing and installing drive plate
    26
  • 3 Removing and installing crankshaft
    28
  • 3.1 Crankshaft dimensions
    29
  • 4 Dismantling and assembling pistons and conrods
    31
  • 4.1 Checking pistons, piston rings and cylinder bores
    32
  • 4.2 Piston and cylinder dimensions
    34
  • Cylinder head, valve gear
    35
  • 1 Cylinder head
    35
  • 1.1 Removing, installing and tensioning toothed belt
    36
  • 1.2 Checking semi-automatic toothed belt tensioning roller
    41
  • 1.3 Removing and installing cylinder head
    42
  • 1.4 Checking compression
    46
  • 2 Repairing valve gear
    49
  • 2.1 Reworking valve seats
    51
  • 2.2 Renewing exhaust camshaft seal
    52
  • 2.3 Removing and installing camshafts
    55
  • 2.4 Checking hydraulic tappets
    57
  • 2.5 Checking valve guides
    58
  • 2.6 Renewing valve guides
    58
  • 2.7 Renewing valve stem seals
    59
  • Lubrication
    62
  • 1 Removing and installing parts of lubrication system
    62
  • 1.1 Engine oil
    62
  • 1.2 Assembly overview - parts of lubrication system
    62
  • 1.3 Dismantling and assembling oil filler bracket
    65
  • 1.4 Dismantling and assembling oil pump with balancer shaft gear assembly
    66
  • 1.5 Removing and installing oil pump with balancer shaft gear assembly
    67
  • 1.6 Removing and installing oil sump
    70
  • 1.7 Checking oil pressure and oil pressure switch
    72
  • Cooling
    74
  • 1 Removing and installing parts of cooling system
    74
  • 1.1 Parts of cooling system - body side
    74
  • 1.2 Parts of cooling system - engine side
    76
  • 1.3 Coolant hose schematic diagram
    78
  • 1.4 Draining and filling coolant
    79
  • 1.5 Removing and installing radiator
    81
  • 1.6 Removing and installing coolant pump
    83
  • 1.7 Removing and installing thermostat
    84
  • Fuel supply system
    87
  • 1 Removing and installing parts of lubrication system
    87
  • 1.1 Removing and installing fuel tank with attachments and fuel filter
    87
  • 1.3 Safety precautions when working on fuel supply system
    95
  • 1.4 Rules for cleanliness
    96
  • 1.5 Removing and installing fuel delivery unit
    96
  • 1.6 Removing and installing fuel gauge sender G
    99
  • 1.7 Removing and installing fuel tank
    99
  • 1.8 Crash fuel shut-off
    101
  • 1.9 Checking fuel pump
    101
  • 2 Power control
    108
  • 2.1 Repairing power control
    108
  • 2.2 Function of EPC system
    108
  • 3 Activated charcoal filter system
    110
  • 3.1 Function
    110
  • 3.2 Repairing parts of activated charcoal filter system
    110
  • 3.3 Checking fuel tank breather
    111
  • Mixture preparation - injection
    113
  • 1 Repairing injection system
    113
  • 1.1 Overview of installation locations
    113
  • 1.2 General notes on injection
    116
  • 1.3 Dismantling and assembling top part of intake manifold
    116
  • 1.4 Dismantling and assembling bottom part of intake manifold
    118
  • 1.5 Dismantling and assembling fuel rail with injectors
    119
  • 1.6 Dismantling and assembling air filter
    120
  • 1.7 Safety precautions
    120
  • 1.8 Rules for cleanliness
    122
  • 1.9 Technical data
    122
  • 2 Checking components
    123
  • 2.1 Checking injection rate and injectors for leaks
    123
  • 2.2 Checking fuel pressure regulator and holding pressure
    125
  • 2.3 Checking variable intake manifold change-over
    128
  • 3 Engine control unit
    131
  • 3.1 Renewing engine control unit
    131
  • 3.2 Adapting functions and components
    131
  • Exhaust system
    134
  • 1 Removing and installing parts of exhaust system
    134
  • 1.1 Vehicles with front wheel drive
    134
  • 1.2 Vehicles with all-wheel drive
    137
  • 2 Secondary air system
    140
  • 2.1 Function
    140
  • 2.2 Removing and installing parts of lubrication system
    140
  • 2.3 Checking combination valve
    141
  • Ignition system
    143
  • 1 Repairing ignition system
    143
  • 1.1 General notes on ignition system
    143
  • 1.2 Removing and installing parts of ignition system
    143
  • 1.3 Safety precautions
    145
  • 1.4 Test data, spark plugs
    145
Hersteller­bezeichnung 4-cylinder injection engine
Hersteller Volkswagen
Passend für Bora / Bora Variant / Golf / Golf Variant (1998 - 2006)
Passende Autotypen 1J
Motor­kennbuchstaben AZJ
Kategorie Reparaturanleitung

Im Moment sind noch keine Bewertungen für dieses Produkt vorhanden.

Ähnliche Reparaturanleitungen

Direct injection and preglow system with distributor-type pump to 04.99

Beispielseite für Reparaturanleitung Direct injection and preglow system with distributor-type pump to 04.99

Für Bora / Bora Variant / Golf / Golf Variant (1998 - 2006)

10,33 € Details

4-cylinder injection engine (1.6 l roller rocker finger)

Beispielseite für Reparaturanleitung 4-cylinder injection engine (1.6 l roller rocker finger)

Für Bora / Bora Variant / Golf / Golf Variant (1998 - 2006)

11,82 € Details

4-cylinder injection engine (5-valve)

Beispielseite für Reparaturanleitung 4-cylinder injection engine (5-valve)

Für Bora / Bora Variant / Golf / Golf Variant (1998 - 2006)

15,16 € Details

Automatic gearbox 01M self-diagnosis

Beispielseite für Reparaturanleitung Automatic gearbox 01M self-diagnosis

Für Bora / Bora Variant / Golf / Golf Variant (1998 - 2006)

6,46 € Details

Direct injection and glow plug system with distributor pump as of 05.99

Beispielseite für Reparaturanleitung Direct injection and glow plug system with distributor pump as of 05.99

Für Bora / Bora Variant / Golf / Golf Variant (1998 - 2006)

10,40 € Details

5-speed manual gearbox 02K

Beispielseite für Reparaturanleitung 5-speed manual gearbox 02K

Für Bora / Bora Variant / Golf / Golf Variant (1998 - 2006)

11,18 € Details

6-cylinder injection engine

Beispielseite für Reparaturanleitung 6-cylinder injection engine

Für Bora / Bora Variant / Golf / Golf Variant (1998 - 2006)

18,58 € Details

Basic equipment, from October 1998

Beispielseite für Reparaturanleitung Basic equipment, from October 1998

Für Bora / Bora Variant / Golf / Golf Variant (1998 - 2006)

40,99 € Details

Brake systems

Beispielseite für Reparaturanleitung Brake systems

Für Bora / Bora Variant / Golf / Golf Variant (1998 - 2006)

13,20 € Details

5-speed manual gearbox 02T

Beispielseite für Reparaturanleitung 5-speed manual gearbox 02T

Für Bora / Bora Variant / Golf / Golf Variant (1998 - 2006)

14,07 € Details

Unsere Best Seller

Schon gewusst? Wir bieten auch originale Autoteile an.

Autoteil 4G0919268H Aufnahme

4G0919268H

Aufnahme

24,58 €

Details
Autoteil 8W0973737 Gehaeuse

8W0973737

Gehaeuse

7,38 €

Details
Autoteil 06F198107A Dichtringe

06F198107A

Dichtringe

55,68 €

Details
Autoteil 1J1857351B4J4 Deckel

1J1857351B4J4

Deckel

65,67 €

Details
Autoteil 3Q0713128 Modul

3Q0713128

Modul

109,44 €

Details

Nr. 547: Der 2,0l-176kW-TDI-Biturbo-Motor der Dieselmotoren-Baureihe EA288

Beispielseite für Reparaturanleitung Nr. 547: Der 2,0l-176kW-TDI-Biturbo-Motor der Dieselmotoren-Baureihe EA288

5,89 € Details

Karosserie-Instandsetzung

Beispielseite für Reparaturanleitung Karosserie-Instandsetzung

Für New Beetle / New Beetle (USA) (1998 - 2007) / New Beetle (Europe) (1999 - 2002)

10,12 € Details

Nr. 540: Das Abgasnachbehandlungssystem Selective-Catalytic-Reduction
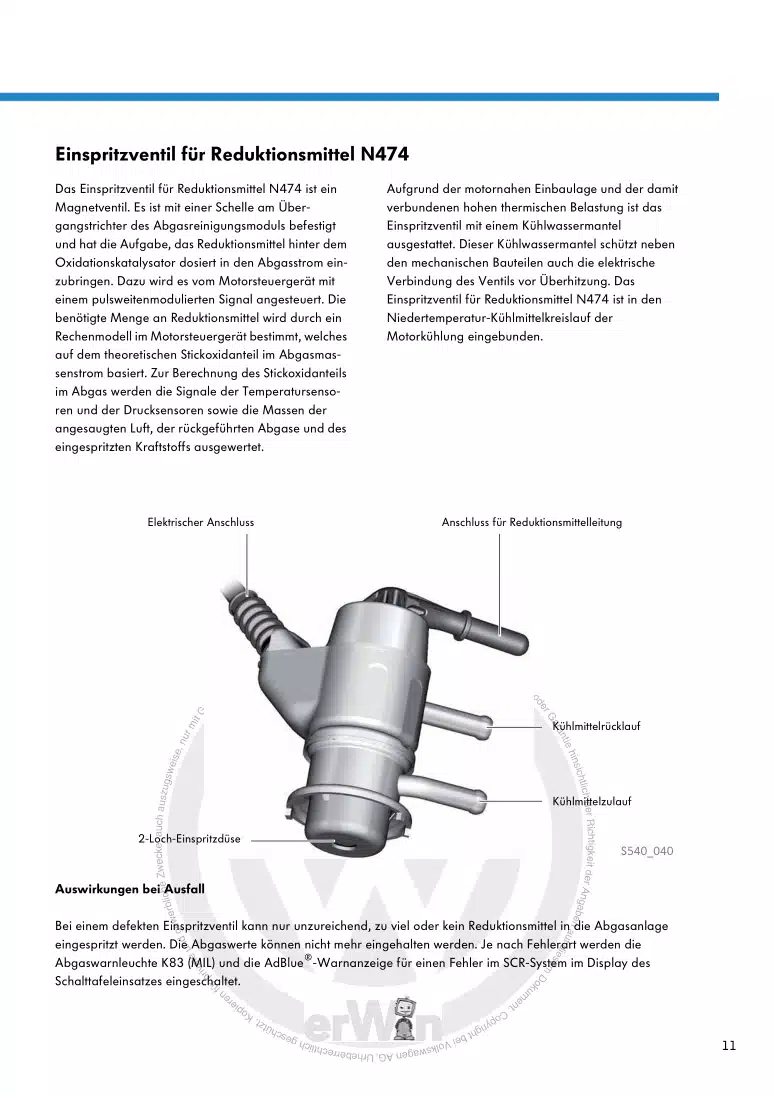
Beispielseite für Reparaturanleitung Nr. 540: Das Abgasnachbehandlungssystem Selective-Catalytic-Reduction

5,67 € Details

image/svg+xml Über Clonck

Originale Reparaturanleitungen und Ersatzteile

Unsere Reparaturanleitungen sind Originale, kommen direkt von Volkswagen und erfüllen die höchsten Qualitätsstandards.

In unserem Originalteile-Shop verkaufen wir hochwertige Originalersatzteile der Fahrzeughersteller. Mithilfe der Suche gibst du die gewünschte Teilenummer (OE-Nummer) ein und bestellst schnell und einfach das benötigte Ersatzteil.

Höchste Qualitätsstandards

Bei Clonck wollen wir Autoschrauber und Kfz-Profis glücklich machen. Aus diesem Grund findest du bei Clonck ausschließlich professionelle und hochwertige Reparaturanleitungen, mit deren Hilfe du dein Fahrzeug fachgerecht reparieren kannst.

Unsere Partner

Autohaus Schmidt GmbH
Automag GmbH Filiale Laim
KFZ-VERLAG GmbH
Zimpel und Franke GmbH

Clonck: Der Autoreparatur-Shop - gibt's auch als App!

Clonck App Logo Play Store

Clonck: Passende Autoteile für deine Autoreparatur

4,5 90

Mit Clonck bestellst du die richtigen Originalersatzteile im Handumdrehen.

  • Fahrzeugmodell hinzufügen
  • Baugruppe auswählen
  • Fahrzeug-Identifizierungsnummer (FIN) eingeben
  • Über 5.000 originale Reparaturanleitungen einsehen
Jetzt App starten
Clonck App Preview Auto Mobiltelefon Autoteile




