Technical data
11 Engine number
12 Engine data
2Removing and installing engine
31 Removing and installing engine
31.1 Removing engine
41.2 Securing engine on engine and gearbox support VAS 6095
111.3 Installing engine
132 Assembly mountings
162.1 Assembly overview - assembly mountings
162.2 Removing and installing engine mountings
16Crankshaft group
211 Dismantling and assembling engine
211.1 Part I
221.2 Part II
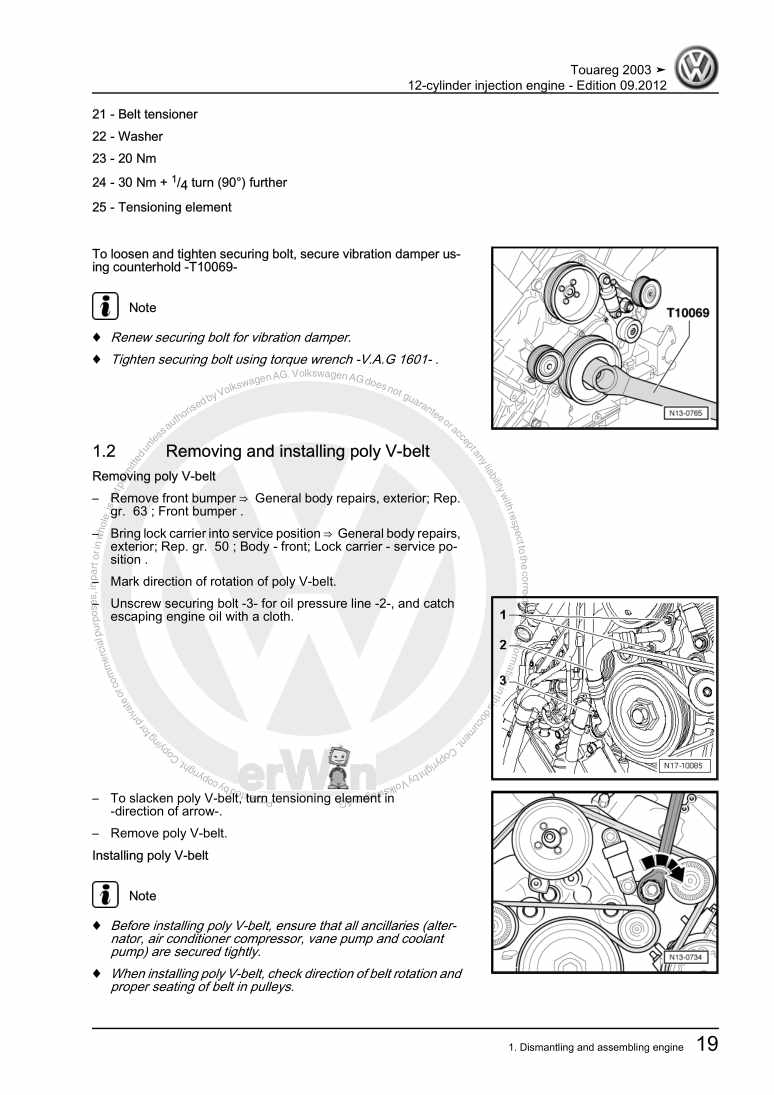
251.3 Removing and installing poly V-belt
272 Sealing flange and dual-mass flywheel/drive plate
292.1 Assembly overview - sealing flanges and dual-mass flywheel/drive plate
292.2 Assembly overview - timing chain covers
302.3 Removing and installing seal, flywheel end
312.4 Removing and installing sealing flange on gearbox side
322.5 Removing and installing flywheel
352.6 Removing and installing drive plate
362.7 Renewing crankshaft sealing flange -vibration damper side-
373 Crankshaft
403.1 Assembly overview - crankshaft
403.2 Fitting sender wheel to crankshaft
413.3 Allocation of main bearing shells
424 Pistons and conrods
474.1 Assembly overview - pistons and conrods
474.2 Checking piston and cylinder
484.3 Piston and cylinder dimensions
52Cylinder head, valve gear
531 Cylinder head
531.1 Assembly overview - cylinder head
531.2 Removing and installing cylinder head
561.3 Checking valve timing
631.4 Removing and installing camshaft adjuster
691.5 Removing and installing chain drive for oil pump
821.6 Removing and installing camshaft drive timing chain, vehicles with vacuum pump
911.8 Removing and installing cylinder head cover
991.9 Assembly overview - mechanical vacuum pump
1011.10 Removing and installing mechanical vacuum pump
1021.11 Installing cover oil seals
1041.12 Checking compression
1052 Valve gear
1082.1 Assembly overview - valve gear
1082.2 Camshafts, checking axial clearance
1102.3 Assembly overview - timing housing
1112.4 Removing and installing camshaft control valves
1122.5 Removing and installing camshafts
1142.6 Camshaft identification
1212.7 Renewing valve stem seals
1212.8 Valve dimensions
1242.9 Checking valve guides
1242.10 Reworking valve seats
125Lubrication
1271 Parts of lubrication system
1271.1 Engine oil
1271.2 Assembly overview - sump, oil pump and oil filter bracket
1281.3 Removing and installing oil sump
1301.4 Removing and installing oil pump
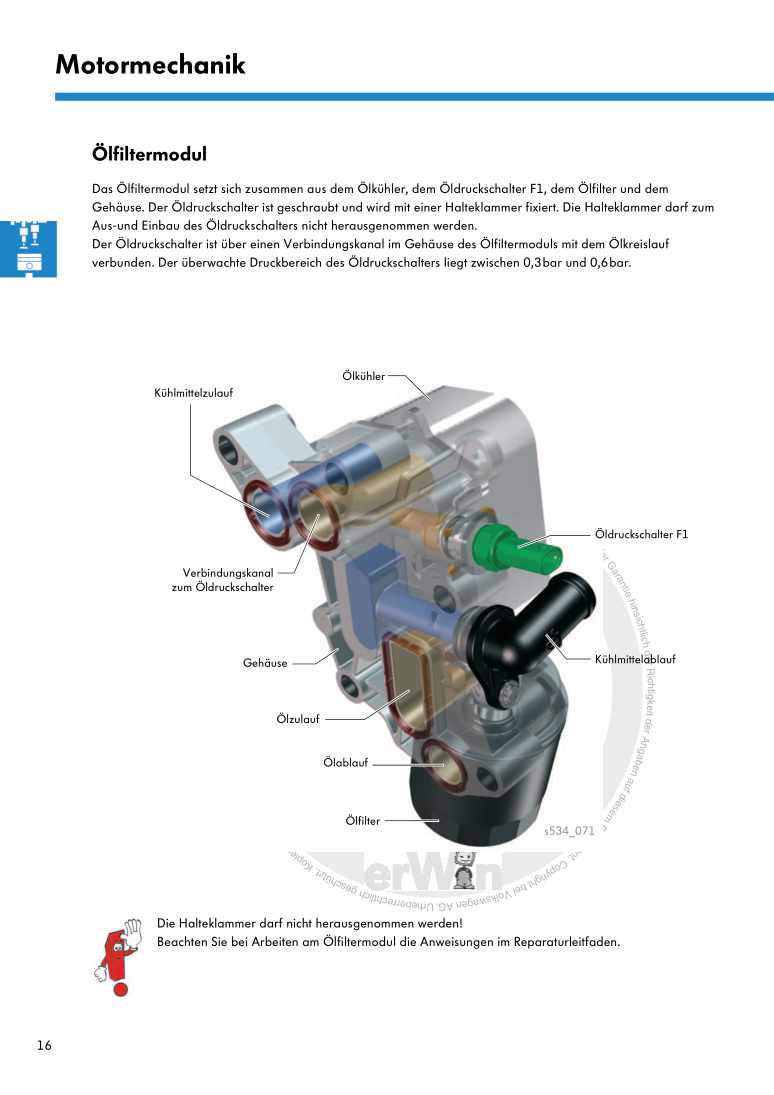
1351.5 Assembly overview - oil filter housing
1381.6 Removing and installing left engine support with oil filter housing
1401.7 Removing and installing engine oil cooler
1431.8 Checking oil pressure and oil pressure switch
145Cooling
1491 Parts of cooling system
1491.1 Assembly overview - radiator
1501.2 Assembly overview - radiator fan
1521.3 Assembly overview - cooling system, engine side, front and rear
1521.4 Assembly overview - cooling system, engine side, left
1531.5 Assembly overview - coolant pump and thermostat
1541.6 Assembly overview - parts of cooling system, body side
1561.7 Coolant hose schematic diagram
1571.8 Draining and filling coolant
1581.9 Removing and installing fan support with fans
1611.10 Removing and installing radiator
1611.11 Removing and installing, checking thermostat
1631.12 Removing and installing coolant pump
1641.13 Checking cooling system for leaks
166Fuel supply system
1691 Safety precautions
1691.1 Safety precautions when working on fuel supply system
1691.2 Releasing pressure in high-pressure area
1702 Parts of fuel supply system
1722.1 Rules for cleanliness
1732.2 Assembly overview - fuel tank with attachments
1742.3 Assembly overview - fuel filter
1762.4 Renewing fuel filter
1762.5 Emptying fuel tank
1782.6 Removing and installing fuel gauge sender and suction-jet pumps
1812.7 Removing and installing fuel delivery unit and fuel gauge sender
1832.8 Removing and installing fuel tank with attached components
1862.9 Checking fuel pump (vehicles with one-piece intake manifold)
1902.10 Checking fuel pumps (vehicles with two-piece intake manifold)
1993 Electronic power control (EPC)
2073.1 Function of EPC system
2073.2 Assembly overview - accelerator
2074 Activated charcoal filter system
2094.1 Function
2094.2 Assembly overview - activated charcoal filter system (vehicles up to 08.2006)
2104.3 Assembly overview - activated charcoal filter system (vehicles from 08.2006)
2115.1 Assembly overview - activated charcoal filter system
2135.2 Checking fuel system for leaks
2156 Activated charcoal filter system (vehicles for USA and Canada from 08.2006)
2226.1 Assembly overview - activated charcoal filter system
2236.2 Checking fuel system for leaks
224Mixture preparation - injection
2321 Injection system (vehicles with one-piece manifold)
2321.1 General notes on the injection system
2331.2 Rules for cleanliness
2331.3 Technical data
2331.4 Assembly overview - intake manifold
2341.5 Checking vacuum reservoir in intake manifold for leaks
2351.6 Checking vacuum unit for intake manifold flaps
2361.7 Assembly overview - fuel rail with high-pressure pump and injectors
2371.8 Assembly overview - air filter
2401.9 Assembly overview - suction-jet pump
2411.10 Removing and installing intake manifold
2421.11 Removing and installing high-pressure pump
2481.12 Checking fuel pressure sender G247
2501.13 Removing and installing injectors
2532 Injection system (vehicles with two-piece manifold)
2612.1 General notes on the injection system
2622.2 Rules for cleanliness
2622.3 Technical data
2622.4 Assembly overview - intake manifold
2632.5 Checking vacuum reservoir in intake manifold for leaks
2642.6 Checking vacuum unit for intake manifold flap
2652.7 Assembly overview - fuel rail with high-pressure pump and injectors
2662.8 Assembly overview - air filter
2692.9 Removing and installing intake manifold upper part
2702.10 Removing and installing intake manifold lower part with fuel rail
2732.11 Removing and installing high-pressure pump
2762.12 Checking fuel pressure sender G247
2782.13 Removing and installing injectors
2813 Engine control unit
2883.1 Removing and installing engine control unit
2883.2 Removing and installing anti-theft engine control unit
288Exhaust system
2921 Parts of the exhaust system
2921.1 Assembly overview - exhaust manifold with starter catalytic converters and attachments
2931.2 Silencer with mountings
2951.4 Removing and installing catalytic converters
297Ignition system
2991 Ignition system
2991.1 General notes on ignition system
2991.2 Assembly overview - ignition system
2991.3 Safety precautions
3011.4 Test data, spark plugs
3021.5 Removing and installing ignition coils with output stage
302
